|
|
Posted on 08-18-21, 08:22 pm (rev. 71 by
|
 Paragoomba ParagoombaKarma: 353 Posts: 46/76 Since: 03-04-19 |
Before starting!
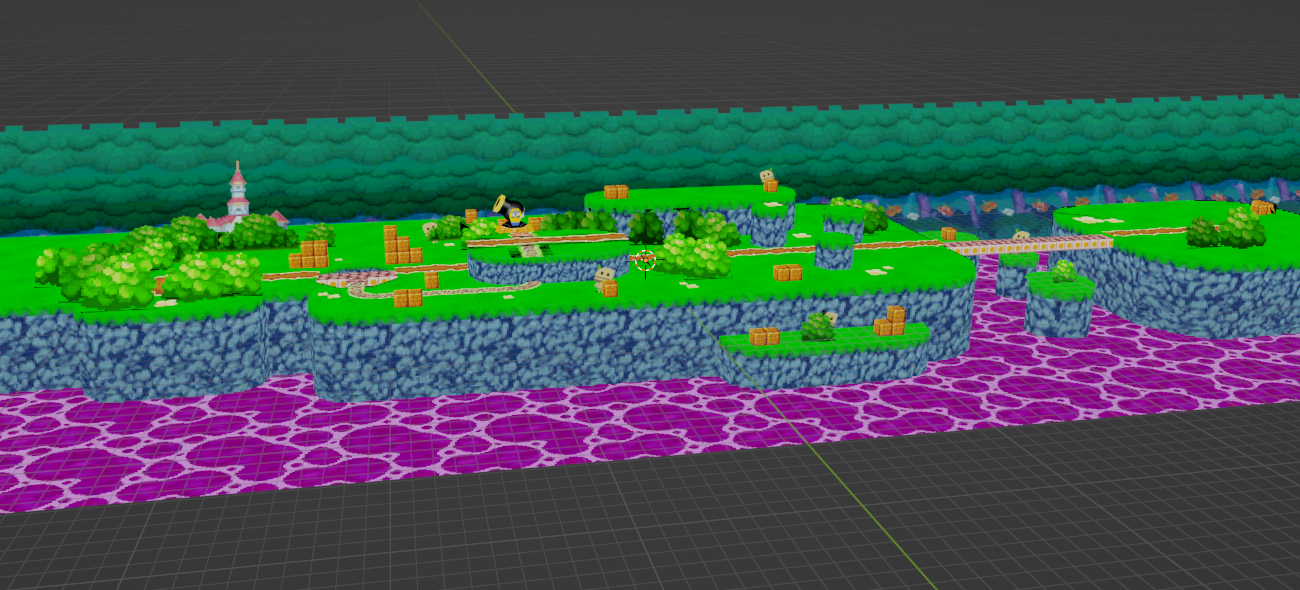
It's important to understand how the worldmap functions. The worldmap consists of all those following files: Individuals • cursor_koopa_jr.nsbmd + ...nsbca --> Bowser JR's model and animations on the world map. • cursor_peach.nsbmd + ...nsbca --> Peach's model and animations on the world map. The worldmap itself • wX.nsbmd --> The world map model, but only the still standing objects. • wXtree.nsbmd + ...nsbca --> The world map model, but only the moving objects. For example, certain mushrooms in w1 have an animation that is similiar to bouncing. You'll find on every map that something is slighlty moving, mostly just a bounce animation. • wX_move.nsbca --> Path animation meaning all the movements across the paths on the worldmap. Without those Mario or Bowser JR. are going to be doing random stuff on the worldmap. • wX.nsbta --> Texture animation by moving/rotating/scaling the UV or the polygon/model. For example, the liqiud (water, posion, lava) in every wm. You can create some cool stuff like a waterfall. • wX.nsbtp --> Texture pattern by using several textures for the same polygon/model. Basically, the textures alternate over time similiar to a gif. For example, the brick blocks in w1 have a shining/reflecting effect for a short time. Addiotional buildings • wX_castle.nsbmd + ...nsbca --> The castle's model and animations, however, some worldmaps share the same castle you'll realise w3, w4 and w6 are missing the wX_castle.nsbmd file. It's likely (not sure though) that w1 + w3 and w2 + w4 + w6 share the same castle. • wX_tower.nsbmd + ...nsbca --> The tower's model and animations. • map_dragon.nsbmd + ...nsbca --> Star coin sign's model and animations. • wX_kinoko_x.nsbmd --> The models of the toad houses. You might notice that some stuff are missing and that's probably because I don't know what some of them are or do  . You can easily find all these listed files above with NSMBe under the path "ROM File/Browser/root/map/..." . You can easily find all these listed files above with NSMBe under the path "ROM File/Browser/root/map/..." Here is some further information about the worldmap in this documentation: https://docs.google.com/document/u/0/d/15XGSgFwxANzM-icqLlMgOqh1aR50Os9EQ8fHnSn-Aco/mobilebasic You might need it for the camera settings or restrictions although coding it is more recommendable than just hex-editing the overlays. THE TUTORIAL ASSUMES THAT YOU KNOW HOW TO CREATE MODELS, HANDLE MATERIALS AND SET UP THE NNS BLENDER PLUGINS! ---------------------------------------------------------------------------------------------------------------------------------- How to create your own wX.nsbmd You will need these things here: • Blender (latest version) https://www.blender.org/ • Nintendo Plugins for Blender https://github.com/jellees/nns-blender-plugin/releases/ • NitroPaint https://github.com/Garhoogin/NitroPaint/releases • g3dcvtr https://projectpokemon.org/home/files/file/2102-g3dcvtr/ • modelling skills and experiences IT IS RECOMMENDED TO READ THE INSTRUCTIONS BEFORE STARTING! GOOD LUCK  Let’s start: Simply create the desired model and make sure that you seperate those 3 mesh types: •) terrain... one single enormous mesh (can take any name but "terrain" recommended) that doesn't include the following things beneath •) paths... several meshes, each path is supposed to be a stand-alone mesh that is NAMED exactly like "moveXX" and move00 being the first path, move01 the second one, move02 the third one etc. This is very IMPORTANT, because otherwise the unlock-animation and semi-visibility won't work. •) billboards... mesh planes that always face the camera, which gives it a three-dimensional appearance (just like the cannon spheres from several worlds, but in reality it's just a plane). Each billboard is supposed to be a stand-alone mesh and can be named whatever you wish. Make sure you don’t name ANYTHING longer than 16 characters, don't use unnecesarry mesh polygons or that the shape of the polygons is either a rectangle or a triangle or they won't be displayed. If you have problems orientating yourself when placing, have a look at the text below. Q: How do I know where to place it exactly? A: Don’t worry! Just extract the original wX.nsbmd file from your rom with the NSMB Editor. Then convert it to “.dae” with apicula by “drag&dropping” it onto the “.exe” file. Now you need to convert it once again to ".fbx" with the Autodesk FBX converter. Afterwards import the fbx file into Blender and scale everything by 100 times. Lastly, look at the coordinates of the objects for orientation and move your object to the place you want to! I will leave a link to apicula and to the Autodesk FBX converter here: https://www.mediafire.com/file/j0q9dd9au4bn9gw/apicula.rar/file https://www.autodesk.com/developer-network/platform-technologies/fbx-converter-archives That is my model for w1.nsbmd 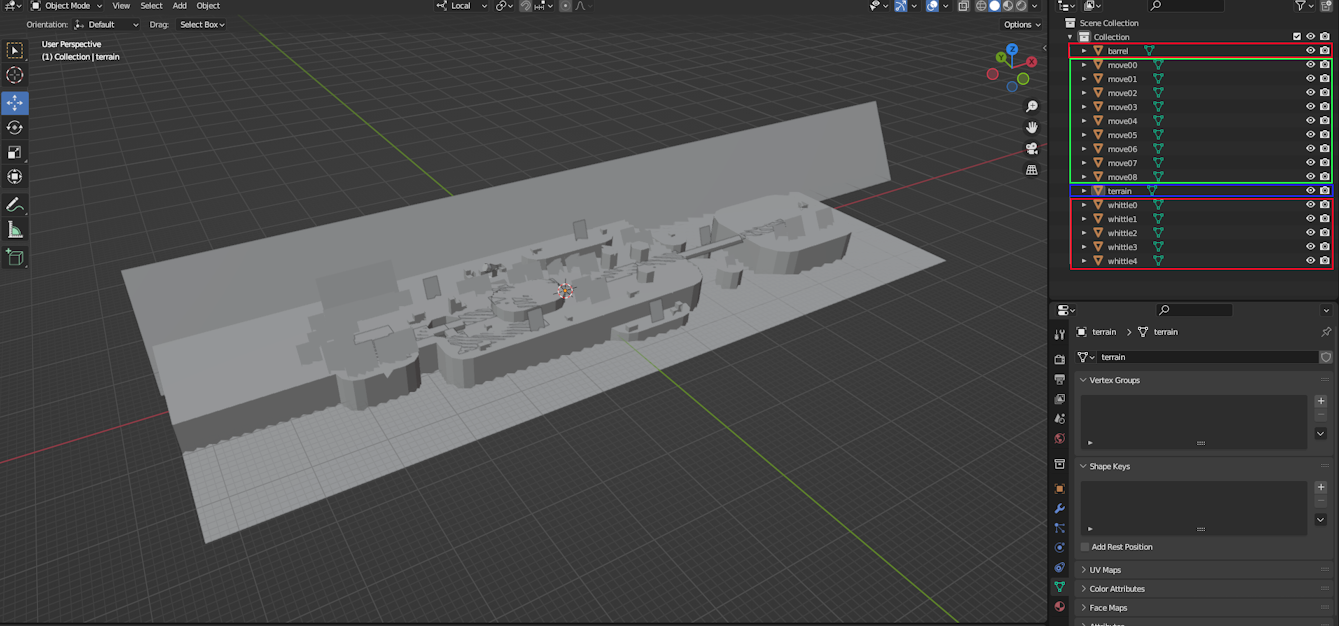 RED being the billboards BLUE being the terrain GREEN being the paths Here's how you quickly set up the billboards (using the original cannon sphere as an example): Click on the billboard -> Go to the "Object Properties" tab -> You should see the "NNS Object Options" and then set the "Billboard settings" to "Always face camera". Now do the following -> The origin must be set correctly at the center of the object and it needs to have the X rotation value set to 90 deg (basically if the object has 0 deg rotation on every axis just rotate it by 90 deg in object mode and -90 deg in edit mode). And that's pretty much it. 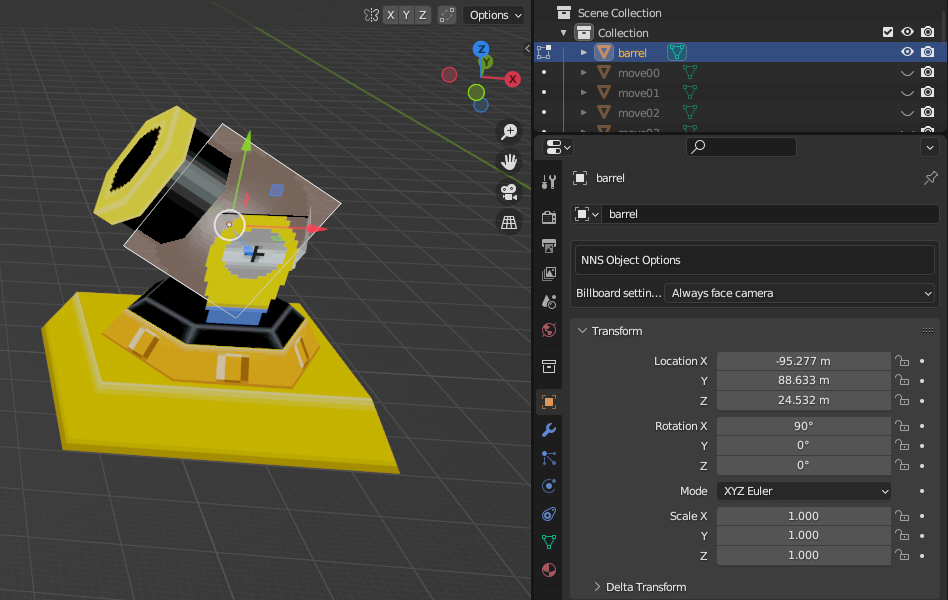 Now we want to add the textures! Here are some rules to follow: • size of all the textures need to be “power of 2” × “power of 2” in Pixel (examples: 64×32, 8×16, 128×4) • don’t use too big textures (try to make the most textures less than 128×128) Q: So some textures can be bigger than 128x128? A: Yes, but you will have to make the other textures much much much smaller in return, so that they fit in vram. Just simply don't do it. Always try to minimize the size usage. Q: But how do you know whether you've reached the total size limit of all textures? Is there a clear number? A: No, there isn't. You can only find it out through testing. The bug will be very obvious! • don’t use too many textures Q: Why? A: Already answered above. There is a size limit meaning not everything will fit in vram and cause weird bugs. • all the textures need to be converted to the Nitro TGA format You will end up with bugs if you don’t keep to these rules! Q: How do I convert my textures to the Nitro TGA format? A: In NitroPaint go to File -> New -> New Texture. Open the texture you need to convert. 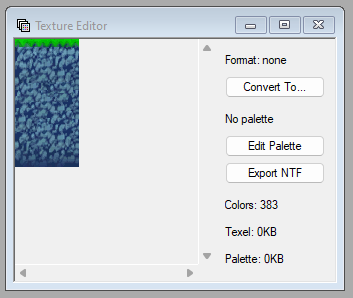 Click on “Convert To…” and simply select the format that best fits for the texture (it mostly is tex4x4, a5i3, palette16 or palette256). Lastly go to File -> Save. Now we want to assign our converted textures to the model, so in Blender go to the “Material Properties” tab, click on “New” to add a new default material and then press on “Create NNS Material”. Then delete the default material, because we won't need it anymore. 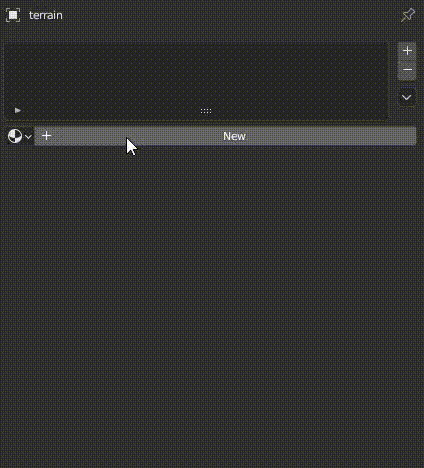 Set the “Material type” to “Textured + solid color (or vertex color)” and the rest (UV Unwrapping) should be pretty clear. Here is the final result of my w1 model: [imghttps://nsmbhd.net/file/LQRHcMOTJfHB0wYz/blender_wmap4.png Now let’s export it! Go to File -> Export -> Nitro Intermediate and set the Magnification (it's something like scaling) to 1,0000. Please uncheck, if “Export .ica”, “Export .ita” or "Export .itp" are checked.  Click on Export Nitro. Lastly we need to convert the “.imd” file to “.nsbmd” with g3dcvtr. Just drag&drop it on the “.exe” file.  Afterwards replace wX.nsbmd in the NSMB Editor.  While scorlling through the map, you'll quickly realise that a lot of things are out of order. There is nothing to worry about, because the animated/moving objects can be edited/moved which is going to be discussed at the step "How to create your own wXtree.nsbmd". The buildings such as the tower, mushroom house etc. can also be placed at the desired spot and some paths may appear fully visible even though you NAMED them correctly "moveXX". This will be mentioned at the step "How to create your own wX_move.nsbca (and how to set up things in Goombatlas)". The still standing liquid (in my case poison water) still needs a texture animation, so go to the step "How to create your own wX.nsbta". We're not done yet. There's one last problem due to the NNS Blender plugins, which don't know how to precisely handle the priority levels of polygons when it comes to NSMB. Usually happens when the same mesh has several polygons that use disparate materials. See below: On the first image, you can see that in Blender certain mesh faces were put infront of others which suddenly appear beneath in-game as shown in the second picture.   Since there is no correct polygon order when exporting, you'll have to do it yourself manually. It is absolutely recommended to do this step after you're finsihed with the worldmap. Open the .imd file with any software that can read text (for example Text Editor, but I'll be using VS Code) and search for the polygon block that you're looking for. In my case, it's the path named move00 which uses 2 different materials meaning I'll find 2 polygon blocks. Now put the lower polygon block higher than the other one and then save. Here's how I did it: 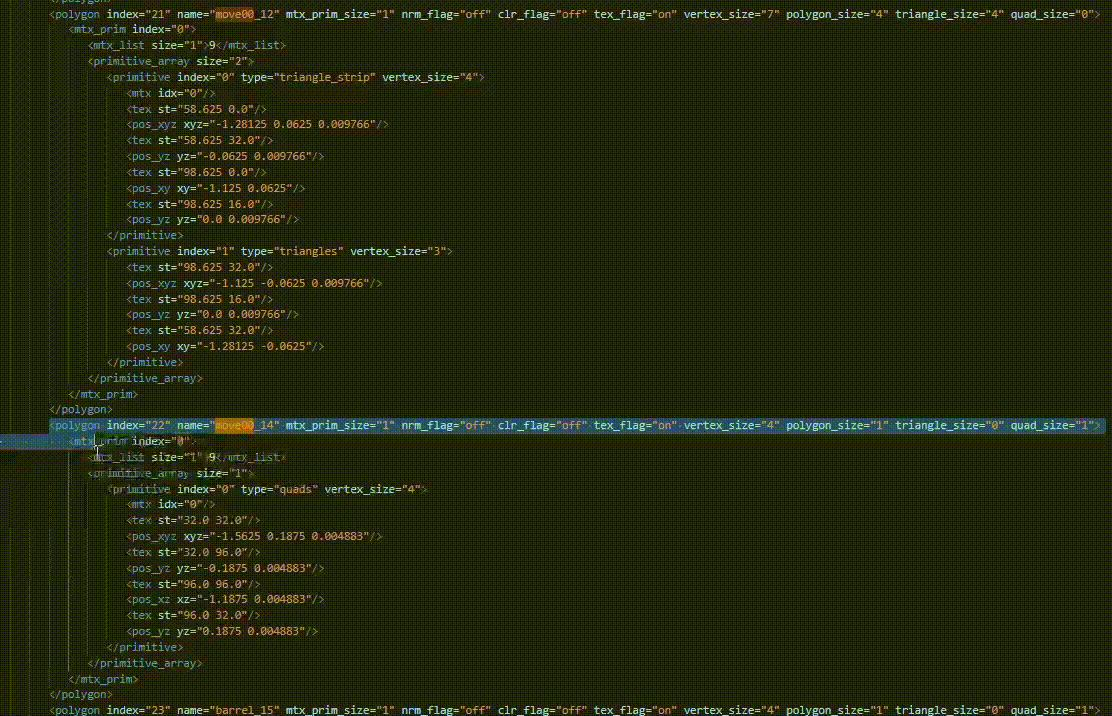 After converting the .imd to .nsbmd and replacing the wX.nsbmd file once again, you'll get the following result: 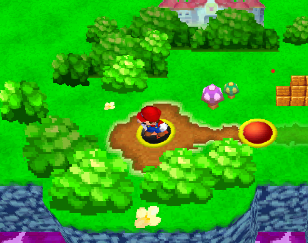 You did it!  Bugs that might appear after following this tutorial: • w1 is rotated wrongly in-game, but it looks fine in Blender. Check whether you accidentaly attach it to an armature or not, because the original w1 model doesn't use any. Otherwise, you simply didn't rotate it correctly in Blender. • w1 is scaled wrongly in-game. Maybe you didn't set the "Magnification" to 1.0000 or you simply didn't scale it corrctly in Blender. • Some faces or whole meshes didn’t appear even though I followed all the steps correctly? This may be happening due to the normals of the mesh being flipped in the wrong direction. The issue should already be visible in Blender (transparent polygons in the Material Preview mode). Try selecting all the wrongly flipped faces in Edit Mode -> press ALT + N -> Flip. • Some faces or whole meshes don’t appear although the meshes/faces are correcly flipped? Probably because of the shape of your polygon. If it's not a triangle or rectangle, then make it one! • Some paths are fully visible and not semi-visible? There are two possibilities. You didn't name the path "moveXX" or you haven't set up the path in Goombatlas for it yet. The game is still using the original data which doesn't apply to additional paths. • The billboards disappeared? You didn't follow the instructions accordingly. The X-rotation of the object must be 90 degrees (at least in Object mode) and the origin at the center of the billboard . ---------------------------------------------------------------------------------------------------------------------------------- How to create your own wX.nsbta You will need these things here: • Blender (latest version) https://www.blender.org/ • Nintendo Plugins for Blender https://github.com/jellees/nns-blender-plugin/releases/ • g3dcvtr https://projectpokemon.org/home/files/file/2102-g3dcvtr/ • modelling skills and experiences IT IS RECOMMENDED TO READ THE INSTRUCTIONS BEFORE STARTING! GOOD LUCK Let’s start: Take your wX.nsbmd Blender model and choose the material you want to add a texture animation to. In this tutorial, I'm going to choose the material "poi_water" for my liquid on the world map model. In the "Material Properties" tab, scroll down to the NNS Material SRT settings. There are 3 options, you can move, rotate or scale the UV of the respective polygons. I want to create an apparent movement of the water, so I'll be using "Translate". Choose a value, right click on the field -> Insert Keyframes . Now navigate in the timeline forward, change the value and right click on the field -> Insert Keyframes . Now if you play the animation, you'll see that you're liquid is moving. It's about choosing the values you want and then inserting them in the form of keyframes. You can play around with those. 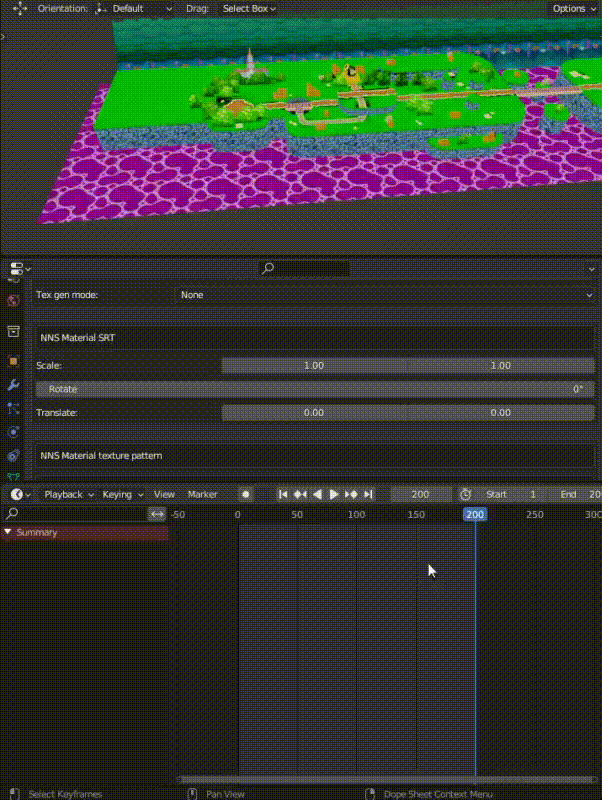 There's one tip before we move on. I'd recommend to force Blender to only do linear interpolation in the preference menu, because otherwise you'll have to play around with the settings to make the animation loop. So go to "Edit" -> "Preferences..." -> "Animation" -> "F-Curves" -> Default Interpolation to "Linear" and Default Smoothing Mode to "None". Save and restart Blender and redo all the keyframes. Now you'll have to deal less with trying to loop the animation.. Now let’s export it! Go to File -> Export -> Nitro Intermediate and check "Export .ita". Please uncheck, if “Export .imd”, “Export .ica” or "Export .itp" are checked. 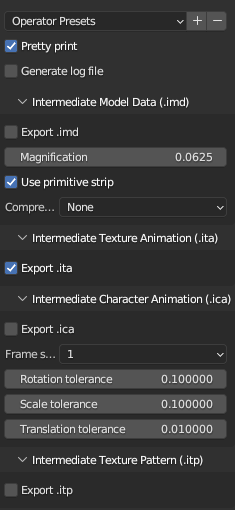 Click on Export Nitro. Lastly we need to convert the “.ita” file to “.nsbta” with g3dcvtr. Just drag&drop it on the “.exe” file.  Afterwards replace wX.nsbta in the NSMB Editor.  You did it! Bugs that might appear after following this tutorial: • It loops after a break? Go to the timeline and make sure you've set the end of the rendering range at the final keyframe. ---------------------------------------------------------------------------------------------------------------------------------- How to create your own wX_move.nsbca (and how to set up things in Goombatlas) You will need these things here: • Blender (latest version) https://www.blender.org/ • Nintendo Plugins for Blender https://github.com/jellees/nns-blender-plugin/releases/ • g3dcvtr https://projectpokemon.org/home/files/file/2102-g3dcvtr/ • Goombatlas https://nsmbhd.net/thread/3727-goombatlas-the-nsmb-worldmap-editor-wip/ • modelling skills and experiences IT IS RECOMMENDED TO READ THE INSTRUCTIONS BEFORE STARTING! GOOD LUCK In this part we'll be creating Mario's movement across the world map called path animations (which you must always name "moveXX"). The amount of path animations equals to the amount of path meshes included in your world map model (in my case move00 - move08 are 9 in total) + the amount of towers/castles (in my case 1 tower + 1 castle) + an additional one if there is a subsequent world after the last level (not true in my case). I'll have to create 11 animations in total. 9 path animations for each path in my model and then 2 additional ones. move09 is going to be the animation where Mario jumps into the tower move10 is going to be the animation where Mario jumps into the castle It's also important to note that you won't have to create a reverse version of the same path animation, because this can already be set with Goombatlas. So only create path animations where Mario goes forwards. Unfortunately, you can't use diagonal paths, because this will be interpreted as a jump by the game and therefore the jump animation of Mario will be played in-game. Let’s start: Open up Blender and delete everything except the default cube (we won't really need it, but a mesh must be included somewhere, so Blender doesn't throw an error when exporting). Now create an Armature. So far, so good! 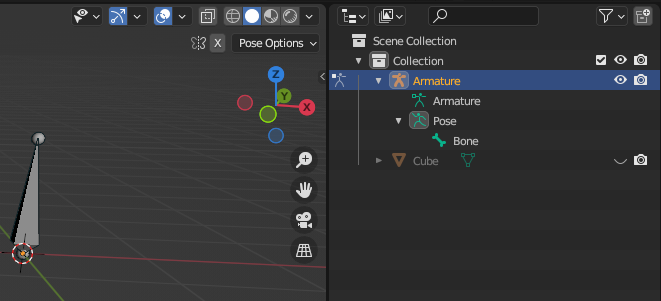 Now go into Pose mode while having selected the armature, place it whererever you want and insert keyframes. Basically, create an animation. I'll be creating the move00 path animation first and for that I had to look up the coordinates of my path named mesh00 from wX.nsbmd. I copy-pasted the coordinates and inserted the keyframes. Now Mario will be walking from the start to the end of move00 path. 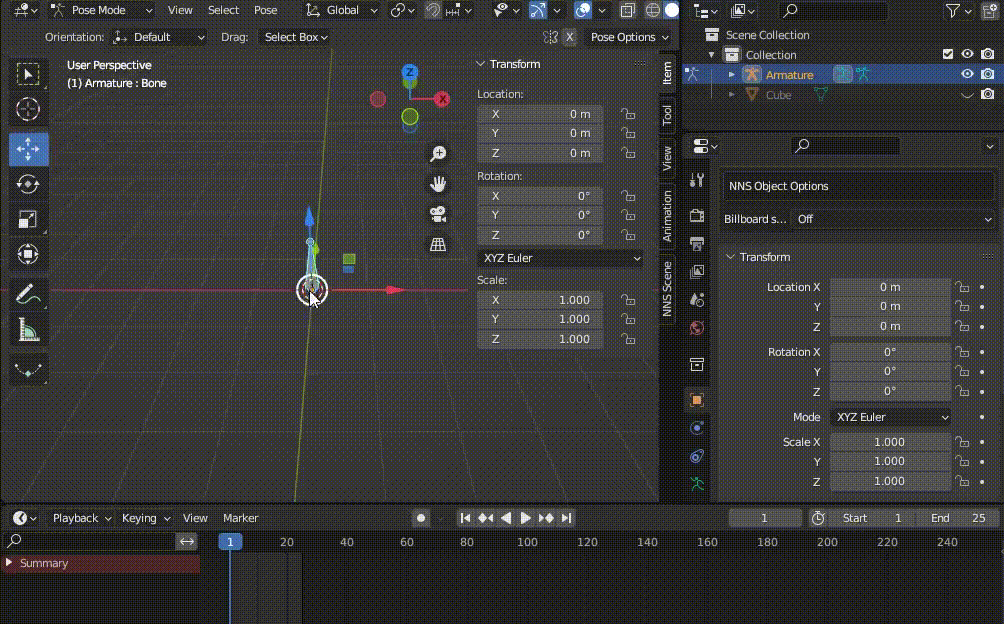 Now let’s export it! Go to File -> Export -> Nitro Intermediate and set the Magnification (it's something like scaling) to 1,0000. Make sure you check "Export .ica" and uncheck everything else (“Export .imd”, “Export .ita” and "Export .itp"). 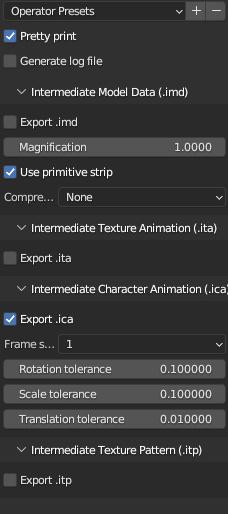 IMPORTANT: Name it "moveXX" (in my case move00.ica)! Click on Export Nitro. Now there are some issues with the NNS Blender plugins when it comes to exporting path animations for NSMB, because it creates additional unnecessary nodes and messes up the rotation (It doesn't really mess it up, because it's to make up for the axis difference between the game and Blender. Nonetheless, it's not needed in our case, so we have to revert it). Open the .ica file with any software that can read text (for example Text Editor, but I'll be using VS Code) and change the value for node_size="..." to 1 1 (meaning we have one node). 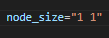 The next step is now to remove every redundant node_anm block. You can do that by looking at every block and all but one are the same. The different looking one is ours which is actively being used (armature). Thereafter change the node_anm index to 0, because it's the first one and change the node_anm_array size to 1, because it currently contains only one node_anm. 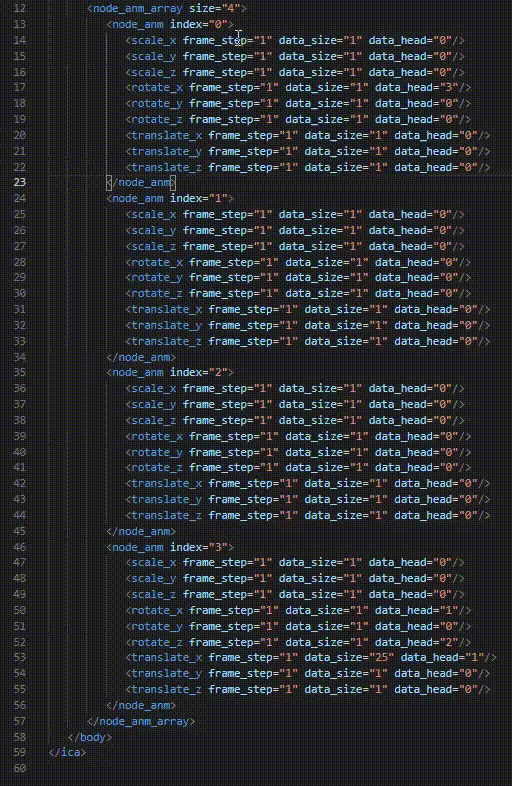 Now, we'll have to fix the rotation. First, you'll have to understand some parts of the .ica file. node_scale_data, node_rotation_data and node_translate_data are kind of like lists containing every single coordinate data that you've used in Blender before exporting the animation. data_size of node_anm determines how many consecutive coordinate datas it's going to use, starting with the value specified for data_head (0 being the first value). Depending on which column you are (for example scale_x, rotate_y... etc.), you can actually manually set the animation without using Blender at all. Anyway, I've been using only the values 0 and 90 degrees in Blender for x, y and z-rotation (to be exact 0 for x and z, 90 for y), that means I'll remove every value except for those 2 and also change node_rotate_data size to 2 accordingly. Before: <node_rotate_data size="4">0.000000 90.000003 89.999996 -90.000000</node_rotate_data> Afterwards: <node_rotate_data size="2">0.000000 90.000000</node_rotate_data> Now the rotate_x data_head and rotate_z data_head must both be set to 0 (because I'm using 0.000000 degrees at position 0). The rotate_y data_head must be set to 1 (because I'm using 90.000000 degrees at position 1). End result of my move00.ica file: 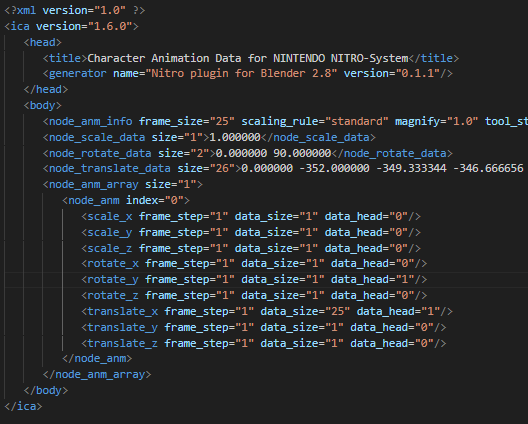 You'll have to repeat the process for every single path animation, I would recommend testing it before going on with the next one. To make Mario jump on the world map simply change the z-coordinate. Changing the z-coordinate across the frames tells the game to perform a jump animation for Mario (or aforementioned changing two coordinates at the same time, but I don't know what use that bug could have). Lastly we need to convert all the “.ica” files to “.nsbca” with g3dcvtr. Open up the Command Prompt, drag&drop g3dcvtr.exe first on it, then drag&drop the ".ica" files one after another and enter the following command "-o [path]\wX_move.nsbca". Press the ENTER key. Example:  Afterwards replace wX_move.nsbca in the NSMB Editor. You're done with the first part. Now we're heading to Goombatlas: Since the tool is beginner-friendly, I won't cover all the stuff that are included in Goombatlas for now. I learned everything by myself by taking a look into the recreation of the original w1 map. Nevertheless, if more and more people get interested into NSMB world map design, I may do some explaining in the future. Anyway, once you're done creating the paths for your world map aswell as putting all the need buildings etc., you can export it via File -> Export to Code. Choose the World Number and then create a folder on your Desktop. Name it whatever you want and create a ".txt" file inside named "replaces". Then change the file extension from ".txt" to ".x", so that the file's name is "replaces.x".  Now go back to Goombatlas and enter the exact path for replaces.x as for the file that you just created. If it asks you to replace it, say yes (It's a weird bug that sadly wasn't fixed by the Goombatlas creator. You'll always need a pre-existing replacable file named "replaces.x"). For the C File any directory is fine. Press OK. 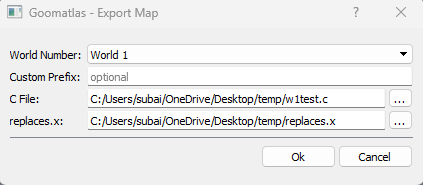 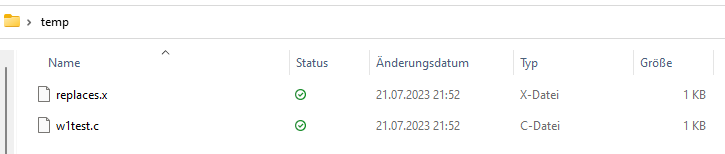 Finally, there is one last step left. We have to add Bowser Jr.'s paths manually because they can't be added with the unfinished project Goombatlas. You'll need to open up the ".c" file and then add some arrays of type bowserJrNode and then one single array of type bowserJrNode* that includes all the aforementioned arrays of type bowserJrNode. The amount of arrays of type bowserJrNode is equal to the amount of tower(s) + castle(s?) + an additional one if there is a subsequent world after the last level (not true in my case, but I'll include it for educational purpose). So there will be 3 arrays in total for me. I will name the arrays as follows wX_jrPath_X (doesn't need to be the same one, but recommended). The first array will contain all the movements of Bowser Jr. going from the start to tower... w1_jrPath_0 The second array will contain all the movements of Bowser Jr. going from the tower to the castle... w1_jrPath_1 The third array woll contain all the movement of Bowser Jr. going from the castle out of the map (leaving the wolrdmap)... w1_jrPath_2 The array of type bowserJrNode looks like as follows: 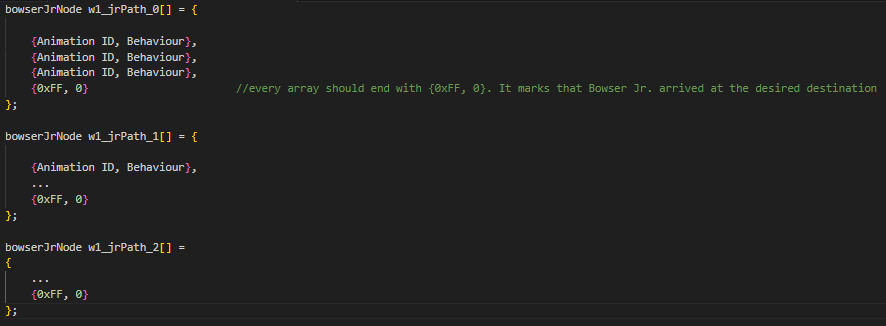 Now this is how the arrays for my worldmap look like: 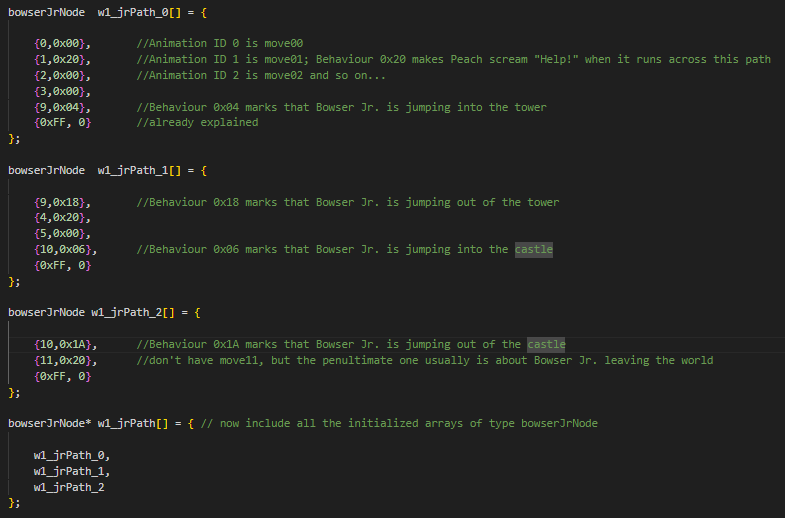 Open the ".c" file and add those arrays at the bottom of the code. "Old template" users: Now open the ".x" file and put this line of code 0x020E79E0_ov_08: [Name of the bowserJrNode* array] (works only for w1, don't know the addresses for other worldmaps, but you can look them up yourself in the database) above the last line of code. Here is how my ".x" file looks like: 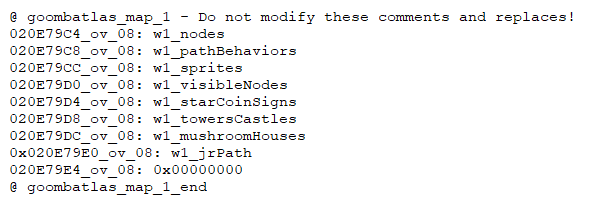 Save it. Here are the pointers to Bowser JR's path: W1 - 0x020E79E0 W2 - 0x020E7A08 W3 - 0x020E7A30 W4 - 0x020E7A58 W5 - 0x020E7A80 W6 - 0x020E7AA8 W7 - 0x020E7AD0 W8 - 0x020E7AF8 The rest with setting the template up, using the correct NSMBe version (for inserting worldmaps; see RicBent's thread about Goombatlas) and then inserting all the files together with worldmap.h should be clear. "NSMB 5.4 + NCPatcher" users: Now open the ".x" file and copy all the lines of code (@ comments excluded) and paste them at the bottom of the ".c" file. Now add this part 0x020E79E0_ov_08: [Name of the bowserJrNode* array] above the last line of code. Lastly, you'll need to adjust a few areas of the code. I think it's best if you see it for youself rather than writing a long explanation: 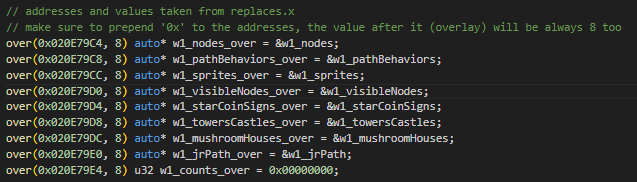 You should now replace over with ncp_over, because we're using NCPatcher and not the Fireflower patcher (which is outdated now and not supported anymore). Save it as a ".cpp" file. The rest with setting NCPatcher up, using the NSMBe 5.4 version and then inserting the ".cpp" file together with the "worldmap.h" should be clear. Once you've done that, you'll see that Bowser Jr. doesn't behave weirdly (anymore) on the wolrdmap after the intro scene, every path animatio works as supposed to and every building is in the right place. Here is the result of my w1_move.nsbca and inserted goombatlas data: [Picture coming soon] You did it! Bugs that might appear after following this tutorial: • I have to wait before I can move Mario across the paths? I assume that the responsible path animation doesn't end at the last inserted keyframe, because you forgot to change the end of the rendering range. Go to the timeline and make sure you've set the end at the final keyframe and then redo all the changes inside of the ".ica" file. • Mario doesn't appear when a certain path animation is executed? The cause here is very likely the path animation. Maybe it's the rotation, maybe you didn't change the node size and remove the unnecessary ones etc. But again, it has very likely something to do with your ".ica" file. • Other weird bugs on the world map? Most of the time (like 90% of the time for me) it's Goombatlas. Maybe you've set something wrong. Go ahead and check everything again. You can always co.pare it to an example of w1 provided by RicBent in his Goombatlas thread. • Weird Goombatlas bug when unchecking "going to next world"? It will very likely break the path animation for jumping into the castle. I honestly don't really know why. Maybe its purpose is a different one than what I was thinking. Basically, the best way to really stop Mario from going to the next Wolrd is code. I would always leave it checked. ---------------------------------------------------------------------------------------------------------------------------------- How to create your own wXtree.nsbmd You will need these things here: • Blender (latest version) https://www.blender.org/ • Nintendo Plugins for Blender https://github.com/jellees/nns-blender-plugin/releases/ • NitroPaint https://github.com/Garhoogin/NitroPaint/releases • g3dcvtr https://projectpokemon.org/home/files/file/2102-g3dcvtr/ • modelling skills and experiences IT IS RECOMMENDED TO READ THE INSTRUCTIONS BEFORE STARTING! GOOD LUCK Let’s start: Create whatever you want to create and try to avoid unnecessary polygons. Also don’t name ANYTHING longer than 16 characters.  Then place it on the right spot! Q: How do I know where to place it exactly? A: Don’t worry! Just extract the original wX.nsbmd or wXtree.nsbmd file from your rom with the NSMB Editor. Then convert it to “.dae” with apicula by “drag&dropping” it onto the “.exe” file. Now you need to convert it once again to ".fbx" with the Autodesk FBX converter. Afterwards import the fbx file into Blender and scale everything by 100 times. Lastly, look at the coordinates of the objects for orientation and move your object to the place you want to! I will leave a link to apicula and to the Autodesk FBX converter here: https://www.mediafire.com/file/j0q9dd9au4bn9gw/apicula.rar/file https://www.autodesk.com/developer-network/platform-technologies/fbx-converter-archives Now we want to add the textures! Here are some rules to follow: • size of all the textures need to be “power of 2” × “power of 2” in Pixel (examples: 64×32, 8×16, 128×4) • don’t use too big textures (try to make the most textures less than 128×128) Q: So some textures can be bigger than 128x128? A: Yes, but you will have to make the other textures much much much smaller in return, so that they fit in vram. Just simply don't do it. Always try to minimize the size usage. Q: But how do you know whether you've reached the total size limit of all textures? Is there a clear number? A: No, there isn't. You can only find it out through testing. The bug will be very obvious! • don’t use too many textures Q: Why? A: Already answered above. There is a size limit meaning not everything will fit in vram and cause weird bugs. • all the textures need to be converted to the Nitro TGA format You will end up with bugs if you don’t keep to these rules! Q: How do I convert my textures to the Nitro TGA format? A: In NitroPaint go to File -> New -> New Texture. Open the texture you need to convert.  Click on “Convert To…” and simply select the format that best fits for the texture (it mostly is tex4x4, a5i3, palette16 or palette256). Lastly go to File -> Save. Now we want to assign our converted textures to the model, so in Blender go to the “Material Properties” tab, click on “New” to add a new default material and then press on “Create NNS Material”. Then delete the default material, because we won't need it anymore. 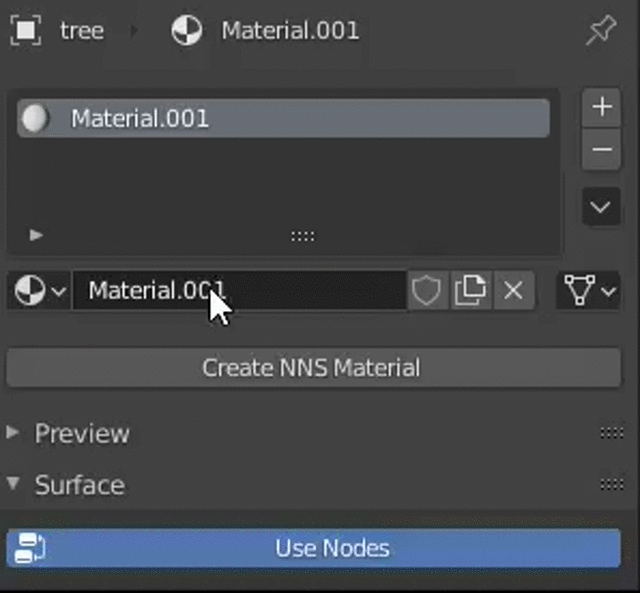 Set the “Material type” to “Textured + solid color (or vertex color)” and the rest (UV Unwrapping) should be pretty clear. Here is the final result of my w1tree model: 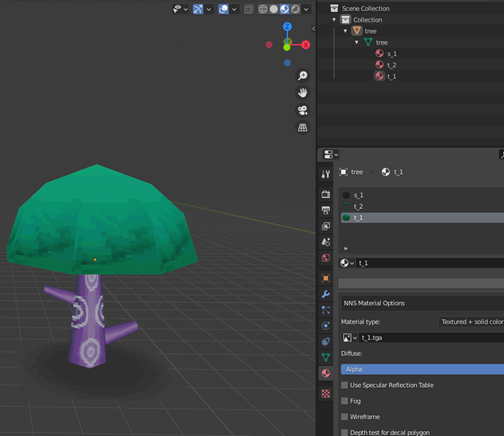 There is one last thing, we have to do before exporting the model. We need an armature, so create one and make sure the single bone it has is called "tree". Attach your mesh model to the armature by going to the "Modifier Properties" and adding the "Armature" modifier. Click on the empty field next to "Object" and choose "Armature". Then drop the mesh on the armature to set it parent. You must also add a vertex group and give it the same name as the bone which the Armature contains. Also make sure you don't forget about the "Weight Paint", everything can either be weighted 0 or 1 (other values aren't supported). In our case everything should be 1 meaning show red in Weight Paint mode (since every part of the mesh is supposed to move on the world map). 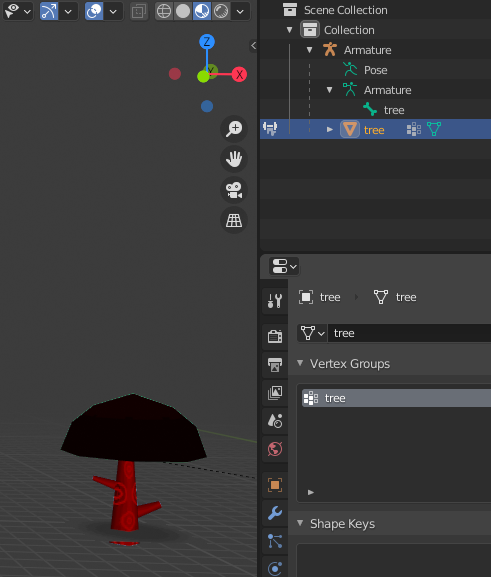 Now let’s export it! Go to File -> Export -> Nitro Intermediate and set the Magnification (it's something like scaling) to 1,0000. Please uncheck, if “Export .ica”, “Export .ita” or "Export .itp" are checked. Click on Export Nitro. Lastly we need to convert the “.imd” file to “.nsbmd” with g3dcvtr. Just drag&drop it on the “.exe” file. 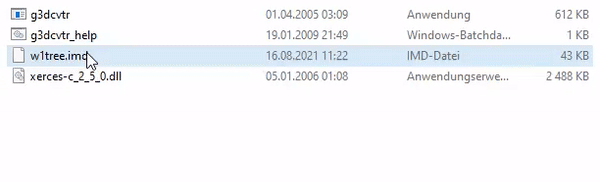 Afterwards replace wXtree.nsbmd in the NSMB Editor. 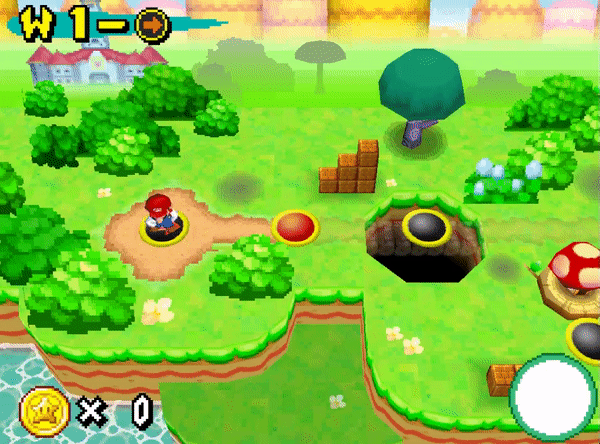 You did it! Bugs that might appear after following this tutorial: • w1tree is rotated wrongly in-game, but it looks fine in Blender. Selecet everything in Blender by pressing A, then try "STRG + A" and apply "All Transforms". If it's still not rotated correctly, then maybe you didn't attach your model to the armature correctly. • w1tree is scaled wrongly in-game. Selecet everything in Blender by pressing A, then try "STRG + A" and apply "All Transforms". If it's still not scaled correctly, then maybe you didn't set the "Magnification" to 1.0000. Another possibility is you simply didn't scale it correctly in Blender. • w1tree's models are not stading on the correct spots in-game. Selecet everything in Blender by pressing A, then try "STRG + A" and apply "All Transforms". Another possibility is you simply didn't place them correctly in Blender. Some faces or whole meshes didn’t appear even though I followed all the steps correctly? This may be happening due to the normals of the mesh being flipped in the wrong direction. The issue should already be visible in Blender (transparent polygons in the Material Preview mode). Try selecting all the wrongly flipped faces in Edit Mode -> press ALT + N -> Flip. • Some faces or whole meshes don’t appear although the meshes/faces are correcly flipped? Probably because of the shape of your polygon. If it's not a triangle or rectangle, then make it one! ---------------------------------------------------------------------------------------------------------------------------------- How to create your own wX.nsbtp Currently not possible with the NNS Blender Plugins v0.1.1 and therefore no explanation here until it's updated. Nonetheless, you could try to figure it out yourself with the Maya Plugins 2011 since it's not hard (getting Maya2011 is probably the hardest step lol). If you run into problems or don't even know where to start after obtaining Maya and the NNS Plugins, feel free to ask here, join the NSMBC Discord Server (you can find the link on the forum here, a button saying "Join our Discord") or join the MKDS Modding Discord Server. ---------------------------------------------------------------------------------------------------------------------------------- If any other bugs appear, please tell me. Discord: UglyFuzzy#8515 or here in the chat. CREDITS: Xgone for helping immensely with modelling issues MKDS Modding Server for helping with some modelling or tool issues NSMBHD Community for several tools and past discussions about worldmaps NSMBC Server for helping with certain issues ItzTacos for showing how to make the exported Goombatlas code useable for "NSMBe + NCPatcher" users. RicBent for answering lots of questions |
|
|
Posted on 08-18-21, 08:28 pm
|
|
The boy who always has something up his sleeve
 Karma: 968 Posts: 606/754 Since: 02-01-21 |
That is very useful, Maybe i use this for my second hack
_________________________ The star project that shows my brilliant mind  |
|
|
Posted on 08-18-21, 09:01 pm
|
 Red Goomba Red GoombaWhen the  Karma: 55 Posts: 28/37 Since: 05-12-20 |
Thank you for explaining (some) of the tutorial, Can't wait to do this some time in the future.
_________________________ hmm what to say... |
|
|
Posted on 08-24-21, 01:31 pm (rev. 1 by
|
|
Paragoomba Karma: 353 Posts: 47/76 Since: 03-04-19 |
I updated the thread. Added another solution for another possible bug.
|
| kapitaljack |
Posted on 10-23-21, 09:24 pm
|
|
Newcomer
 Karma: 1 Posts: 1/2 Since: 10-23-21 |
Sorry if this is a stupid question
 Is there a way to extract maps from the game and load those into blender? Is there a way to extract maps from the game and load those into blender?
|
|
|
Posted on 10-23-21, 10:01 pm
|
 Giant Red Paratroopa Giant Red ParatroopaNot Edible  Karma: 3416 Posts: 1404/1447 Since: 02-12-16 |
Yeah, you can convert the NSBMDs to DAEs with Apicula.
_________________________ Nothing to say, so jadnjkfmnjamnfjkldnajfnjkanfjdksan jsdnvj m. 
|
| kapitaljack |
Posted on 10-23-21, 10:26 pm
|
|
Newcomer
Karma: 1 Posts: 2/2 Since: 10-23-21 |
Posted by poudink Yeah, you can convert the NSBMDs to DAEs with Apicula. Thank you! |
|
|
Posted on 12-30-21, 03:32 am
|
|
Red Goomba When the Karma: 55 Posts: 32/37 Since: 05-12-20 |
I don't mean to be impatient, but how's the rest of the tutorial coming along?
_________________________ hmm what to say... |
|
|
Posted on 12-30-21, 08:55 am
|
|
The boy who always has something up his sleeve
Karma: 968 Posts: 702/754 Since: 02-01-21 |
I think they are working to make it as understandable as possible, but the first tutorial is perfectly fine for what I am going to do, and I also have a question, how can I place positions for things in the Map, because the Tree not is in the correct place here?
_________________________ The star project that shows my brilliant mind |
|
|
Posted on 01-02-22, 02:57 pm (rev. 2 by
|
|
Paragoomba Karma: 353 Posts: 50/76 Since: 03-04-19 |
Sent by MarioFalls I don't mean to be impatient, but how's the rest of the tutorial coming along? Sorry. I couldn't work on the tutorial, because I had a lot of stuff to do. But I will try to continue and complete wX.nsbmd this week. Sent by alpha I think they are working to make it as understandable as possible, but the first tutorial is perfectly fine for what I am going to do, and I also have a question, how can I place positions for things in the Map, because the Tree not is in the correct place here? I am not sure what you mean exactly, so could you rephrase this sentence. Do you mean, when you move the tree to a certain place in Blender that it doesn't appeare on the exact same spot in-game? |
|
|
Posted on 01-03-22, 11:35 am
|
|
The boy who always has something up his sleeve
Karma: 968 Posts: 704/754 Since: 02-01-21 |
I was wondering how to place/move the tree for example to a specific location on the map?
I hope I explained myself better _________________________ The star project that shows my brilliant mind |
|
|
Posted on 01-03-22, 08:31 pm
|
|
Paragoomba Karma: 353 Posts: 51/76 Since: 03-04-19 |
Sent by alpha I was wondering how to place/move the tree for example to a specific location on the map? I hope I explained myself better You will have to find it out for yourself by doing this: Sent by subair Q: How do I know where to place it exactly? A: Don’t worry! Just extract the original wXtree.nsbmd file from your rom with the NSMB Editor. Then convert it to “.dae” with apicula by “drag&dropping” it onto the “.exe” file. Afterwards import the dae file into Blender. Lastly, look at the coordinates of the objects for orientation and move your object to the place you want to! I will leave a link to apicula here: https://www.mediafire.com/file/j0q9dd9au4bn9gw/apicula.rar/file |
|
|
Posted on 02-26-22, 04:52 pm
|
 Mole MoleGoomba's run the world...  Karma: 473 Posts: 57/358 Since: 08-27-20 |
Whenever I use apicula it detects the model, textures, and pallets, but then gives me:
[ERROR] error: The filename, directory name, or volume label syntax is incorrect. (os error 123) Does anyone know what I'm doing wrong? I just need to get the dae files. _________________________  Hacks Channel: https://www.youtube.com/channel/UCqA5CgsW-CTfD56DCa2kvYw/channels |
|
|
Posted on 05-28-22, 02:04 pm
|
|
Paragoomba Karma: 353 Posts: 53/76 Since: 03-04-19 |
Posted by OfuzzyboiO Whenever I use apicula it detects the model, textures, and pallets, but then gives me: [ERROR] error: The filename, directory name, or volume label syntax is incorrect. (os error 123) Does anyone know what I'm doing wrong? I just need to get the dae files. Sorry for the late reply. Try this out: 1.) Place all the extracted files from apicula.rar and the NSBMD file in the same folder. 2.) Give the NSBMD file (which you are going to drag&drop on the apicula EXE file) a simple name. (No spaces and no special characters.) 3.) Make sure you're dropping the dragged NSBMD file on "convert_NSBMD". 4.) Afterwards a cmd command will appear, which requires a save sub directory to place the dae file and the textures. 5.) You can just type in a simple name with no spaces and no special characters such as "output". 6.) And it will create a new folder in the same directory as your NSBMD file with the name you typed it. If it still doesn't work, contact me on Discord UglyFuzzy#8515 |
|
|
Posted on 07-01-23, 08:19 pm
|
|
Paragoomba Karma: 353 Posts: 63/76 Since: 03-04-19 |
I updated the tutorial with addiotional information that might be useful to know before getting into the actual tutorial. I'll do my best to be finshed with the whole tutorial next week, but I can't promise anything

|
|
|
Posted on 07-07-23, 02:58 am
|
|
Mole Goomba's run the world... Karma: 473 Posts: 277/358 Since: 08-27-20 |
Wait your that guy who made that awesome lava world map
_________________________ Hacks Channel: https://www.youtube.com/channel/UCqA5CgsW-CTfD56DCa2kvYw/channels |
|
|
Posted on 07-20-23, 04:02 pm
|
|
Paragoomba Karma: 353 Posts: 67/76 Since: 03-04-19 |
Bump!
Posted by OfuzzyboiO Wait your that guy who made that awesome lava world map Yes, I guess you've seen it in the NSMBC discord server. Anyway, I've edited the world map tutorial. One last step is left being "How to create your own wXmove.nsbca (and how to set up things in Goombatlas)" and then the tutorial is finally going to be finished after all those years of not updating it. |
|
|
Posted on 07-22-23, 02:08 pm
|
|
Paragoomba Karma: 353 Posts: 68/76 Since: 03-04-19 |
Another Bump!
The tutorial is officially finished  . Now you can create a fully custom worldmap yourself. I haven't managed to show a result for the step "How to create your own wX_move.nsbca (and how to set up things in Goombatlas)" yet, but you can expect it in the next few days. . Now you can create a fully custom worldmap yourself. I haven't managed to show a result for the step "How to create your own wX_move.nsbca (and how to set up things in Goombatlas)" yet, but you can expect it in the next few days. I will keep updating some parts when they are either poorly explained, not structured very well, wrong (I could have forgotten smth), new usual bugs appear or some tools have been updated. So it's very important that you leave feedback or show me your issue, so others can avoid that in the future. Anyhow, hope you like the tutorial. |
|
|
Posted on 08-11-23, 03:30 pm
|
 Micro-Goomba Micro-GoombaSuper Mario Bros Worlds Developer Karma: 10 Posts: 1/13 Since: 08-11-23 |
How Do You Add Levels Or Move Levels Around On The World Map?
|
|
|
Posted on 08-11-23, 03:48 pm (rev. 3 by
|
|
Paragoomba Karma: 353 Posts: 69/76 Since: 03-04-19 |
Posted by MysteryGamer987 How Do You Add Levels Or Move Levels Around On The World Map? You can't really add "more levels" without extra code, however, there is a workaround. In Goombatlas, you have to set a certain ID for every node to make it load the desired level. You probably have to look the right number up on the data base. The fun part of that is when you enter a random number. I happened to make the 1-1 node load 1-1 but starting with the second area. You could basically crate a "level" for each area and make each node load a different area (making it basically a whole level). The problem with that is that you're forced to use less areas for a single level and you're still restricted with the level amount because the amount of areas in each world aren't endless. But I assume that you're not planning to have more than 20 levels in a single world. Oh and another issue there. The UI used to display the level number has obly graphics for x-1, x-2, x-3 x-4, x-5, x-6, x-7, x-8, x-tower, x-second-tower, x- castle, x-bowser's-castle, x-A, x-B and x-C. There is no x-9 for example meaning you can't create a level named 1-9 etc. |