Pages: 1
| TwisterBoy |
Posted on 10-02-25, 12:55 am (rev. 1 by TwisterBoy on 10-02-25, 12:55 am)
|
 Paragoomba ParagoombaGenesis begins it all  Karma: 49 Posts: 36/71 Since: 09-09-25 |
Hey everyone can someone tell me if i can use aseprite to make the logo for the title screen and how big the canvas sould be thank you
_________________________ Check out the latest updates with twister smb my hack |
| Thierry |
Posted on 10-03-25, 04:49 pm
|
|
この記号は… 解読できないよ…
 Karma: 6272 Posts: 2805/2823 Since: 01-17-13 |
You can use Aseprite, yes. Just use whatever image editor you know how to use best.
In your previous thread, you were given the link to a tutorial which outlines the steps you need to take to insert a logo into the game, as well as how big the canvas can be. I'll try to simplify the part of the tutorial that mentions the canvas for you, step-by-step. Notice how the tutorial has this image: 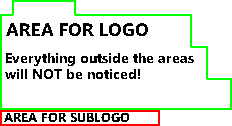 This is the canvas image. Right-click this image and save it to your computer. - Open both the canvas image and the full-size image of your logo in the same image editor (Which can be Paint, Aseprite, Paint.NET, or whatever else you prefer). - The goal now is to RESIZE your logo to fit the canvas image. Specifically, your logo has to fit INSIDE of the GREEN BORDER in the canvas image. - The full size of the canvas, excluding the sublogo, is 232 pixels (width) by 110 pixels (height). Note however that everything OUTSIDE the RED and GREEN lines will not display ingame. Therefore, the space you can use depends on the shape of your logo. Most logos will be 208 pixels (width) by 96 pixels (height) in order to fit in the nearly rectangular area inside the green border (aside from the rectangular chunk in the top left). - Open the image properties for your logo image and change the SIZE to the biggest size that can fit INSIDE the GREEN BORDER. Try 208 by 96 pixels, for example. Then, copy-paste the logo from your now resized logo image to the canvas image, and place it inside of the green border. - If your image editor supports layers, you can then delete the borders by wiping clean the entire BASE layer (or deleting it). If it does not (or you have no idea what layers are) then preemptively erase everything from the canvas image before pasting your copied logo. This is harder, as it requires you to memorize precisely where the logo should be placed in the canvas image. - Once your copied logo is where it should be, save the canvas image you just edited. From there, follow the rest of the steps outlined in the tutorial, INCLUDING the steps I did not talk about. Note that everything I told you just now is NOT a complete tutorial on its own and only supplements the linked tutorial. Refer to the tutorial for the rest. ____ There ARE other ways to insert a logo, some with less limitations on SIZE and COLORS (notably if you don't care about the intro cutscene or used ASM/code hacks to disable it from playing) but I won't be making tutorials on these right now. If you need further help on the linked tutorial, I advise you to ask to members in the Discord server, where you will likely get quicker replies. I'm a bit busy (and sick) but tutorials on a variety of topics to make modding more accessible are ongoing, as well as general documentation efforts. Said tutorials will be less haphazard than what I threw together just now, but I won't babify them too much; you need to know how to use computers in general if you want to do game modding. This includes basic knowledge of image tools and whatnot. |
| TwisterBoy |
Posted on 10-03-25, 11:17 pm (rev. 2 by TwisterBoy on 10-03-25, 11:34 pm)
|
|
Paragoomba Genesis begins it all Karma: 49 Posts: 39/71 Since: 09-09-25 |
Thanks thierry you always help when i need it i'm sorry your sick and hope you get better soon again thanks

_________________________ Check out the latest updates with twister smb my hack |
Pages: 1