|
|
Posted on 10-25-11, 10:01 pm (rev. 1 by ImageBot on 11-21-16, 02:08 am)
|
 Super Mario Super MarioAAaAaaaaAAAaaaa Karma: 10234 Posts: 1055/4464 Since: 06-08-11 |
We had this on the old forum. I thought it'd be a good idea to copy it here. Sooo, here you go!
Posted by Orengefox
When I first read about the possibility of hacking the sound and music to NSMB DS here, it really peaked my interest to where it was something I wanted to do. Since then, I’ve done a fair bit of research and here's what I've manage to come up with. This guide is for anyone interested in hacking the sound and music to NSMB DS. I do apologize ahead of time if there are any errors in the guide (as well as the information being a bit extensive). This guide will be revised whenever possible. I do hope some of the information in here will be of some use to those of you who are new to this as well as to those of you with experience. Before you continue reading; here’s a list of tools I recommend using: NSMBe5.exe – NSMB Editor 5 Editor.exe – NDS Editor 0.1 Sseq2mid.exe, midi2sseq.exe, swave2wave.exe, wav2swav.exe, swav2swar, and strm2wave.exe – Conversion Tools VGMTrans.exe – VGM Trans Astudio.exe – Anvil Studio FL.exe – FL Studio 9 Audacity.exe – Audacity 1.3 Beta Hworks32.exe – Hex Workshop Provided in this guide is a copy of a modified sound_data folder (for the NDS Editor in conjunction with hacking NSMB DS) and a file dump of the original sound_data.sdat file for locating certain sounds and music. You can read more about it in the LAST MINUTE INFORMATION section located near the end of the guide. Note: All of the following hacking techniques were done using a (U) rom. I haven’t tested these hacking techniques on any other type of rom yet. Using any other type of rom other than a (U) shouldn’t be a problem; however, there are no guarantees. 29 August 2010: Guide has been revised to reflect a lot of the newer information that’s available now. 18 December 2009: Guide has been revised to reflect what the NSMB Editor 5 can do. ----------------------------------------------------------------------- -Table of Contents- ----------------------------------------------------------------------- INTRODUCTION TO SOUND & MUSIC HACKING (NSMB DS) ----------------------------------------------------------------------- I. MUSIC HACKING A. Switching music data around in NSMB DS B. Replacing/Swapping *.sseq/*.sbnk/*.swar files C. Converting *.mid files and using them for NSMB DS ----------------------------------------------------------------------- II. SOUND HACKING A. Replacing/Swapping *.swav files in a *.swar file B. Converting *.wav files and using them for NSMB DS C. Hacking *.sbnk files in connection with *.swav files ----------------------------------------------------------------------- III. LAST MINUTE INFORMATION A. The modified sound_data folder and its use for the NDS Editor B. Be prepared for a lot of trial and error when hacking sound & music C. Some brief information on the symb.bin, info.bin, *.ssar, and *.strm file ----------------------------------------------------------------------- ACKNOWLEDGEMENT ----------------------------------------------------------------------- ======================================================= <font size=3>INTRODUCTION TO SOUND & MUSIC HACKING (NSMB DS)</font> ======================================================= All of the sound and music you hear in NSMB DS (not including what’s heard in the minigames section) comes from the sound_data.sdat file. The minigames section uses the mgvs_sound_data.sdat file. Where the sound_data.sdat file is located within the rom depends on which hacking tool is being used. Consisted in the *.sdat file are *.sseq files, *.ssar files, *.sbnk files, *.swar files, an info.bin file and a symb.bin file. Please refer to the following link for more information on what an *.sdat file is and what they consist of. This guide will provide you with a quick run-down on some of the *.sdat file information before moving onto what can be hacked so that you have a general understanding. With that in mind, we move onto the first section. ======================================================= <font size=3>I. MUSIC HACKING</font> ======================================================= The music you hear in NSMB DS comes from three different file types; an *.sseq file, a *.sbnk file and a *.swar file. An *.sseq file (located in the Sequence folder of the sound_data.sdat file using the NDS Editor) is basically a *.mid file but in a format that can work for the game. Now if you’ve converted a *.sseq file to a *.mid file before, you’ll notice that the *.mid file doesn’t sound anything like the actual song you hear the game; in fact, it sounds a bit basic. That’s because the notes (within a channel) that are being played in the *.sseq/*.mid file tend to be played using an actual sound (like one that is played on a *.wav file). So what file do these channels rely on for such sound? It’s none other than a *.swav file. An *.swav file is basically a *.wav file but in a format that can work for the game. This kind of file can normally be found in a *.swar file which is located in the Wave Archive folder of the sound_data.sdat file using the NDS Editor. A *.swar file is a lot like a *.rar file. It usually carries more than one *.swav file. Hence why you tend to see more than one *.wav file after you’ve extracted all the *.swav data from out of an *.swar file then converted it into a *.wav file using any hacking tool. So now you can picture this *.sseq file relying on a *.swar file for sound. However there’s still one other problem. The *.sseq file is unable to choose which sound from out of the *.swar file to use for each channel. So which file assists the *.sseq file in all this? It’s none other than the *.sbnk file. An *.sbnk file (located in the Bank folder of the sound_data.sdat file using the NDS Editor) basically assists the *.sseq file in choosing which sound from out of the *.swar file it can use for each channel. An *.sbnk file can even assist the *.sseq file to rely on more than one *.swar file (as well as assist an *.sseq channel to rely on more than one *.swav file) for sound and it can even get the *.swar file to play its sound files a certain way. Please refer to the following link for more information on what a *.sseq/*.sbnk/*.swar file is. Now that you know what *.sseq/*.sbnk/*.swar files are, you can now read up on what’s possible to hack. ----------------------------------------------------------------------- A. Switching music data around in NSMB DS ----------------------------------------------------------------------- You might already know how to switch the music around in any level using the NSMB Editor 5. If not, it's as simple as selecting an Area of that level, then click the Edit Level button, click on the Views button on top, then click on the available View on the far left, change the music and save (example here). But how does one go about switching the music around between Bowser Jr. and the Bosses? One way to do it would be through this topic from GBAtemp.net. It’s got simple instructions on how to do it using Hex Workshop and CrystalTile2. Keep in mind however, the topic only goes on about switching the relative addresses of *.sseq files. You would need to repeat this technique for the *.sbnk and *.swar files as well; otherwise expect undesirable results. Now for those of you, who would like to psychically swap the music files around, refer to the next sub-section. ----------------------------------------------------------------------- B. Replacing/Swapping *.sseq/*.sbnk/*.swar files ----------------------------------------------------------------------- Before you continue reading; here’s a list of what I used for this technique: NSMBe5.exe – NSMB Editor 5 Editor.exe – NDS Editor 0.1 VGMTrans.exe – VGM Trans A file dump of the sound_data.sdat file The modified sound_data folder used for the NDS Editor So let’s say you wanted to replace the non-classic flag pole music from NSMB DS with the victory star music from Super Mario 64 DS. Here’s what you have to do: Step 1: Load up SM64DS using VGM Trans. From out of its list of music, click on the one that says “NCS_BGM_CLEAR” (that’s the victory star music). Right at the very bottom left hand corner of VGM Trans, you’ll see a list of files which make up “NCS_BGM_CLEAR”. They are the fallowing: “NCS_BGM_CLEAR.sseq”, “NCS_BANK_BGM_CLEAR.sbnk”, “NCS_WAVE_BGM_RESIDENT.swar”, and “NCS_WAVE_BGM_CLR_CHJO.swar”. You’ll need to extract these files from out of the program which you can do by right-clicking on the listed files using VGM Trans (or the NDS Editor; instructions here); it doesn’t matter if you give them file extensions or not. If you ever find yourself lost and don’t know which music files you’re looking for, use VGM Trans. Step 2: You’ll need from out of the NSMB DS rom all the extracted files that are in the sound_data.sdat file which you can get using the NDS Editor. Bare in mind, you will need to re-organize the files around before compiling it back up; or you can use the modified sound_data folder (get your copy here) which already does all that for you. You can read more about it in the LAST MINUTE INFORMATION section. Step 3: Load up NSMB DS using VGM Trans. From out of the list of music, click on the one that says “BGM_COURSE_CLEAR” (that’s the non-classic flag pole music). Looking to see which files make up “BGM_COURSE_CLEAR”, you see a list of fallowing: “BGM_COURSE_CLEAR.sseq”, “BANK_GOAL_FANFARE_BGM.sbnk”, “WAVE_GOAL_FANFARE_BGM.swar”, and “WAVE_WAKAI_SHARE.swar”. Step 4: Using the modified sound_data folder, locate the files which make up “BGM_COURSE_CLEAR”. They’ll be going by the same names as the names you saw on VGM Trans but with numbers next to them for re-organizing reasons; case in point: “04 BGM_COURSE_CLEAR.sseq”, “08 BANK_GOAL_FANFARE_BGM.sbnk”, “08 WAVE_GOAL_FANFARE_BGM.swar”, and “09 WAVE_WAKAI_SHARE.swar”. Even if you’ve extracted all the files from the sound_data.sdat file yourself, they’ll still be going by the same names as the ones you saw on VGM Trans. Step 5: Now rename the following files you extracted from SM64DS like this: NCS_BGM_CLEAR.sseq – 04 BGM_COURSE_CLEAR NCS_BANK_BGM_CLEAR.sbnk – 08 BANK_GOAL_FANFARE_BGM NCS_WAVE_BGM_RESIDENT.swar – 08 WAVE_GOAL_FANFARE_BGM NCS_WAVE_BGM_CLR_CHJO.swar – 09 WAVE_WAKAI_SHARE Notice that the names of these files going in the order of how it is listed on the very bottom left hand corner of VGM Trans whenever a music track is selected. When switching file names around, make sure to do it in the order how it was listed on VGM Trans; this mainly concerns the *.swar files and not so much the other files. Otherwise expect undesirable results. This would have been a much easier process if it involved one *.swar file; but it’s good to know this in case it does involve more than one *.swar file. Step 6: Replace the original files you located in the sound_data folder with the newly renamed files. Compile all the files in the sound_data folder into a new sound_data.sdat file using the NDS Editor (Tools –> Make Sdat File –> Select a folder –> OK). Step 7: Finally, replace the original sound_data.sdat file that’s in the NSMB DS rom with the one you compiled using NSMB Editor 5. Congratulations, you’ve manage to hacked the music in NSMB DS by replacing the *.sseq/*.sbnk/*.swar files around. Bare in mind, you may run into problems. You can read more about it in the LAST MINUTE INFORMATION section. It's best to test the results on an emulator and not on VGM Trans because unlike an emulator, it can’t tell you if it actually worked or not. ----------------------------------------------------------------------- C. Converting *.mid files and using them for NSMB DS ----------------------------------------------------------------------- Before you continue reading; here’s a list of what I used for this technique: NSMBe5.exe – NSMB Editor 5 Editor.exe – NDS Editor 0.1 Midi2sseq.exe – Conversion Tool VGMTrans.exe – VGM Trans Astudio.exe – Anvil Studio FL.exe – FL Studio 9 Hworks32.exe – Hex Workshop The modified sound_data folder used for the NDS Editor So let’s say you have this midi file “smb3world1-2.mid”, which is the music to World 1-2 in SMB3 and you want to use it in your NSMB DS hack. Here’s what you’d have to do: Step 1: Load up NSMB DS using VGM Trans. Looking through the list of music; pick a music track from out of the game as you’ll be replacing this music track later on with the music to SMB3’s World 1-2 (unfortunately there’s no way to just add it into the game at the moment). Let’s go with “BGM_CHIJOU_CONT” (which is the music to World 1-1 in NSMB DS) as the one that’ll get replaced by the music to SMB3’s World 1-2. Look up the *.sseq file to that music track (it’ll be the first one listed at the very bottom left hand corner) and save it as a *.mid file using VGM Trans as it’ll come in handy in a moment. Step 2: Open up both “smb3world1-2.mid” and “BGM_CHIJOU_CONT.mid” using FL Studio. Take a good look at the instruments for “BGM_CHIJOU_CONT.mid”; each instrument within one or more channels represents the actual sound (or *.swav) being played. In a way, each instrument is like an offset to that particular sound despite the *.sbnk file being the one directing the instruments to those sounds. Obviously you’ll want to instruments in “smb3world1-2.mid” to be the same like “BGM_CHIJOU_CONT.mid”. Should you have any trouble editing any *.mid files using FL Studio, try using Anvil Studio to do it. Once you’ve set all the instruments right for “smb3world1-2.mid”; using just FL Studio only, export the newly edited file to midi. Step 3: Open the newly exported “smb3world1-2.mid” file using Hex Workshop. Look for 0x0000000C (which is the 12th byte); it should look like this "0060". Now change it to "00C0" and save. Open the newly hex edited file using FL Studio. The midi file should sound 2 times as fast, this is what you want. Now export it to midi again; overwriting the old one if you like. Open the more newly exported “smb3world1-2.mid” file using Hex Workshop and look for 0x0000000C once more. This time, change the "0060" to "0030" and save. Now play the midi on any media player, and it should sound normal. Step 4: Place both the newly hex edited “smb3world1-2.mid” file and midi2sseq tool in the same folder area. Start the (DOS) Command Prompt up and head to the folder containing both the *.mid file and tool using the Command Prompt (instructions for this can be found here). Once you’re in the right folder, type in the Command Prompt the fallowing text: midi2sseq smb3world1-2.mid Usually these sorts of conversions are successful. Depending on the *.mid file though, sometimes it doesn’t work at all. This could be due to the file being corrupted. Even then, a lot of the *.mid files on the internet weren’t meant to be used for a NDS game anyways. If the conversion is successful, your newly converted music file “smb3world1-2.sseq” will be located in the same folder that the “smb3world1-2.mid” and midi2sseq tool is in. Step 5: Open the newly converted “smb3world1-2.sseq” file using Hex Workshop. Do a Hex Value search for "FFC0". For every "FFC0" you find, you’ll need to change the "C0" to "C7" and the byte after it to "00". There should only be about as many "FFC0"s as there are channels in the *.sseq file. After you’ve done that, save the newly hex edited file. What you’re doing is fixing a major problem which a lot people have come across when converting *.mid files to *.sseq files. It was fortwaffles (a member of The PokeCommunity) who found out that an important bit of information (which is what you’ve just put in using Hex Workshop) was nonexistent every time a *.mid file was converted into an *.sseq file; you can check out the original link to the post here. Without this bit of information, a newly converted *.sseq wouldn’t play properly on a NDS game. Bare in mind, these particular files still can’t loop. At the time of this discovery, I went on to further hex edit these particular files and tried inserting “94” at the end of each channel (within these *.sseq files). “94” is a Jump command; it makes it so that it jumps to another part of the music track (almost like a loop). It worked however; a channel would get cut out every time the music track looped to the point of it had no sound what so ever. I’ll continue to research on this to see how this can work. Step 6: Recall that a music track in NSMB DS consists of three files; an *.sseq file, a *.sbnk file and a *.swar file. You’ve got the *.sseq file (smb3world1-2.sseq). Seeing as you’ll be replacing “BGM_CHIJOU_CONT.SSEQ” with “smb3world1-2.sseq”, I suggest using the *.sbnk and *.swar file that was being used for “BGM_CHIJOU_CONT” as well; even then, you would of wanted those two files in the first place assuming you want to use the instrumental sounds that were being produced from “BGM_CHIJOU_CONT”. With that in mind, the only file that needs to be replaced from out of the sound_data folder is just the “BGM_CHIJOU_CONT.SSEQ” file. Step 7: Before you continue on, you’ll need from out of the NSMB DS rom all the extracted files that are in the sound_data.sdat file which you can get using the NDS Editor (instructions here). Bare in mind, you will need to re-organize the files around before compiling it back up; or you can use the modified sound_data folder (get your copy here) which already does all that for you. You can read about it in the LAST MINUTE INFORMATION section. Step 8: Using the modified sound_data folder, locate the “BGM_CHIJOU_CONT.SSEQ” file. It’ll go by the same name as the one you saw on VGM Trans but with numbers next to it for re-organizing reasons; case in point: “25 BGM_CHIJOU_CONT”. Even if you’ve extracted all the files that are in the sound_data.sdat file yourself, they’ll still be going by the same names as the names you saw on VGM Trans. Now you’re going to rename your newly hex edited “smb3world1-2.sseq” file like this: smb3world1-2.sseq – 25 BGM_CHIJOU_CONT Replace the original file you located in the sound_data folder with the newly renamed file. Compile all the files in the sound_data folder into a new sound_data.sdat file using the NDS Editor (Tools –> Make Sdat File –> Select a folder –> OK). Step 9: Finally, replace the original sound_data.sdat file that’s in the NSMB DS rom with the one you compiled using NSMB Editor 5. Congratulations, you’ve manage to hacked the music in NSMB DS by converting *.mid files and inserting them into the rom. It's best to test the results on an emulator and not on VGM Trans because unlike an emulator, it can’t tell you if it actually worked or not. Bare in mind, you may run into problems in which case you may need to repeat this process (by either tweaking the instruments in the *.mid file and/or using a completely different *.sbnk & *.swar for the *.mid file) a few times in case the results don't sound right. You can read more about it in the LAST MINUTE INFORMATION section. Let's move on now to the next section. ======================================================= <font size=3>II. SOUND HACKING</font> ======================================================= The sound effects you hear in NSMB DS comes from an *.swav file. Recall in the last section that an *.swav file is basically a *.wav file but in a format that can work for the game. This kind of file can normally be found in a *.swar file which is located in the Wave Archive folder of the sound_data.sdat file using the NDS Editor. A *.swar file is a lot like a *.rar file. It usually carries more than one *.swav file. Hence why you tend to see more than one *.wav file after you’ve extracted all the *.swav data from out of an *.swar file then converted it into a *.wav file using any hacking tool. Please refer to the following link for more information on what a *.swav/*.swar file is. Now that you know what *.swav/*.swar files are, you can now read up on what’s possible to hack. ----------------------------------------------------------------------- A. Replacing/Swapping *.swav files in a *.swar file ----------------------------------------------------------------------- Before you continue reading; here’s a list of what I used for this technique: NSMBe5.exe – NSMB Editor 5 Editor.exe – NDS Editor 0.1 Swav2Swar – Conversion Tools The modified sound_data folder used for the NDS Editor Say you wanted to change the sound Mario makes when shot from out of a warp/pipe canon to the sound Wario makes after being squashed by a Thwomp in Super Mario 64 DS. Here’s what you would have to do: Step 1: Let’s say you already know which files to look for. Case in point, the sound file for Mario’s voice when shot from out of a warp/pipe canon is the “WAVE_MARIO_BASE_SE_000.swav” file (or “WAVE_MARIO_BASE_SE_214.swav” file if extracted using the NDS Editor) which is in the “WAVE_MARIO_BASE_SE.swar” file (located in the “Wave Archive” folder within NSMB DS’ sound_data.sdat file); and the sound file for Wario’s voice after being squashed by a Thwomp is the “NCS_WAVE_SE_VOICE_WARIO_MG_004.swav” file (or “NCS_WAVE_SE_VOICE_WARIO_MG_240.swav” file if extracted using the NDS Editor) which is in the “NCS_WAVE_SE_VOICE_WARIO_MG.swar” file (located in the “Wave Archive” folder within SM64DS’ sound_data.sdat file). Load up both NSMB DS & SM64DS using the NDS Editor. Double-click the two games and locate their sound_data.sdat file. Once you’ve located the two *.sdat files, double-click them both; they’ll then be uploaded onto the NDS Editor. Step 2: Double-click the two newly uploaded *.sdat files and search for the *.swar file you’re after in each *.sdat file. Once you’ve located both the “WAVE_MARIO_BASE_SE.swar” & “NCS_WAVE_SE_VOICE_WARIO_MG.swar” file, you’ll then want to extract the *.swav files from out of the two *.swar files using the NDS Editor. It will then create two new folders in the same folder that the NDS Editor is in; the first folder being “WAVE_MARIO_BASE_SE” and the second folder being “NCS_WAVE_SE_VOICE_WARIO_MG”. Each folder will contain the *.swav file you’re after along with any other *.swav files that were included in the *.swar file they came out of. Now if somehow you’re not entirely sure which *.swar file contains which sound files, the best thing to do is to extract the *.swav files from out of all the *.swar files and as well as an extraction of all the *.swav files converted into *.wav files using the NDS Editor. Obviously if the *.swar file has got an “SE” in its name then you know it’ll contain the main sound effects to the game. As for the others that don’t have an “SE” in its name, those will be the instrumental sounds for the music files. It’s just a matter of playing each and every sound file to see what’s what. Step 3: Start up Swav2Swar. The program is pretty straight forward, you click “Add” and insert as many *.swav files as you like into the program; you then click “Create SWAR” which will then create a new *.swar file containing those selected *.swav files but in the order of which *.swav was inserted first. Seeing as you’ll be creating a new “WAVE_MARIO_BASE_SE.swar” with some modifications, you’ll want to add all the *.swav files it originally had (in numerical order) onto the program except for the one that you want to replace. Looking in through the “WAVE_MARIO_BASE_SE” folder, it’s quite obvious that “WAVE_MARIO_BASE_SE_214.swav” (which also goes by “WAVE_MARIO_BASE_SE_000.swav”) was the first file listed in the original *.swar file. If you’re not sure about it, make a file dump of “WAVE_MARIO_BASE_SE.swar” using the NDS Editor and look it up. With that in mind, you’ll want to add the file that’s replacing “WAVE_MARIO_BASE_SE_214.swav” first. Using Swav2Swar, click “Add” and look for “NCS_WAVE_SE_VOICE_WARIO_MG_240.swav” which will be in the “NCS_WAVE_SE_VOICE_WARIO_MG” folder. After you’ve added the first file in, you’ll then want to add in the rest of the *.swav files which made up the original “WAVE_MARIO_BASE_SE.swar” file. Once you’ve added the rest of the *.swav files in, it should look something like this: 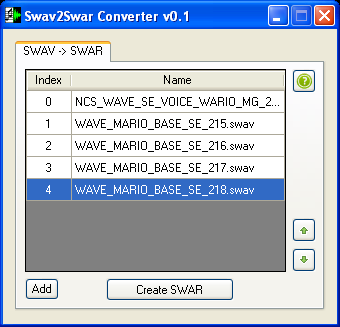 If the files are out of order, use the up/down arrow buttons to move them around. Click “Create SWAR” and name the new file “41 WAVE_MARIO_BASE_SE”; now save the file anywhere you like. It’ll save with the file extension which I suggest to take out just to make things easy for when you go to Step 5. Step 4: Before you continue any further, you’ll need from out of the NSMB DS rom all the extracted files that are in the sound_data.sdat file which you can get using the NDS Editor (instructions here). Bare in mind, you will need to re-organize the files around before compiling it back up; or you can use the modified sound_data folder (get your copy here) which already does all that for you. You can read about it in the LAST MINUTE INFORMATION section. Step 5: Using the modified sound_data folder, locate the “41 WAVE_MARIO_BASE_SE” file (the files are numbered for re-organizing reasons). Once you’ve located the file, you’ll then want to replace that file with the new one you created using Swav2Swar. Compile all the files in the sound_data folder into a new sound_data.sdat file using the NDS Editor (Tools –> Make Sdat File –> Select a folder –> OK). Step 6: Finally, replace the original sound_data.sdat file that’s in the NSMB DS rom with the one you compiled using NSMB Editor 5. Congratulations, you’ve manage to hack the sound in NSMB DS by replacing/swapping *.swav files in a *.swar file. Give your newly hacked NSMB DS rom a test run on an emulator. Though I’ve not run into any problems yet when using this hacking technique; there is a chance you may still run into problems. You can read more about it in the LAST MINUTE INFORMATION section. Try this experiment out the next time you’re replacing *.sseq files with one that’s been converted from a *.mid file or one that came from another game. Instead of using the existing *.swar file that came with the original *.sseq file (before it got replaced); you could use one that’s been customized using Swav2Swar. ----------------------------------------------------------------------- B. Converting *.wav files and using them for NSMB DS ----------------------------------------------------------------------- Before you continue reading; here’s a list of what I used for this technique: NSMBe5.exe – NSMB Editor 5 Editor.exe – NDS Editor 0.1 Wav2swav.exe and swav2swar – Conversion Tools Audacity.exe – Audacity 1.3 Beta The modified sound_data folder used for the NDS Editor So let’s say you have this wave file “sm64_boo.wav”, which is sound Boos make in Super Mario 64 and you want to use it to replace the current sound the Boos make in NSMB DS. Here’s what you’d have to do: Step 1: Place both the “sm64_boo.wav” file and wav2swav tool in the same folder area. Normally it’s pretty straight forward; you drag the *.wav file over to the program, drop it in and the let the program do the rest. Should nothing happen however, its best see what went wrong using the (DOS) Command Prompt. Start the Command Prompt up and head to the folder containing both the *.wav file and tool using the Command Prompt (instructions for this can be found here). Once you’re in the right folder, type in the Command Prompt the fallowing text: wav2swav sm64_boo.wav Usually what tends to be the problem if the conversion was unsuccessful is that *.wav file was not in Mono. If that happens, you will need to set the *.wav file to Mono which you can do using Audacity. Once the conversion is successful, your newly converted sound file “sm64_boo.swav” will be located in the same folder that the “sm64_boo.wav” and wav2swav tool is in. For future reference, you can use wav2swav in conjunction with Swav2Swar if you put the two programs in the same folder. Step 2: Let’s say you already know which file the NSMB DS Boo sound is. Case in point, it’s the “WAVE_ENEMY_06_SE_009.swav” file (or “WAVE_ENEMY_06_SE_239.swav” file if extracted using the NDS Editor) which is in the “WAVE_ENEMY_06_SE.swar” file (located in the “Wave Archive” folder within NSMB DS’ sound_data.sdat file). Load up NSMB DS using the NDS Editor. Double-click the game and locate the sound_data.sdat file. Once you’ve located the *.sdat file, double-click it; it’ll then be uploaded onto the NDS Editor. Step 3: Double-click the newly uploaded *.sdat file and search for the *.swar file you’re after. Once you’ve located the “WAVE_ENEMY_06_SE.swar” file, you’ll then want to extract the *.swav files from out of the *.swar file using the NDS Editor. It will then create a new folder (titled “WAVE_ENEMY_06_SE”) in the same folder that the NDS Editor is in. The new folder will contain the *.swav file you’re after along with any other *.swav files that were included in the *.swar file they came out of. Now if somehow you’re not entirely sure which *.swar file contains which sound files, the best thing to do is to extract the *.swav files from out of all the *.swar files and as well as an extraction of all the *.swav files converted into *.wav files using the NDS Editor. Obviously if the *.swar file has got an “SE” in its name then you know it’ll contain the main sound effects to the game. As for the others that don’t have an “SE” in its name, those will be the instrumental sounds for the music files. It’s just a matter of playing each and every sound file to see what’s what. Step 4: Start up Swav2Swar. The program is pretty straight forward, you click “Add” and insert as many *.swav files as you like into the program; you then click “Create SWAR” which will then create a new *.swar file containing those selected *.swav files but in the order of which *.swav was inserted first. Seeing as you’ll be creating a new “WAVE_ENEMY_06_SE.swar” with some modifications, you’ll want to add all the *.swav files it originally had (in numerical order) onto the program except for the one that you want to replace. Looking in through “WAVE_ENEMY_06_SE” folder, it’s quite obvious that “WAVE_ENEMY_06_SE_239.swav” (which also goes by “WAVE_ENEMY_06_SE_009.swav”) was the last file listed in the original *.swar file. If you’re not sure about it, make a file dump of “WAVE_ENEMY_06_SE.swar” using the NDS Editor and look it up. With that in mind, you’ll want to add the file that’s replacing “WAVE_ENEMY_06_SE_239.swav” last. Using Swav2Swar, click “Add” and look for the “WAVE_ENEMY_06_SE” folder containing all the *.swav files. Add in all the *.swav files which made up the original “WAVE_ENEMY_06_SE.swar” file first. After you’ve added those in, you’ll then want to add the “sm64_boo.swav” file in. Once you’ve done that, it should look something like this: 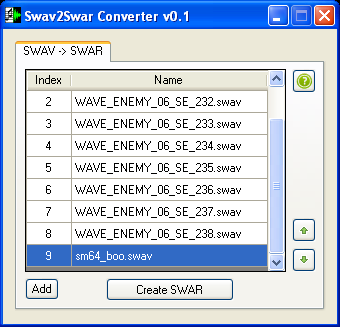 If the files are out of order, use the up/down arrow buttons to move them around. Click “Create SWAR” and name the new file “57 WAVE_ENEMY_06_SE”; now save the file anywhere you like. It’ll save with the file extension which I suggest to take out just to make things easy for when you go to Step 6. Step 5: Before you continue any further, you’ll need from out of the NSMB DS rom all the extracted files that are in the sound_data.sdat file which you can get using the NDS Editor (instructions here). Bare in mind, you will need to re-organize the files around before compiling it back up; or you can use the modified sound_data folder (get your copy here) which already does all that for you. You can read about it in the LAST MINUTE INFORMATION section. Step 6: Using the modified sound_data folder, locate the “57 WAVE_ENEMY_06_SE” file (the files are numbered for re-organizing reasons). Once you’ve located the file, you’ll then want to replace that file with the new one you created using Swav2Swar. Compile all the files in the sound_data folder into a new sound_data.sdat file using the NDS Editor (Tools –> Make Sdat File –> Select a folder –> OK). Step 7: Finally, replace the original sound_data.sdat file that’s in the NSMB DS rom with the one you compiled using NSMB Editor 5. Congratulations, you’ve manage to hack the sound in NSMB DS by converting *.wav files and inserting them into the rom. Give your newly hacked NSMB DS rom a test run on an emulator. Though I’ve not run into any problems yet when using this hacking technique; there is a chance you may still run into problems. You can read more about it in the LAST MINUTE INFORMATION section. ----------------------------------------------------------------------- C. Hacking *.sbnk files in connection with *.swav files ----------------------------------------------------------------------- Before you continue reading; here’s a list of what I used for this technique: NSMBe5.exe – NSMB Editor 5 Editor.exe – NDS Editor 0.1 Swav2Swar – Conversion Tools VGMTrans.exe – VGM Trans Hworks32.exe – Hex Workshop A file dump of whichever *.sbnk file you’re hacking The modified sound_data folder used for the NDS Editor I think the best way to explain this would be to imagine this scenario. You’ve just replace a NSMB DS music track using “NCS_BGM_DOLPIC.SSEQ” which is the Delfino Plaza music that was used in Super Mario 64 DS. For the *.sbnk & *.swar file, you decide to use “BANK_059.SBNK” & “WAVE_059.SWAR” which came from the Delfino Square music track in Mario Kart DS. You play the files altogether and it works however, you’re not very keen on one (or two) of the instrumental sounds that’s being used for one of the channels (case in point, “WAVE_059_005.swav” & “WAVE_059_006.swav”). So you decide to switch them out for one that was used in the Delfino Plaza music on SM64DS (case in point, “NCS_WAVE_BGM_DOLPIC_004.swav”). You then make the necessary modifications for “WAVE_059.SWAR” using Swav2Swar. You play the files altogether once more and it works however, there’s still one other problem. The instrumental sound you decided to use to replace the two older ones isn’t playing correctly. In fact it sounds a bit off; nothing like how it was being played in the Delfino Plaza music on SM64DS. It’s the information on the *.sbnk file that’s causing this to happen. To fix this, you’ll need to copy some specific information from off the “NCS_BANK_BGM_DOLPIC.SBNK” file (which is used for the Delfino Plaza music on SM64DS) and paste it into the right area of the “BANK_059.SBNK” file using a Hex editor. Here’s what you have to do: Step 1: If you don’t have a copy of the “NCS_BANK_BGM_DOLPIC.SBNK” file as well as the “BANK_059.SBNK” file yet, you can get a copy of the two files by going to the “Bank” folder within SM64DS & NSMB DS’ sound_data.sdat file using the NDS Editor. You can also get a copy of the two files using VGM Trans; just load SM64DS & NSMB DS onto the program and search for the two files there. One other thing you’ll need as well is a file dump of “NCS_BANK_BGM_DOLPIC.SBNK” & “BANK_059.SBNK” which you can get using the NDS editor. Step 2: Looking through the “NCS_BANK_BGM_DOLPIC.SBNK” file dump, you see a huge list of offsets. The offsets you’re after will contain information which will direct one of the *.sseq channels to use “NCS_WAVE_BGM_DOLPIC_004.swav” as well as to play it a certain way. So let’s say you’ve located these offsets; you see that it starts at 0x0000026c and ends at 0x00000274. Open the “NCS_BANK_BGM_DOLPIC.SBNK” file up using Hex Workshop and highlight everything starting from 0x0000026c all the way to where it ends at 0x00000274. Then copy all of the highlighted hex data. Step 3: Looking through the “BANK_059.SBNK” file dump, you again see a huge list of offsets. The offsets you’re after this time will contain information which will direct one of the *.sseq channels to use “WAVE_059_005.swav” & “WAVE_059_006.swav” as well as to play them a certain way. So let’s say you’ve located these offsets; you see that it starts at 0x0000027c and ends at 0x00000290. Open the “BANK_059.SBNK” file up using Hex Workshop and highlight everything starting from 0x0000027c all the way to where it ends at 0x00000290. You will then paste over the old highlighted hex data with the one you copied from off of “NCS_BANK_BGM_DOLPIC.SBNK”. Next you’re going want to find (from out of the hex data you just pasted) the bit that says “0400 0100”, change it to “0500 0000” and click save. Once you’ve done that, it should look something like this: 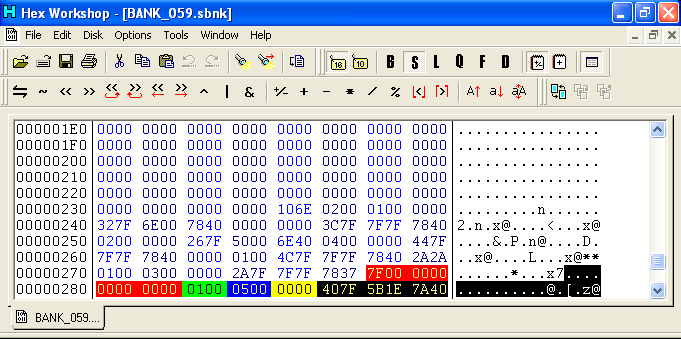 At this time I would like to take a moment to go into detail about what was consisted in the hex data you just pasted (as well as changed) as it’ll give you a better understanding of how certain parts of an *.sbnk file functions. The picture above contains five different colored areas; each one will go on to explain what that particular area represents. Put the five different colored areas altogether and you’ve got yourself a function; this being the very one that directs an *.sseq channel into using a specific *.swav file as well as getting that *.swav file to play a certain way. Areas colored in Red: These are referred to as Regions. Some offsets won’t have this bit of information but if it’s there at the start of the string, then you’ll want to copy it along with the rest of the string of information. Areas colored in Green: If there are no Regions, then this bit of information is always the start of the string. Not much is known about it at the moment other than it’s usually defaulted at “0100”. Areas colored in Blue: This bit of information will choose which *.swav file (depending which *.swar file it’s coming from initially) to use; the number inserted is where in alphabetical/numerical order the *.swav file is located at (case in point, it’s the 6th file). Areas colored in Yellow: This bit of information will choose which *.swar file to use. Now this bit information can get a bit tricky because the number inserted (which can be 0, 1, 2, 3 and so on) is based off two things; which *.swar files are being used and where in alphabetical/numerical order the *.swar file is located at.. My suggestion would be to load NSMB DS onto VGM Trans and look at how certain multiple *.swar files are listed as that’s how this bit of information reads it. Areas colored in Black: Each byte in this bit of information is referred to in this particular order as: Note Number, Attack Rate, Decay Rate, Sustain Rate, Release Rate, and Pan. It basically tells the chosen *.swar file to play a certain way. So let’s say you made a file dump of the newly hex edited “BANK_059.SBNK” file and you scrolled down to the offsets you’ve just edited; this is what you’d be looking at. 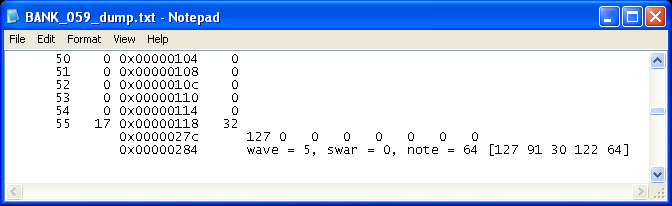 My suggestion would be to compare this picture to the one above it. Being able to read file dumps like these will make it easier to locate a certain offsets as well as knowing what the offsets consists of. At any rate, this is what you want to be looking for if you’re going to be hacking *.sbnk files in order to change the way a sound file is played. Step 4: So now that you’ve got a general understanding of how certain parts of an *.sbnk file function, the only thing left to do now would to be go through the usual procedures of compiling all the files together; replacing the old *.sbnk file with the newly hex edited “BANK_059.SBNK” file, compiling all the files that are in the sound_data folder into a new sound_data.sdat file using the NDS Editor and replacing the original sound_data.sdat file that’s in the NSMB DS rom with the one you’ve compiled using NSMB Editor 5. Congratulations, you’ve manage to hack the sound in NSMB DS by hacking the *.sbnk files in connection with *.swav files. Give your newly hacked NSMB DS rom a test run on an emulator. Though I’ve not run into any problems yet when using this hacking technique; there is a chance you may still run into problems. You can read more about it in the LAST MINUTE INFORMATION section. ======================================================= <font size=3>III. LAST MINUTE INFORMATION</font> ======================================================= I would like to conclude this guide with some last minute information relating to a lot of the stuff this guide has covered. ----------------------------------------------------------------------- A. The modified sound_data folder and its use for the NDS Editor ----------------------------------------------------------------------- When I first started using the NDS Editor to hack NSMB DS, I kept running into a problem where the sound and music would completely mess up every time I replaced the games original sound_data.sdat file with one that I compiled; even when no changes were ever made to the compiled file. What had happen is the program would compile a new sound_data.sdat file, putting each of the file formats (*.sseq/*.ssar/*.sbnk/*.ssar/*.bin) back into their designated folder but in alphabetical order instead of in the listed order they were in originally. The files would then be renamed to reflect the listed order they were in originally even though the name doesn’t match the actual file; this can be seen when browsing through content of the sound_data.sdat file using the NDS Editor. So I started re-arranging all the files in the sound_data folder; renaming them (you can do this with/without the file extension) so that everything would go in the order it was supposed to be in once compiled and it worked. For those of you who don’t want to go through the hassle of making your own sound_data folder, I’ve provided a copy of this modified sound_data folder so that you can compile your own *.sdat file with ease. Get your copy of the modified sound_data folder here. Also included with the modified folder are a copy of this document, and a file dump of the original sound_data.sdat file for locating certain sounds and music. If you would like to see an example some of these hacking techniques in action, check out my current project here; it’s a NSMB DS rom hack which includes a variety of different music & sounds that weren’t originally in the game using the hacking techniques shown here. ----------------------------------------------------------------------- B. Be prepared for a lot of trial and error when hacking sound & music ----------------------------------------------------------------------- Unfortunately you may run into some problems when replacing the games original music with music from another NDS game or from a *.mid file; you may even run into some problems when replacing the games original sound files with sound files from another NDS game or from a *.wav file. Some of these problems include the game having sound but some to no music, having music but some to no sound, having some sound but no music, having some music but no sound, or having some to no sound/music. Why this happens might have something to do with the information on those files which is confusing the game or the fact that it’s due to memory limitations (in other words, the game can only play so many sounds at a time). I’m learning a lot from these scenarios and will continue to learn more as time goes on. One other thing you should be aware of is that some of the music in NSMB DS uses the same *.swar file. Even some of the sounds in NSMB DS uses the same *.swav file. Should you go on to replace a *.swar file that’s being used by one or more music tracks, hopefully you have a way of getting around it without messing up either music track. Same goes for should you go on to replace an *.swav file that’s being used for multiple sounds, hopefully you have a way of getting around it without messing up the rest of the sounds. It’s a lot of trial and error when hacking the sound & music to NSMB DS. ----------------------------------------------------------------------- C. Some brief information on the symb.bin, info.bin, *.ssar, and *.strm file ----------------------------------------------------------------------- I won’t go into too much detail on some of the information in this sub-section; it’ll be brief enough to give you an idea at least. An *.ssar file is a lot like a *.swar file but instead of there being a collection of *.swav files, it’s got a collection of *.sseq files. Unfortunately there aren’t any tools out which can extract such *.sseq files from out of a *.ssar file yet. At the very least you can swap the *.sseq data around in a *.ssar using a Hex editor and a file dump of the *.ssar file. A *.strm file is basically an individual wave file. There aren’t any *.strm files that I know of in NSMB DS but you can find them in other NDS games. A symb.bin file basically carries the names of each and every file within the *.sdat file while the info.bin file carries the information of each and every file within the *.sdat file. Please refer to the following link for more information on what a symb.bin, info.bin, *.ssar and *.strm file is. Try this experiment out sometime. Replace either the symb.bin or info.bin file with one from another NDS game. Compile it with all the necessary files into an *.sdat file using the NDS Editor (instructions here). You'll then replace the original sound_data.sdat file with the one you compiled using NSMB Editor 5. Finally using the NDS Editor, open up your newly hacked NSMB DS rom and make a file dump of its sound_data.sdat file to see the difference between that file dump and one that came from the original sound_data.sdat file. My advice is to try these things out. Get a feel for how these hacking tools and techniques work. Experiment on some things; you might discover something that no one else yet has. Once you do enough of it, you’ll get the hang of it. It may not even take as much time to do this sort of hacking once it gets easier. Most importantly, don’t try to frustrate yourself when doing this sort of hacking. Enjoy it; no matter how you go about it. ======================================================= <font size=3>ACKNOWLEDGEMENT</font> ======================================================= In no particular order, I would to thank the following people: Treeki – Author of NSMB Editor 5, Nitro Explorer 2 and NARC Explorer 2 Dirbaio – Co-Author and now leading developer of NSMB Editor 5 kiwi.ds – Author of the Nitro Composer File (*.sdat) Specification, NDS editor, sseq2midi.exe, and midi2sseq.exe Crystal – Author of CrystalTile2.exe loveemu – Author of sseq2mid.exe, swave2wave.exe, wav2swav.exe and strm2wave.exe Borra – Author of swav2swar.exe Nintendon – Author of ndssndext.exe DJ Bouche – Author of sdattool.exe VGMTrans – Author of VGMTrans.exe Willow Software – Author of Anvil Studio Image-Line Software – Author of FL Studio 9 Audacity Team – Author of Audacity BreakPoint Software, Inc. – Author of Hex Workshop FAST6191 – Techromancer and Magazine Staff Member of GBAtemp.net fortwaffles – Member of The PokeCommunity Garmichael – Member of Jul And to everyone who made this possible. Thank you! |
|
|
Posted on 10-25-11, 10:28 pm
|
|
Karma: 3782 Posts: 615/2112 Since: 06-28-11 |
LOL. Look at the length. That't why I never liked Music Hacking.
 But once you learned it and don't need the guide anymore, it is quite nice!  Thanks for copying!  
 
|
|
|
Posted on 10-26-11, 01:12 pm
|
 Flurry Flurry Karma: 744 Posts: 28/258 Since: 10-14-11 |
thanks for uploading this but everytime i try to load a rom in VGMTrans it keeps crashing?
|
| LeWario |
Posted on 10-27-11, 02:52 pm
|
|
Banned for being a complete idiot.
Karma: 549 Posts: 519/987 Since: 07-09-11 |
Posted by Shadey21 thanks for uploading this but everytime i try to load a rom in VGMTrans it keeps crashing? Which ROM and region? |
|
|
Posted on 10-27-11, 03:45 pm
|
|
Flurry Karma: 744 Posts: 29/258 Since: 10-14-11 |
|
|
Posted on 10-27-11, 03:53 pm
|
|
Super Mario AAaAaaaaAAAaaaa Karma: 10234 Posts: 1062/4464 Since: 06-08-11 |
That's too strange. Have you got the proper version of VGMTrans? And are you opening the ROM correctly?
|
|
|
Posted on 10-27-11, 04:11 pm
|
|
Flurry Karma: 744 Posts: 30/258 Since: 10-14-11 |
Posted by Dirbaio That's too strange. Have you got the proper version of VGMTrans? And are you opening the ROM correctly? i think i do. the link on the tutorial didnt work so i googled it. i just click and drag the rom onto the file VGMTrans with the "H" icon but when i click on the play button it just crashes |
| LeWario |
Posted on 10-30-11, 03:01 pm (rev. 1)
|
|
Banned for being a complete idiot.
Karma: 549 Posts: 528/987 Since: 07-09-11 |
Hm strange. You probably got an old/bad version of VGMTrans.
I still have a copy of VGMTrans (the latest I could find at the time) that works with a lot of games I've tried. Just don't keep playing music all the time and restart it once in a while, otherwise it will crash. Do you want it? |
|
|
Posted on 10-30-11, 03:32 pm
|
|
Flurry Karma: 744 Posts: 34/258 Since: 10-14-11 |
Posted by ELMario Hm strange. You probably got an old/bad version of VGMTrans. I still have a copy of VGMTrans (the latest I could find at the time) that works with a lot of games I've tried. Just don't keep playing music all the time and restart it once in a while, otherwise it will crash. Do you want it? yeah i would like to see if it works 
|
| LeWario |
Posted on 10-30-11, 07:11 pm
|
|
Banned for being a complete idiot.
Karma: 549 Posts: 529/987 Since: 07-09-11 |
|
|
Posted on 10-30-11, 09:26 pm
|
|
Flurry Karma: 744 Posts: 35/258 Since: 10-14-11 |
Posted by ELMario ty where can i get Editor.exe – NDS Editor 0.1 |
|
|
Posted on 10-30-11, 09:30 pm
|
 Fuzzy FuzzyFull mod  Karma: 1183 Posts: 265/785 Since: 06-28-11 |
I think this is what you're looking for.
|
|
|
Posted on 10-31-11, 02:09 am (rev. 2)
|
|
Flurry Karma: 744 Posts: 36/258 Since: 10-14-11 |
Posted by Piranhaplant I think this is what you're looking for. i have to do a survey which i cannot do? EDIT: Nevermind went to download wrong thing ... whops got it now EDIT 2: it all works fine but when i load the game on my ds, the sounds dont work and the music doesnt play. it plays weird beats of the music but doesnt play the music. what did i do wrong |
|
|
Posted on 10-31-11, 11:46 am
|
 Roy Koopa Roy KoopaThe guy who does things.  Karma: 12804 Posts: 119/2796 Since: 07-01-11 |
Is it coincidence that the day Dirbaio posted this was the same day i returned to jul to view this page? @Shadey I'm not sure, it could be a whole number of things that could have done it. When i was trying to make custom music for NSMB back in 2009 I encountered this problem many times and never got it to work properly. What method did you use to hack the music in? One specific method or multiple methods used in the guide? New Super Mario Bros.: Clone Tag Team 1+2 / New Super Mario Advance + Take 2 / Super Mario: Endless Earth My two greatest assets have been mental stability and being, like, really smart. |
|
|
Posted on 10-31-11, 05:33 pm
|
Roy Koopa Karma: 4036 Posts: 912/2722 Since: 06-26-11 |
Posted by Shadey21 Posted by Piranhaplant I think this is what you're looking for. EDIT 2: it all works fine but when i load the game on my ds, the sounds dont work and the music doesnt play. it plays weird beats of the music but doesnt play the music. what did i do wrong Hmm... I think thats because the music in which you imported does not support your MIDI. Every song has own wavs for sounds and soundbanks which say what it should load. Your midi does not use these wavs. You can try to set the Instruments of your midi to the same of the original. It will work but probably sounds bad... _________________________ If you want to support me, you might check out my Patreon Page : ) |
|
|
Posted on 12-01-11, 08:15 pm (rev. 1)
|
 Panser Panser Karma: 387 Posts: 156/335 Since: 06-28-11 |
I have trouble understanding this part:
Open up both “smb3world1-2.mid” and “BGM_CHIJOU_CONT.mid” using FL Studio. Take a good look at the instruments for “BGM_CHIJOU_CONT.mid”; each instrument within one or more channels represents the actual sound (or *.swav) being played |
|
|
Posted on 12-02-11, 05:03 am
|
|
Roy Koopa Karma: 4036 Posts: 1055/2722 Since: 06-26-11 |
You should open the extracted midi and your midi to replace in FL studio. There you can see the used instruments. Each instrument is the swav what plays in the game ...
See a lots of creative DS Hacking here
_________________________ If you want to support me, you might check out my Patreon Page : ) |
|
|
Posted on 01-10-12, 12:15 pm
|
 Fuzz Ball Fuzz BallKirbyFanatic64 (LOL)  Karma: 1386 Posts: 127/950 Since: 11-13-11 |
-Is there any limitations of the .mid file being used? (like length, file size, or else)
-Is this guide still up to date, or something new is discovered but didn't update yet? -If we replacing "NSMB's .sseq" with "Other DS game's .sseq" instead of with .sseq that came from .mid, Will it be more probability to get it works? _________________________
Great games must be fun, not fancy.
Music Hacker needed! PM me if you wish!
|
|
|
Posted on 01-10-12, 03:43 pm
|
|
Super Mario AAaAaaaaAAAaaaa Karma: 10234 Posts: 1418/4464 Since: 06-08-11 |
Limitations about the MID file? Uh, I'm not sure, just make sure it's a reasonable size. The DS has 4 MB of RAM so you probably can't play HUGE files of around 1MB or so.
The DS has 16 sound channels, so only 16 notes can play at once (maybe less dues to the sound effects). Yea, replacing music from other games is possible, and many people have done it. But you'll have to replace the .sbnk file from the other game too, or it won't sound the same. (?) |
|
|
Posted on 01-10-12, 05:36 pm
|
|
Roy Koopa Karma: 4036 Posts: 1215/2722 Since: 06-26-11 |
You have to replace the .sseq, .sbnk and .swar
See a lots of creative DS Hacking here
_________________________ If you want to support me, you might check out my Patreon Page : ) |