- NSMBHD
- Forum index
- Member list
Dirbaio
- +1'd posts
|
|
Posted on 12-06-12, 05:44 pm in tutorial How ASM hacks are setup (rev. 4 by RicBent on 11-03-18, 11:11 am)
|
 Super Mario Super Mario( ͡° ͜ʖ ͡°) Karma: 10212 Posts: 2944/4459 Since: 06-08-11 |
You will need
About the ASM patch templateThe template contains everything you need to start creating ASM hacks. Here's an explanation of what each file does.
How to compile an ASM hackPlace a ROM in the template folder (NOT in data/ or source/. In the main folder). Also the path to the template may not include spaces ("C:\this\is\very wrong\" "C:\this\works\"). Open it with NSMB Editor. Go to the Tools tab and click "Run make and insert". Yes, it's that easy. You will see some new files appear when you compile your hack:
When you run "make clean" all these temporary files will be deleted. (except the bak/ folder). How to make an ASM hackNow comes the cool part! ASM hacks are made with hooks. You hook an address in the game's code, this means the code in your hook gets executed when the code you hooked gets executed. There are multiple types of hooks:
To create a hook, simply make a function, or a label in ASM, with the hook name. See examples below. Example 1: replacing getCoin() functionSo... We know the function at 02020354 is called when Mario gets a coin. It increments the coin counter and gives an 1up if there's 100 coins. It basically "gives a coin to Mario". Now, what if we replace that function with an empty function, hmm? void nsub_02020354() { } We put that code into a file named noCoin.cpp in the source folder and compile... Now what happens? When Mario gets a coin, the coin counter doesn't go up! Yay! Example 2: calling a function from the game's codeNow let's make Mario get a 1up every time he gets a coin! extern "C" { void get1up(int something, int somethingElse); } void nsub_02020354(int something) { get1up(8, something); } The first part of the code "declares" that there's a function named get1up() so the compiler allows us to call it. The compiler already knows the address for the function because it's listed in symbols.x. The "something" is a value the get1up function needs. If we look at getCoin in IDA Pro, we see that it's passed as a param to getCoin, and getCoin passes it to get1up. We don't really care what it really is, we just pass it around and it will work. (If you're curious, I think it's the player number. In singleplayer it's always 0) Now every time Mario gets a coin, he gets a 1up instead! |
|
|
Posted on 06-08-11, 04:44 pm in This is the beginning
|
|
Super Mario ( ͡° ͜ʖ ͡°) Karma: 10212 Posts: 1/4459 Since: 06-08-11 |
Yes it is

|
|
|
Posted on 10-25-11, 10:01 pm in NSMB Sound & Music Hacking Guide (rev. 1 by ImageBot on 11-21-16, 02:08 am)
|
|
Super Mario ( ͡° ͜ʖ ͡°) Karma: 10212 Posts: 1055/4459 Since: 06-08-11 |
We had this on the old forum. I thought it'd be a good idea to copy it here. Sooo, here you go!
Posted by Orengefox
When I first read about the possibility of hacking the sound and music to NSMB DS here, it really peaked my interest to where it was something I wanted to do. Since then, I’ve done a fair bit of research and here's what I've manage to come up with. This guide is for anyone interested in hacking the sound and music to NSMB DS. I do apologize ahead of time if there are any errors in the guide (as well as the information being a bit extensive). This guide will be revised whenever possible. I do hope some of the information in here will be of some use to those of you who are new to this as well as to those of you with experience. Before you continue reading; here’s a list of tools I recommend using: NSMBe5.exe – NSMB Editor 5 Editor.exe – NDS Editor 0.1 Sseq2mid.exe, midi2sseq.exe, swave2wave.exe, wav2swav.exe, swav2swar, and strm2wave.exe – Conversion Tools VGMTrans.exe – VGM Trans Astudio.exe – Anvil Studio FL.exe – FL Studio 9 Audacity.exe – Audacity 1.3 Beta Hworks32.exe – Hex Workshop Provided in this guide is a copy of a modified sound_data folder (for the NDS Editor in conjunction with hacking NSMB DS) and a file dump of the original sound_data.sdat file for locating certain sounds and music. You can read more about it in the LAST MINUTE INFORMATION section located near the end of the guide. Note: All of the following hacking techniques were done using a (U) rom. I haven’t tested these hacking techniques on any other type of rom yet. Using any other type of rom other than a (U) shouldn’t be a problem; however, there are no guarantees. 29 August 2010: Guide has been revised to reflect a lot of the newer information that’s available now. 18 December 2009: Guide has been revised to reflect what the NSMB Editor 5 can do. ----------------------------------------------------------------------- -Table of Contents- ----------------------------------------------------------------------- INTRODUCTION TO SOUND & MUSIC HACKING (NSMB DS) ----------------------------------------------------------------------- I. MUSIC HACKING A. Switching music data around in NSMB DS B. Replacing/Swapping *.sseq/*.sbnk/*.swar files C. Converting *.mid files and using them for NSMB DS ----------------------------------------------------------------------- II. SOUND HACKING A. Replacing/Swapping *.swav files in a *.swar file B. Converting *.wav files and using them for NSMB DS C. Hacking *.sbnk files in connection with *.swav files ----------------------------------------------------------------------- III. LAST MINUTE INFORMATION A. The modified sound_data folder and its use for the NDS Editor B. Be prepared for a lot of trial and error when hacking sound & music C. Some brief information on the symb.bin, info.bin, *.ssar, and *.strm file ----------------------------------------------------------------------- ACKNOWLEDGEMENT ----------------------------------------------------------------------- ======================================================= <font size=3>INTRODUCTION TO SOUND & MUSIC HACKING (NSMB DS)</font> ======================================================= All of the sound and music you hear in NSMB DS (not including what’s heard in the minigames section) comes from the sound_data.sdat file. The minigames section uses the mgvs_sound_data.sdat file. Where the sound_data.sdat file is located within the rom depends on which hacking tool is being used. Consisted in the *.sdat file are *.sseq files, *.ssar files, *.sbnk files, *.swar files, an info.bin file and a symb.bin file. Please refer to the following link for more information on what an *.sdat file is and what they consist of. This guide will provide you with a quick run-down on some of the *.sdat file information before moving onto what can be hacked so that you have a general understanding. With that in mind, we move onto the first section. ======================================================= <font size=3>I. MUSIC HACKING</font> ======================================================= The music you hear in NSMB DS comes from three different file types; an *.sseq file, a *.sbnk file and a *.swar file. An *.sseq file (located in the Sequence folder of the sound_data.sdat file using the NDS Editor) is basically a *.mid file but in a format that can work for the game. Now if you’ve converted a *.sseq file to a *.mid file before, you’ll notice that the *.mid file doesn’t sound anything like the actual song you hear the game; in fact, it sounds a bit basic. That’s because the notes (within a channel) that are being played in the *.sseq/*.mid file tend to be played using an actual sound (like one that is played on a *.wav file). So what file do these channels rely on for such sound? It’s none other than a *.swav file. An *.swav file is basically a *.wav file but in a format that can work for the game. This kind of file can normally be found in a *.swar file which is located in the Wave Archive folder of the sound_data.sdat file using the NDS Editor. A *.swar file is a lot like a *.rar file. It usually carries more than one *.swav file. Hence why you tend to see more than one *.wav file after you’ve extracted all the *.swav data from out of an *.swar file then converted it into a *.wav file using any hacking tool. So now you can picture this *.sseq file relying on a *.swar file for sound. However there’s still one other problem. The *.sseq file is unable to choose which sound from out of the *.swar file to use for each channel. So which file assists the *.sseq file in all this? It’s none other than the *.sbnk file. An *.sbnk file (located in the Bank folder of the sound_data.sdat file using the NDS Editor) basically assists the *.sseq file in choosing which sound from out of the *.swar file it can use for each channel. An *.sbnk file can even assist the *.sseq file to rely on more than one *.swar file (as well as assist an *.sseq channel to rely on more than one *.swav file) for sound and it can even get the *.swar file to play its sound files a certain way. Please refer to the following link for more information on what a *.sseq/*.sbnk/*.swar file is. Now that you know what *.sseq/*.sbnk/*.swar files are, you can now read up on what’s possible to hack. ----------------------------------------------------------------------- A. Switching music data around in NSMB DS ----------------------------------------------------------------------- You might already know how to switch the music around in any level using the NSMB Editor 5. If not, it's as simple as selecting an Area of that level, then click the Edit Level button, click on the Views button on top, then click on the available View on the far left, change the music and save (example here). But how does one go about switching the music around between Bowser Jr. and the Bosses? One way to do it would be through this topic from GBAtemp.net. It’s got simple instructions on how to do it using Hex Workshop and CrystalTile2. Keep in mind however, the topic only goes on about switching the relative addresses of *.sseq files. You would need to repeat this technique for the *.sbnk and *.swar files as well; otherwise expect undesirable results. Now for those of you, who would like to psychically swap the music files around, refer to the next sub-section. ----------------------------------------------------------------------- B. Replacing/Swapping *.sseq/*.sbnk/*.swar files ----------------------------------------------------------------------- Before you continue reading; here’s a list of what I used for this technique: NSMBe5.exe – NSMB Editor 5 Editor.exe – NDS Editor 0.1 VGMTrans.exe – VGM Trans A file dump of the sound_data.sdat file The modified sound_data folder used for the NDS Editor So let’s say you wanted to replace the non-classic flag pole music from NSMB DS with the victory star music from Super Mario 64 DS. Here’s what you have to do: Step 1: Load up SM64DS using VGM Trans. From out of its list of music, click on the one that says “NCS_BGM_CLEAR” (that’s the victory star music). Right at the very bottom left hand corner of VGM Trans, you’ll see a list of files which make up “NCS_BGM_CLEAR”. They are the fallowing: “NCS_BGM_CLEAR.sseq”, “NCS_BANK_BGM_CLEAR.sbnk”, “NCS_WAVE_BGM_RESIDENT.swar”, and “NCS_WAVE_BGM_CLR_CHJO.swar”. You’ll need to extract these files from out of the program which you can do by right-clicking on the listed files using VGM Trans (or the NDS Editor; instructions here); it doesn’t matter if you give them file extensions or not. If you ever find yourself lost and don’t know which music files you’re looking for, use VGM Trans. Step 2: You’ll need from out of the NSMB DS rom all the extracted files that are in the sound_data.sdat file which you can get using the NDS Editor. Bare in mind, you will need to re-organize the files around before compiling it back up; or you can use the modified sound_data folder (get your copy here) which already does all that for you. You can read more about it in the LAST MINUTE INFORMATION section. Step 3: Load up NSMB DS using VGM Trans. From out of the list of music, click on the one that says “BGM_COURSE_CLEAR” (that’s the non-classic flag pole music). Looking to see which files make up “BGM_COURSE_CLEAR”, you see a list of fallowing: “BGM_COURSE_CLEAR.sseq”, “BANK_GOAL_FANFARE_BGM.sbnk”, “WAVE_GOAL_FANFARE_BGM.swar”, and “WAVE_WAKAI_SHARE.swar”. Step 4: Using the modified sound_data folder, locate the files which make up “BGM_COURSE_CLEAR”. They’ll be going by the same names as the names you saw on VGM Trans but with numbers next to them for re-organizing reasons; case in point: “04 BGM_COURSE_CLEAR.sseq”, “08 BANK_GOAL_FANFARE_BGM.sbnk”, “08 WAVE_GOAL_FANFARE_BGM.swar”, and “09 WAVE_WAKAI_SHARE.swar”. Even if you’ve extracted all the files from the sound_data.sdat file yourself, they’ll still be going by the same names as the ones you saw on VGM Trans. Step 5: Now rename the following files you extracted from SM64DS like this: NCS_BGM_CLEAR.sseq – 04 BGM_COURSE_CLEAR NCS_BANK_BGM_CLEAR.sbnk – 08 BANK_GOAL_FANFARE_BGM NCS_WAVE_BGM_RESIDENT.swar – 08 WAVE_GOAL_FANFARE_BGM NCS_WAVE_BGM_CLR_CHJO.swar – 09 WAVE_WAKAI_SHARE Notice that the names of these files going in the order of how it is listed on the very bottom left hand corner of VGM Trans whenever a music track is selected. When switching file names around, make sure to do it in the order how it was listed on VGM Trans; this mainly concerns the *.swar files and not so much the other files. Otherwise expect undesirable results. This would have been a much easier process if it involved one *.swar file; but it’s good to know this in case it does involve more than one *.swar file. Step 6: Replace the original files you located in the sound_data folder with the newly renamed files. Compile all the files in the sound_data folder into a new sound_data.sdat file using the NDS Editor (Tools –> Make Sdat File –> Select a folder –> OK). Step 7: Finally, replace the original sound_data.sdat file that’s in the NSMB DS rom with the one you compiled using NSMB Editor 5. Congratulations, you’ve manage to hacked the music in NSMB DS by replacing the *.sseq/*.sbnk/*.swar files around. Bare in mind, you may run into problems. You can read more about it in the LAST MINUTE INFORMATION section. It's best to test the results on an emulator and not on VGM Trans because unlike an emulator, it can’t tell you if it actually worked or not. ----------------------------------------------------------------------- C. Converting *.mid files and using them for NSMB DS ----------------------------------------------------------------------- Before you continue reading; here’s a list of what I used for this technique: NSMBe5.exe – NSMB Editor 5 Editor.exe – NDS Editor 0.1 Midi2sseq.exe – Conversion Tool VGMTrans.exe – VGM Trans Astudio.exe – Anvil Studio FL.exe – FL Studio 9 Hworks32.exe – Hex Workshop The modified sound_data folder used for the NDS Editor So let’s say you have this midi file “smb3world1-2.mid”, which is the music to World 1-2 in SMB3 and you want to use it in your NSMB DS hack. Here’s what you’d have to do: Step 1: Load up NSMB DS using VGM Trans. Looking through the list of music; pick a music track from out of the game as you’ll be replacing this music track later on with the music to SMB3’s World 1-2 (unfortunately there’s no way to just add it into the game at the moment). Let’s go with “BGM_CHIJOU_CONT” (which is the music to World 1-1 in NSMB DS) as the one that’ll get replaced by the music to SMB3’s World 1-2. Look up the *.sseq file to that music track (it’ll be the first one listed at the very bottom left hand corner) and save it as a *.mid file using VGM Trans as it’ll come in handy in a moment. Step 2: Open up both “smb3world1-2.mid” and “BGM_CHIJOU_CONT.mid” using FL Studio. Take a good look at the instruments for “BGM_CHIJOU_CONT.mid”; each instrument within one or more channels represents the actual sound (or *.swav) being played. In a way, each instrument is like an offset to that particular sound despite the *.sbnk file being the one directing the instruments to those sounds. Obviously you’ll want to instruments in “smb3world1-2.mid” to be the same like “BGM_CHIJOU_CONT.mid”. Should you have any trouble editing any *.mid files using FL Studio, try using Anvil Studio to do it. Once you’ve set all the instruments right for “smb3world1-2.mid”; using just FL Studio only, export the newly edited file to midi. Step 3: Open the newly exported “smb3world1-2.mid” file using Hex Workshop. Look for 0x0000000C (which is the 12th byte); it should look like this "0060". Now change it to "00C0" and save. Open the newly hex edited file using FL Studio. The midi file should sound 2 times as fast, this is what you want. Now export it to midi again; overwriting the old one if you like. Open the more newly exported “smb3world1-2.mid” file using Hex Workshop and look for 0x0000000C once more. This time, change the "0060" to "0030" and save. Now play the midi on any media player, and it should sound normal. Step 4: Place both the newly hex edited “smb3world1-2.mid” file and midi2sseq tool in the same folder area. Start the (DOS) Command Prompt up and head to the folder containing both the *.mid file and tool using the Command Prompt (instructions for this can be found here). Once you’re in the right folder, type in the Command Prompt the fallowing text: midi2sseq smb3world1-2.mid Usually these sorts of conversions are successful. Depending on the *.mid file though, sometimes it doesn’t work at all. This could be due to the file being corrupted. Even then, a lot of the *.mid files on the internet weren’t meant to be used for a NDS game anyways. If the conversion is successful, your newly converted music file “smb3world1-2.sseq” will be located in the same folder that the “smb3world1-2.mid” and midi2sseq tool is in. Step 5: Open the newly converted “smb3world1-2.sseq” file using Hex Workshop. Do a Hex Value search for "FFC0". For every "FFC0" you find, you’ll need to change the "C0" to "C7" and the byte after it to "00". There should only be about as many "FFC0"s as there are channels in the *.sseq file. After you’ve done that, save the newly hex edited file. What you’re doing is fixing a major problem which a lot people have come across when converting *.mid files to *.sseq files. It was fortwaffles (a member of The PokeCommunity) who found out that an important bit of information (which is what you’ve just put in using Hex Workshop) was nonexistent every time a *.mid file was converted into an *.sseq file; you can check out the original link to the post here. Without this bit of information, a newly converted *.sseq wouldn’t play properly on a NDS game. Bare in mind, these particular files still can’t loop. At the time of this discovery, I went on to further hex edit these particular files and tried inserting “94” at the end of each channel (within these *.sseq files). “94” is a Jump command; it makes it so that it jumps to another part of the music track (almost like a loop). It worked however; a channel would get cut out every time the music track looped to the point of it had no sound what so ever. I’ll continue to research on this to see how this can work. Step 6: Recall that a music track in NSMB DS consists of three files; an *.sseq file, a *.sbnk file and a *.swar file. You’ve got the *.sseq file (smb3world1-2.sseq). Seeing as you’ll be replacing “BGM_CHIJOU_CONT.SSEQ” with “smb3world1-2.sseq”, I suggest using the *.sbnk and *.swar file that was being used for “BGM_CHIJOU_CONT” as well; even then, you would of wanted those two files in the first place assuming you want to use the instrumental sounds that were being produced from “BGM_CHIJOU_CONT”. With that in mind, the only file that needs to be replaced from out of the sound_data folder is just the “BGM_CHIJOU_CONT.SSEQ” file. Step 7: Before you continue on, you’ll need from out of the NSMB DS rom all the extracted files that are in the sound_data.sdat file which you can get using the NDS Editor (instructions here). Bare in mind, you will need to re-organize the files around before compiling it back up; or you can use the modified sound_data folder (get your copy here) which already does all that for you. You can read about it in the LAST MINUTE INFORMATION section. Step 8: Using the modified sound_data folder, locate the “BGM_CHIJOU_CONT.SSEQ” file. It’ll go by the same name as the one you saw on VGM Trans but with numbers next to it for re-organizing reasons; case in point: “25 BGM_CHIJOU_CONT”. Even if you’ve extracted all the files that are in the sound_data.sdat file yourself, they’ll still be going by the same names as the names you saw on VGM Trans. Now you’re going to rename your newly hex edited “smb3world1-2.sseq” file like this: smb3world1-2.sseq – 25 BGM_CHIJOU_CONT Replace the original file you located in the sound_data folder with the newly renamed file. Compile all the files in the sound_data folder into a new sound_data.sdat file using the NDS Editor (Tools –> Make Sdat File –> Select a folder –> OK). Step 9: Finally, replace the original sound_data.sdat file that’s in the NSMB DS rom with the one you compiled using NSMB Editor 5. Congratulations, you’ve manage to hacked the music in NSMB DS by converting *.mid files and inserting them into the rom. It's best to test the results on an emulator and not on VGM Trans because unlike an emulator, it can’t tell you if it actually worked or not. Bare in mind, you may run into problems in which case you may need to repeat this process (by either tweaking the instruments in the *.mid file and/or using a completely different *.sbnk & *.swar for the *.mid file) a few times in case the results don't sound right. You can read more about it in the LAST MINUTE INFORMATION section. Let's move on now to the next section. ======================================================= <font size=3>II. SOUND HACKING</font> ======================================================= The sound effects you hear in NSMB DS comes from an *.swav file. Recall in the last section that an *.swav file is basically a *.wav file but in a format that can work for the game. This kind of file can normally be found in a *.swar file which is located in the Wave Archive folder of the sound_data.sdat file using the NDS Editor. A *.swar file is a lot like a *.rar file. It usually carries more than one *.swav file. Hence why you tend to see more than one *.wav file after you’ve extracted all the *.swav data from out of an *.swar file then converted it into a *.wav file using any hacking tool. Please refer to the following link for more information on what a *.swav/*.swar file is. Now that you know what *.swav/*.swar files are, you can now read up on what’s possible to hack. ----------------------------------------------------------------------- A. Replacing/Swapping *.swav files in a *.swar file ----------------------------------------------------------------------- Before you continue reading; here’s a list of what I used for this technique: NSMBe5.exe – NSMB Editor 5 Editor.exe – NDS Editor 0.1 Swav2Swar – Conversion Tools The modified sound_data folder used for the NDS Editor Say you wanted to change the sound Mario makes when shot from out of a warp/pipe canon to the sound Wario makes after being squashed by a Thwomp in Super Mario 64 DS. Here’s what you would have to do: Step 1: Let’s say you already know which files to look for. Case in point, the sound file for Mario’s voice when shot from out of a warp/pipe canon is the “WAVE_MARIO_BASE_SE_000.swav” file (or “WAVE_MARIO_BASE_SE_214.swav” file if extracted using the NDS Editor) which is in the “WAVE_MARIO_BASE_SE.swar” file (located in the “Wave Archive” folder within NSMB DS’ sound_data.sdat file); and the sound file for Wario’s voice after being squashed by a Thwomp is the “NCS_WAVE_SE_VOICE_WARIO_MG_004.swav” file (or “NCS_WAVE_SE_VOICE_WARIO_MG_240.swav” file if extracted using the NDS Editor) which is in the “NCS_WAVE_SE_VOICE_WARIO_MG.swar” file (located in the “Wave Archive” folder within SM64DS’ sound_data.sdat file). Load up both NSMB DS & SM64DS using the NDS Editor. Double-click the two games and locate their sound_data.sdat file. Once you’ve located the two *.sdat files, double-click them both; they’ll then be uploaded onto the NDS Editor. Step 2: Double-click the two newly uploaded *.sdat files and search for the *.swar file you’re after in each *.sdat file. Once you’ve located both the “WAVE_MARIO_BASE_SE.swar” & “NCS_WAVE_SE_VOICE_WARIO_MG.swar” file, you’ll then want to extract the *.swav files from out of the two *.swar files using the NDS Editor. It will then create two new folders in the same folder that the NDS Editor is in; the first folder being “WAVE_MARIO_BASE_SE” and the second folder being “NCS_WAVE_SE_VOICE_WARIO_MG”. Each folder will contain the *.swav file you’re after along with any other *.swav files that were included in the *.swar file they came out of. Now if somehow you’re not entirely sure which *.swar file contains which sound files, the best thing to do is to extract the *.swav files from out of all the *.swar files and as well as an extraction of all the *.swav files converted into *.wav files using the NDS Editor. Obviously if the *.swar file has got an “SE” in its name then you know it’ll contain the main sound effects to the game. As for the others that don’t have an “SE” in its name, those will be the instrumental sounds for the music files. It’s just a matter of playing each and every sound file to see what’s what. Step 3: Start up Swav2Swar. The program is pretty straight forward, you click “Add” and insert as many *.swav files as you like into the program; you then click “Create SWAR” which will then create a new *.swar file containing those selected *.swav files but in the order of which *.swav was inserted first. Seeing as you’ll be creating a new “WAVE_MARIO_BASE_SE.swar” with some modifications, you’ll want to add all the *.swav files it originally had (in numerical order) onto the program except for the one that you want to replace. Looking in through the “WAVE_MARIO_BASE_SE” folder, it’s quite obvious that “WAVE_MARIO_BASE_SE_214.swav” (which also goes by “WAVE_MARIO_BASE_SE_000.swav”) was the first file listed in the original *.swar file. If you’re not sure about it, make a file dump of “WAVE_MARIO_BASE_SE.swar” using the NDS Editor and look it up. With that in mind, you’ll want to add the file that’s replacing “WAVE_MARIO_BASE_SE_214.swav” first. Using Swav2Swar, click “Add” and look for “NCS_WAVE_SE_VOICE_WARIO_MG_240.swav” which will be in the “NCS_WAVE_SE_VOICE_WARIO_MG” folder. After you’ve added the first file in, you’ll then want to add in the rest of the *.swav files which made up the original “WAVE_MARIO_BASE_SE.swar” file. Once you’ve added the rest of the *.swav files in, it should look something like this: 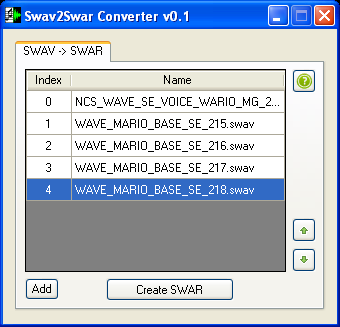 If the files are out of order, use the up/down arrow buttons to move them around. Click “Create SWAR” and name the new file “41 WAVE_MARIO_BASE_SE”; now save the file anywhere you like. It’ll save with the file extension which I suggest to take out just to make things easy for when you go to Step 5. Step 4: Before you continue any further, you’ll need from out of the NSMB DS rom all the extracted files that are in the sound_data.sdat file which you can get using the NDS Editor (instructions here). Bare in mind, you will need to re-organize the files around before compiling it back up; or you can use the modified sound_data folder (get your copy here) which already does all that for you. You can read about it in the LAST MINUTE INFORMATION section. Step 5: Using the modified sound_data folder, locate the “41 WAVE_MARIO_BASE_SE” file (the files are numbered for re-organizing reasons). Once you’ve located the file, you’ll then want to replace that file with the new one you created using Swav2Swar. Compile all the files in the sound_data folder into a new sound_data.sdat file using the NDS Editor (Tools –> Make Sdat File –> Select a folder –> OK). Step 6: Finally, replace the original sound_data.sdat file that’s in the NSMB DS rom with the one you compiled using NSMB Editor 5. Congratulations, you’ve manage to hack the sound in NSMB DS by replacing/swapping *.swav files in a *.swar file. Give your newly hacked NSMB DS rom a test run on an emulator. Though I’ve not run into any problems yet when using this hacking technique; there is a chance you may still run into problems. You can read more about it in the LAST MINUTE INFORMATION section. Try this experiment out the next time you’re replacing *.sseq files with one that’s been converted from a *.mid file or one that came from another game. Instead of using the existing *.swar file that came with the original *.sseq file (before it got replaced); you could use one that’s been customized using Swav2Swar. ----------------------------------------------------------------------- B. Converting *.wav files and using them for NSMB DS ----------------------------------------------------------------------- Before you continue reading; here’s a list of what I used for this technique: NSMBe5.exe – NSMB Editor 5 Editor.exe – NDS Editor 0.1 Wav2swav.exe and swav2swar – Conversion Tools Audacity.exe – Audacity 1.3 Beta The modified sound_data folder used for the NDS Editor So let’s say you have this wave file “sm64_boo.wav”, which is sound Boos make in Super Mario 64 and you want to use it to replace the current sound the Boos make in NSMB DS. Here’s what you’d have to do: Step 1: Place both the “sm64_boo.wav” file and wav2swav tool in the same folder area. Normally it’s pretty straight forward; you drag the *.wav file over to the program, drop it in and the let the program do the rest. Should nothing happen however, its best see what went wrong using the (DOS) Command Prompt. Start the Command Prompt up and head to the folder containing both the *.wav file and tool using the Command Prompt (instructions for this can be found here). Once you’re in the right folder, type in the Command Prompt the fallowing text: wav2swav sm64_boo.wav Usually what tends to be the problem if the conversion was unsuccessful is that *.wav file was not in Mono. If that happens, you will need to set the *.wav file to Mono which you can do using Audacity. Once the conversion is successful, your newly converted sound file “sm64_boo.swav” will be located in the same folder that the “sm64_boo.wav” and wav2swav tool is in. For future reference, you can use wav2swav in conjunction with Swav2Swar if you put the two programs in the same folder. Step 2: Let’s say you already know which file the NSMB DS Boo sound is. Case in point, it’s the “WAVE_ENEMY_06_SE_009.swav” file (or “WAVE_ENEMY_06_SE_239.swav” file if extracted using the NDS Editor) which is in the “WAVE_ENEMY_06_SE.swar” file (located in the “Wave Archive” folder within NSMB DS’ sound_data.sdat file). Load up NSMB DS using the NDS Editor. Double-click the game and locate the sound_data.sdat file. Once you’ve located the *.sdat file, double-click it; it’ll then be uploaded onto the NDS Editor. Step 3: Double-click the newly uploaded *.sdat file and search for the *.swar file you’re after. Once you’ve located the “WAVE_ENEMY_06_SE.swar” file, you’ll then want to extract the *.swav files from out of the *.swar file using the NDS Editor. It will then create a new folder (titled “WAVE_ENEMY_06_SE”) in the same folder that the NDS Editor is in. The new folder will contain the *.swav file you’re after along with any other *.swav files that were included in the *.swar file they came out of. Now if somehow you’re not entirely sure which *.swar file contains which sound files, the best thing to do is to extract the *.swav files from out of all the *.swar files and as well as an extraction of all the *.swav files converted into *.wav files using the NDS Editor. Obviously if the *.swar file has got an “SE” in its name then you know it’ll contain the main sound effects to the game. As for the others that don’t have an “SE” in its name, those will be the instrumental sounds for the music files. It’s just a matter of playing each and every sound file to see what’s what. Step 4: Start up Swav2Swar. The program is pretty straight forward, you click “Add” and insert as many *.swav files as you like into the program; you then click “Create SWAR” which will then create a new *.swar file containing those selected *.swav files but in the order of which *.swav was inserted first. Seeing as you’ll be creating a new “WAVE_ENEMY_06_SE.swar” with some modifications, you’ll want to add all the *.swav files it originally had (in numerical order) onto the program except for the one that you want to replace. Looking in through “WAVE_ENEMY_06_SE” folder, it’s quite obvious that “WAVE_ENEMY_06_SE_239.swav” (which also goes by “WAVE_ENEMY_06_SE_009.swav”) was the last file listed in the original *.swar file. If you’re not sure about it, make a file dump of “WAVE_ENEMY_06_SE.swar” using the NDS Editor and look it up. With that in mind, you’ll want to add the file that’s replacing “WAVE_ENEMY_06_SE_239.swav” last. Using Swav2Swar, click “Add” and look for the “WAVE_ENEMY_06_SE” folder containing all the *.swav files. Add in all the *.swav files which made up the original “WAVE_ENEMY_06_SE.swar” file first. After you’ve added those in, you’ll then want to add the “sm64_boo.swav” file in. Once you’ve done that, it should look something like this: 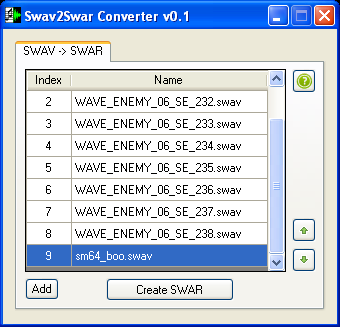 If the files are out of order, use the up/down arrow buttons to move them around. Click “Create SWAR” and name the new file “57 WAVE_ENEMY_06_SE”; now save the file anywhere you like. It’ll save with the file extension which I suggest to take out just to make things easy for when you go to Step 6. Step 5: Before you continue any further, you’ll need from out of the NSMB DS rom all the extracted files that are in the sound_data.sdat file which you can get using the NDS Editor (instructions here). Bare in mind, you will need to re-organize the files around before compiling it back up; or you can use the modified sound_data folder (get your copy here) which already does all that for you. You can read about it in the LAST MINUTE INFORMATION section. Step 6: Using the modified sound_data folder, locate the “57 WAVE_ENEMY_06_SE” file (the files are numbered for re-organizing reasons). Once you’ve located the file, you’ll then want to replace that file with the new one you created using Swav2Swar. Compile all the files in the sound_data folder into a new sound_data.sdat file using the NDS Editor (Tools –> Make Sdat File –> Select a folder –> OK). Step 7: Finally, replace the original sound_data.sdat file that’s in the NSMB DS rom with the one you compiled using NSMB Editor 5. Congratulations, you’ve manage to hack the sound in NSMB DS by converting *.wav files and inserting them into the rom. Give your newly hacked NSMB DS rom a test run on an emulator. Though I’ve not run into any problems yet when using this hacking technique; there is a chance you may still run into problems. You can read more about it in the LAST MINUTE INFORMATION section. ----------------------------------------------------------------------- C. Hacking *.sbnk files in connection with *.swav files ----------------------------------------------------------------------- Before you continue reading; here’s a list of what I used for this technique: NSMBe5.exe – NSMB Editor 5 Editor.exe – NDS Editor 0.1 Swav2Swar – Conversion Tools VGMTrans.exe – VGM Trans Hworks32.exe – Hex Workshop A file dump of whichever *.sbnk file you’re hacking The modified sound_data folder used for the NDS Editor I think the best way to explain this would be to imagine this scenario. You’ve just replace a NSMB DS music track using “NCS_BGM_DOLPIC.SSEQ” which is the Delfino Plaza music that was used in Super Mario 64 DS. For the *.sbnk & *.swar file, you decide to use “BANK_059.SBNK” & “WAVE_059.SWAR” which came from the Delfino Square music track in Mario Kart DS. You play the files altogether and it works however, you’re not very keen on one (or two) of the instrumental sounds that’s being used for one of the channels (case in point, “WAVE_059_005.swav” & “WAVE_059_006.swav”). So you decide to switch them out for one that was used in the Delfino Plaza music on SM64DS (case in point, “NCS_WAVE_BGM_DOLPIC_004.swav”). You then make the necessary modifications for “WAVE_059.SWAR” using Swav2Swar. You play the files altogether once more and it works however, there’s still one other problem. The instrumental sound you decided to use to replace the two older ones isn’t playing correctly. In fact it sounds a bit off; nothing like how it was being played in the Delfino Plaza music on SM64DS. It’s the information on the *.sbnk file that’s causing this to happen. To fix this, you’ll need to copy some specific information from off the “NCS_BANK_BGM_DOLPIC.SBNK” file (which is used for the Delfino Plaza music on SM64DS) and paste it into the right area of the “BANK_059.SBNK” file using a Hex editor. Here’s what you have to do: Step 1: If you don’t have a copy of the “NCS_BANK_BGM_DOLPIC.SBNK” file as well as the “BANK_059.SBNK” file yet, you can get a copy of the two files by going to the “Bank” folder within SM64DS & NSMB DS’ sound_data.sdat file using the NDS Editor. You can also get a copy of the two files using VGM Trans; just load SM64DS & NSMB DS onto the program and search for the two files there. One other thing you’ll need as well is a file dump of “NCS_BANK_BGM_DOLPIC.SBNK” & “BANK_059.SBNK” which you can get using the NDS editor. Step 2: Looking through the “NCS_BANK_BGM_DOLPIC.SBNK” file dump, you see a huge list of offsets. The offsets you’re after will contain information which will direct one of the *.sseq channels to use “NCS_WAVE_BGM_DOLPIC_004.swav” as well as to play it a certain way. So let’s say you’ve located these offsets; you see that it starts at 0x0000026c and ends at 0x00000274. Open the “NCS_BANK_BGM_DOLPIC.SBNK” file up using Hex Workshop and highlight everything starting from 0x0000026c all the way to where it ends at 0x00000274. Then copy all of the highlighted hex data. Step 3: Looking through the “BANK_059.SBNK” file dump, you again see a huge list of offsets. The offsets you’re after this time will contain information which will direct one of the *.sseq channels to use “WAVE_059_005.swav” & “WAVE_059_006.swav” as well as to play them a certain way. So let’s say you’ve located these offsets; you see that it starts at 0x0000027c and ends at 0x00000290. Open the “BANK_059.SBNK” file up using Hex Workshop and highlight everything starting from 0x0000027c all the way to where it ends at 0x00000290. You will then paste over the old highlighted hex data with the one you copied from off of “NCS_BANK_BGM_DOLPIC.SBNK”. Next you’re going want to find (from out of the hex data you just pasted) the bit that says “0400 0100”, change it to “0500 0000” and click save. Once you’ve done that, it should look something like this: 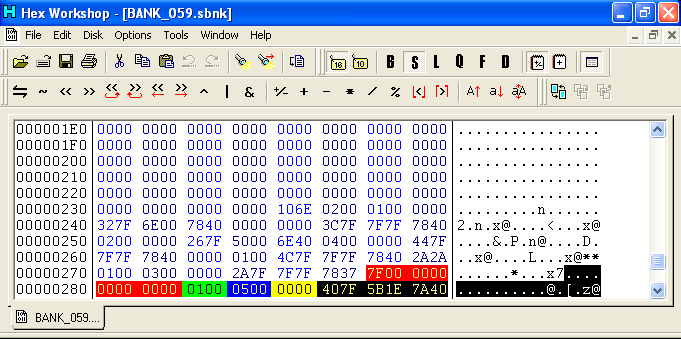 At this time I would like to take a moment to go into detail about what was consisted in the hex data you just pasted (as well as changed) as it’ll give you a better understanding of how certain parts of an *.sbnk file functions. The picture above contains five different colored areas; each one will go on to explain what that particular area represents. Put the five different colored areas altogether and you’ve got yourself a function; this being the very one that directs an *.sseq channel into using a specific *.swav file as well as getting that *.swav file to play a certain way. Areas colored in Red: These are referred to as Regions. Some offsets won’t have this bit of information but if it’s there at the start of the string, then you’ll want to copy it along with the rest of the string of information. Areas colored in Green: If there are no Regions, then this bit of information is always the start of the string. Not much is known about it at the moment other than it’s usually defaulted at “0100”. Areas colored in Blue: This bit of information will choose which *.swav file (depending which *.swar file it’s coming from initially) to use; the number inserted is where in alphabetical/numerical order the *.swav file is located at (case in point, it’s the 6th file). Areas colored in Yellow: This bit of information will choose which *.swar file to use. Now this bit information can get a bit tricky because the number inserted (which can be 0, 1, 2, 3 and so on) is based off two things; which *.swar files are being used and where in alphabetical/numerical order the *.swar file is located at.. My suggestion would be to load NSMB DS onto VGM Trans and look at how certain multiple *.swar files are listed as that’s how this bit of information reads it. Areas colored in Black: Each byte in this bit of information is referred to in this particular order as: Note Number, Attack Rate, Decay Rate, Sustain Rate, Release Rate, and Pan. It basically tells the chosen *.swar file to play a certain way. So let’s say you made a file dump of the newly hex edited “BANK_059.SBNK” file and you scrolled down to the offsets you’ve just edited; this is what you’d be looking at. 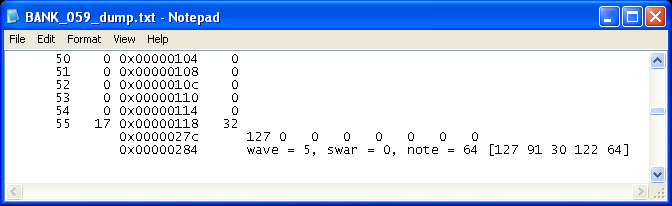 My suggestion would be to compare this picture to the one above it. Being able to read file dumps like these will make it easier to locate a certain offsets as well as knowing what the offsets consists of. At any rate, this is what you want to be looking for if you’re going to be hacking *.sbnk files in order to change the way a sound file is played. Step 4: So now that you’ve got a general understanding of how certain parts of an *.sbnk file function, the only thing left to do now would to be go through the usual procedures of compiling all the files together; replacing the old *.sbnk file with the newly hex edited “BANK_059.SBNK” file, compiling all the files that are in the sound_data folder into a new sound_data.sdat file using the NDS Editor and replacing the original sound_data.sdat file that’s in the NSMB DS rom with the one you’ve compiled using NSMB Editor 5. Congratulations, you’ve manage to hack the sound in NSMB DS by hacking the *.sbnk files in connection with *.swav files. Give your newly hacked NSMB DS rom a test run on an emulator. Though I’ve not run into any problems yet when using this hacking technique; there is a chance you may still run into problems. You can read more about it in the LAST MINUTE INFORMATION section. ======================================================= <font size=3>III. LAST MINUTE INFORMATION</font> ======================================================= I would like to conclude this guide with some last minute information relating to a lot of the stuff this guide has covered. ----------------------------------------------------------------------- A. The modified sound_data folder and its use for the NDS Editor ----------------------------------------------------------------------- When I first started using the NDS Editor to hack NSMB DS, I kept running into a problem where the sound and music would completely mess up every time I replaced the games original sound_data.sdat file with one that I compiled; even when no changes were ever made to the compiled file. What had happen is the program would compile a new sound_data.sdat file, putting each of the file formats (*.sseq/*.ssar/*.sbnk/*.ssar/*.bin) back into their designated folder but in alphabetical order instead of in the listed order they were in originally. The files would then be renamed to reflect the listed order they were in originally even though the name doesn’t match the actual file; this can be seen when browsing through content of the sound_data.sdat file using the NDS Editor. So I started re-arranging all the files in the sound_data folder; renaming them (you can do this with/without the file extension) so that everything would go in the order it was supposed to be in once compiled and it worked. For those of you who don’t want to go through the hassle of making your own sound_data folder, I’ve provided a copy of this modified sound_data folder so that you can compile your own *.sdat file with ease. Get your copy of the modified sound_data folder here. Also included with the modified folder are a copy of this document, and a file dump of the original sound_data.sdat file for locating certain sounds and music. If you would like to see an example some of these hacking techniques in action, check out my current project here; it’s a NSMB DS rom hack which includes a variety of different music & sounds that weren’t originally in the game using the hacking techniques shown here. ----------------------------------------------------------------------- B. Be prepared for a lot of trial and error when hacking sound & music ----------------------------------------------------------------------- Unfortunately you may run into some problems when replacing the games original music with music from another NDS game or from a *.mid file; you may even run into some problems when replacing the games original sound files with sound files from another NDS game or from a *.wav file. Some of these problems include the game having sound but some to no music, having music but some to no sound, having some sound but no music, having some music but no sound, or having some to no sound/music. Why this happens might have something to do with the information on those files which is confusing the game or the fact that it’s due to memory limitations (in other words, the game can only play so many sounds at a time). I’m learning a lot from these scenarios and will continue to learn more as time goes on. One other thing you should be aware of is that some of the music in NSMB DS uses the same *.swar file. Even some of the sounds in NSMB DS uses the same *.swav file. Should you go on to replace a *.swar file that’s being used by one or more music tracks, hopefully you have a way of getting around it without messing up either music track. Same goes for should you go on to replace an *.swav file that’s being used for multiple sounds, hopefully you have a way of getting around it without messing up the rest of the sounds. It’s a lot of trial and error when hacking the sound & music to NSMB DS. ----------------------------------------------------------------------- C. Some brief information on the symb.bin, info.bin, *.ssar, and *.strm file ----------------------------------------------------------------------- I won’t go into too much detail on some of the information in this sub-section; it’ll be brief enough to give you an idea at least. An *.ssar file is a lot like a *.swar file but instead of there being a collection of *.swav files, it’s got a collection of *.sseq files. Unfortunately there aren’t any tools out which can extract such *.sseq files from out of a *.ssar file yet. At the very least you can swap the *.sseq data around in a *.ssar using a Hex editor and a file dump of the *.ssar file. A *.strm file is basically an individual wave file. There aren’t any *.strm files that I know of in NSMB DS but you can find them in other NDS games. A symb.bin file basically carries the names of each and every file within the *.sdat file while the info.bin file carries the information of each and every file within the *.sdat file. Please refer to the following link for more information on what a symb.bin, info.bin, *.ssar and *.strm file is. Try this experiment out sometime. Replace either the symb.bin or info.bin file with one from another NDS game. Compile it with all the necessary files into an *.sdat file using the NDS Editor (instructions here). You'll then replace the original sound_data.sdat file with the one you compiled using NSMB Editor 5. Finally using the NDS Editor, open up your newly hacked NSMB DS rom and make a file dump of its sound_data.sdat file to see the difference between that file dump and one that came from the original sound_data.sdat file. My advice is to try these things out. Get a feel for how these hacking tools and techniques work. Experiment on some things; you might discover something that no one else yet has. Once you do enough of it, you’ll get the hang of it. It may not even take as much time to do this sort of hacking once it gets easier. Most importantly, don’t try to frustrate yourself when doing this sort of hacking. Enjoy it; no matter how you go about it. ======================================================= <font size=3>ACKNOWLEDGEMENT</font> ======================================================= In no particular order, I would to thank the following people: Treeki – Author of NSMB Editor 5, Nitro Explorer 2 and NARC Explorer 2 Dirbaio – Co-Author and now leading developer of NSMB Editor 5 kiwi.ds – Author of the Nitro Composer File (*.sdat) Specification, NDS editor, sseq2midi.exe, and midi2sseq.exe Crystal – Author of CrystalTile2.exe loveemu – Author of sseq2mid.exe, swave2wave.exe, wav2swav.exe and strm2wave.exe Borra – Author of swav2swar.exe Nintendon – Author of ndssndext.exe DJ Bouche – Author of sdattool.exe VGMTrans – Author of VGMTrans.exe Willow Software – Author of Anvil Studio Image-Line Software – Author of FL Studio 9 Audacity Team – Author of Audacity BreakPoint Software, Inc. – Author of Hex Workshop FAST6191 – Techromancer and Magazine Staff Member of GBAtemp.net fortwaffles – Member of The PokeCommunity Garmichael – Member of Jul And to everyone who made this possible. Thank you! |
|
|
Posted on 06-08-11, 04:52 pm in This is the beginning
|
|
Super Mario ( ͡° ͜ʖ ͡°) Karma: 10212 Posts: 2/4459 Since: 06-08-11 |

|
|
|
Posted on 05-02-18, 10:40 pm in Nintendo DS dev hardware! IS-NITRO-EMULATOR & co. (rev. 3 by
|
|
Super Mario ( ͡° ͜ʖ ͡°) Karma: 10212 Posts: 4407/4459 Since: 06-08-11 |
I recently came across an auction from a bankrupt Spanish video game development company. They had tons of cool rare development hardware, among it Nintendo DS development ones! Of course I had to get some
I've been playing with them, trying to get them working and do useful stuff. I thought I should document publicly what they do, instead of just shelving them away as collectibles like most people seem to do. It's really cool because they have very interesting ROM hacking applications Rewritable flash cards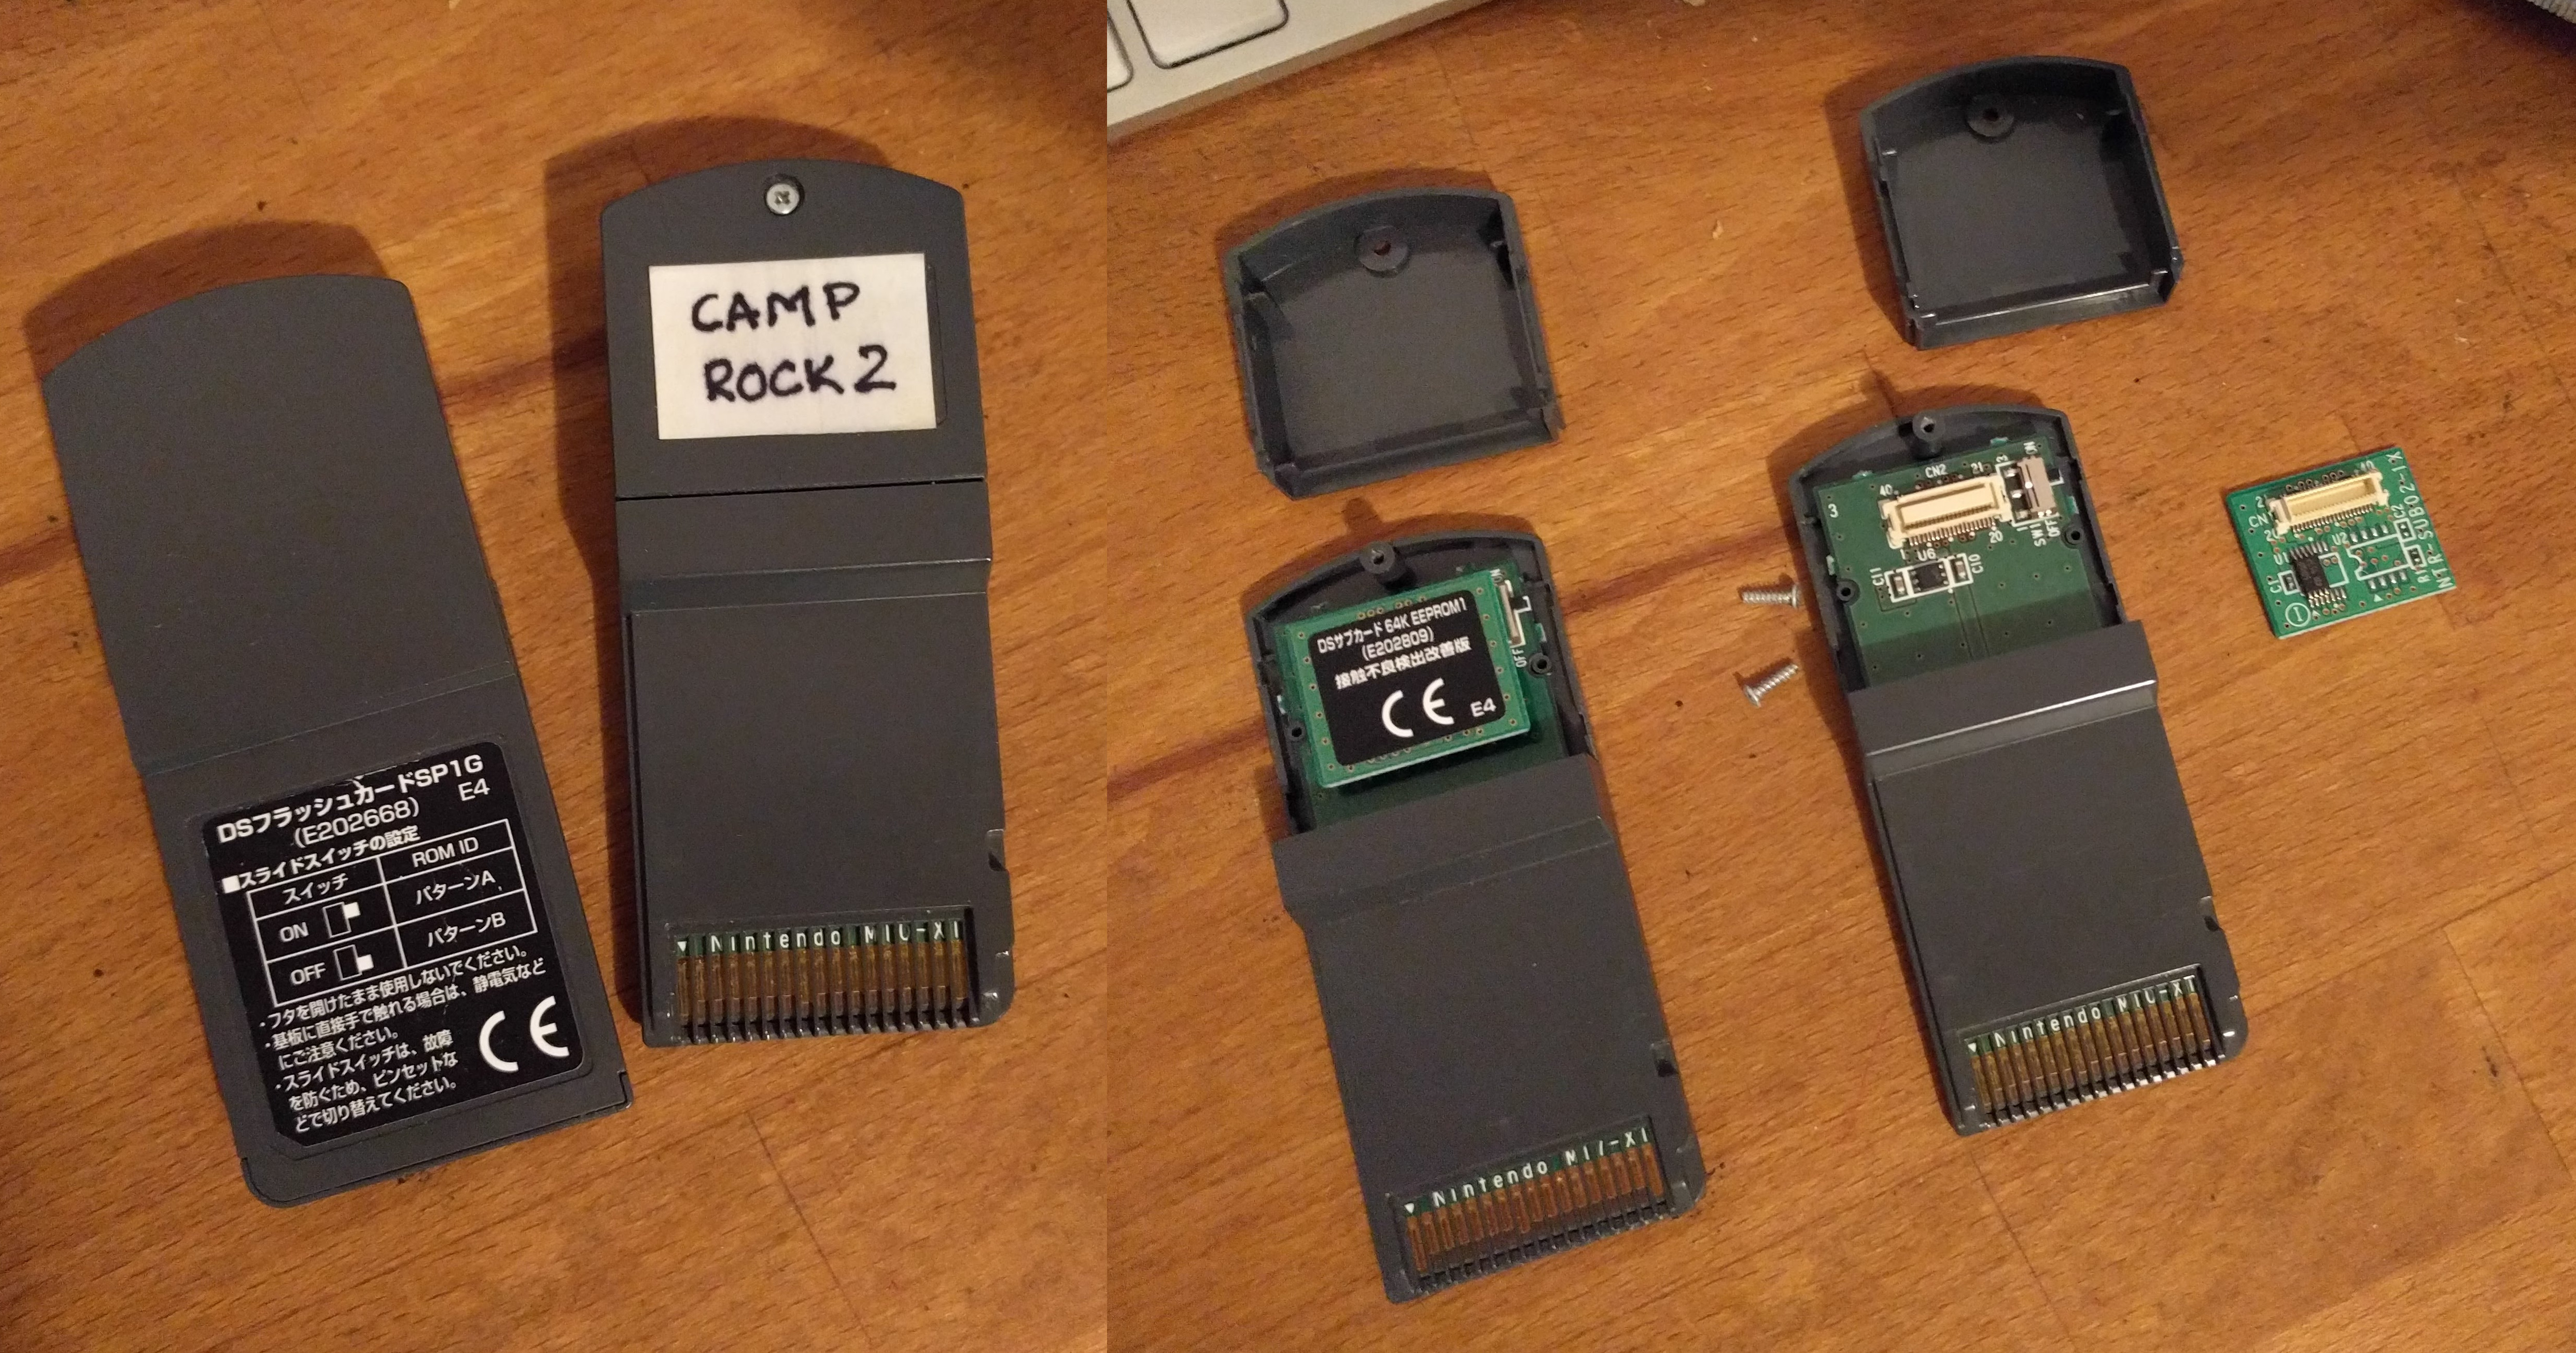 These act like regular Nintendo DS game cards, except they can have ROMs written and rewritten to them, using the IS-NITRO-EMULATOR or the IS-NITRO-WRITER. If you open the top half, they have a "sub-card" inside, which is the backup memory (for saved game data). They're swappable because there are several types and sizes of backup memory (EEPROM and Flash), and the game developers needed to test with cards with the right type of backup memory. The main cards and the sub cards were sold to devs separately so they could choose the backup memory type and swap it themselves. Having the right sub card is important if you want to run a commercial ROM that needs a particular backup memory type and size. IS-NITRO-EMULATORThis is the "main" Nintendo DS development kit. Devs used this to test and debug their games. You can boot a ROM in it and then debug it, put breakpoints in the ASM code, view and edit the RAM, etc. The name "EMULATOR" comes from the fact it emulates the DS game card: it has extra hardware that makes the NDS CPU believe it's reading stuff from a game card, but it's in fact reading from some special RAM inside it that can be written to using its PC software. Interestingly the backup memory is passed through to the real card plugged in to the SLOT-1. This is probably because the entire gamecard SPI bus is passed through, probably so devs can use real cards that have extra fancy hardware in the SPI bus like some games do. 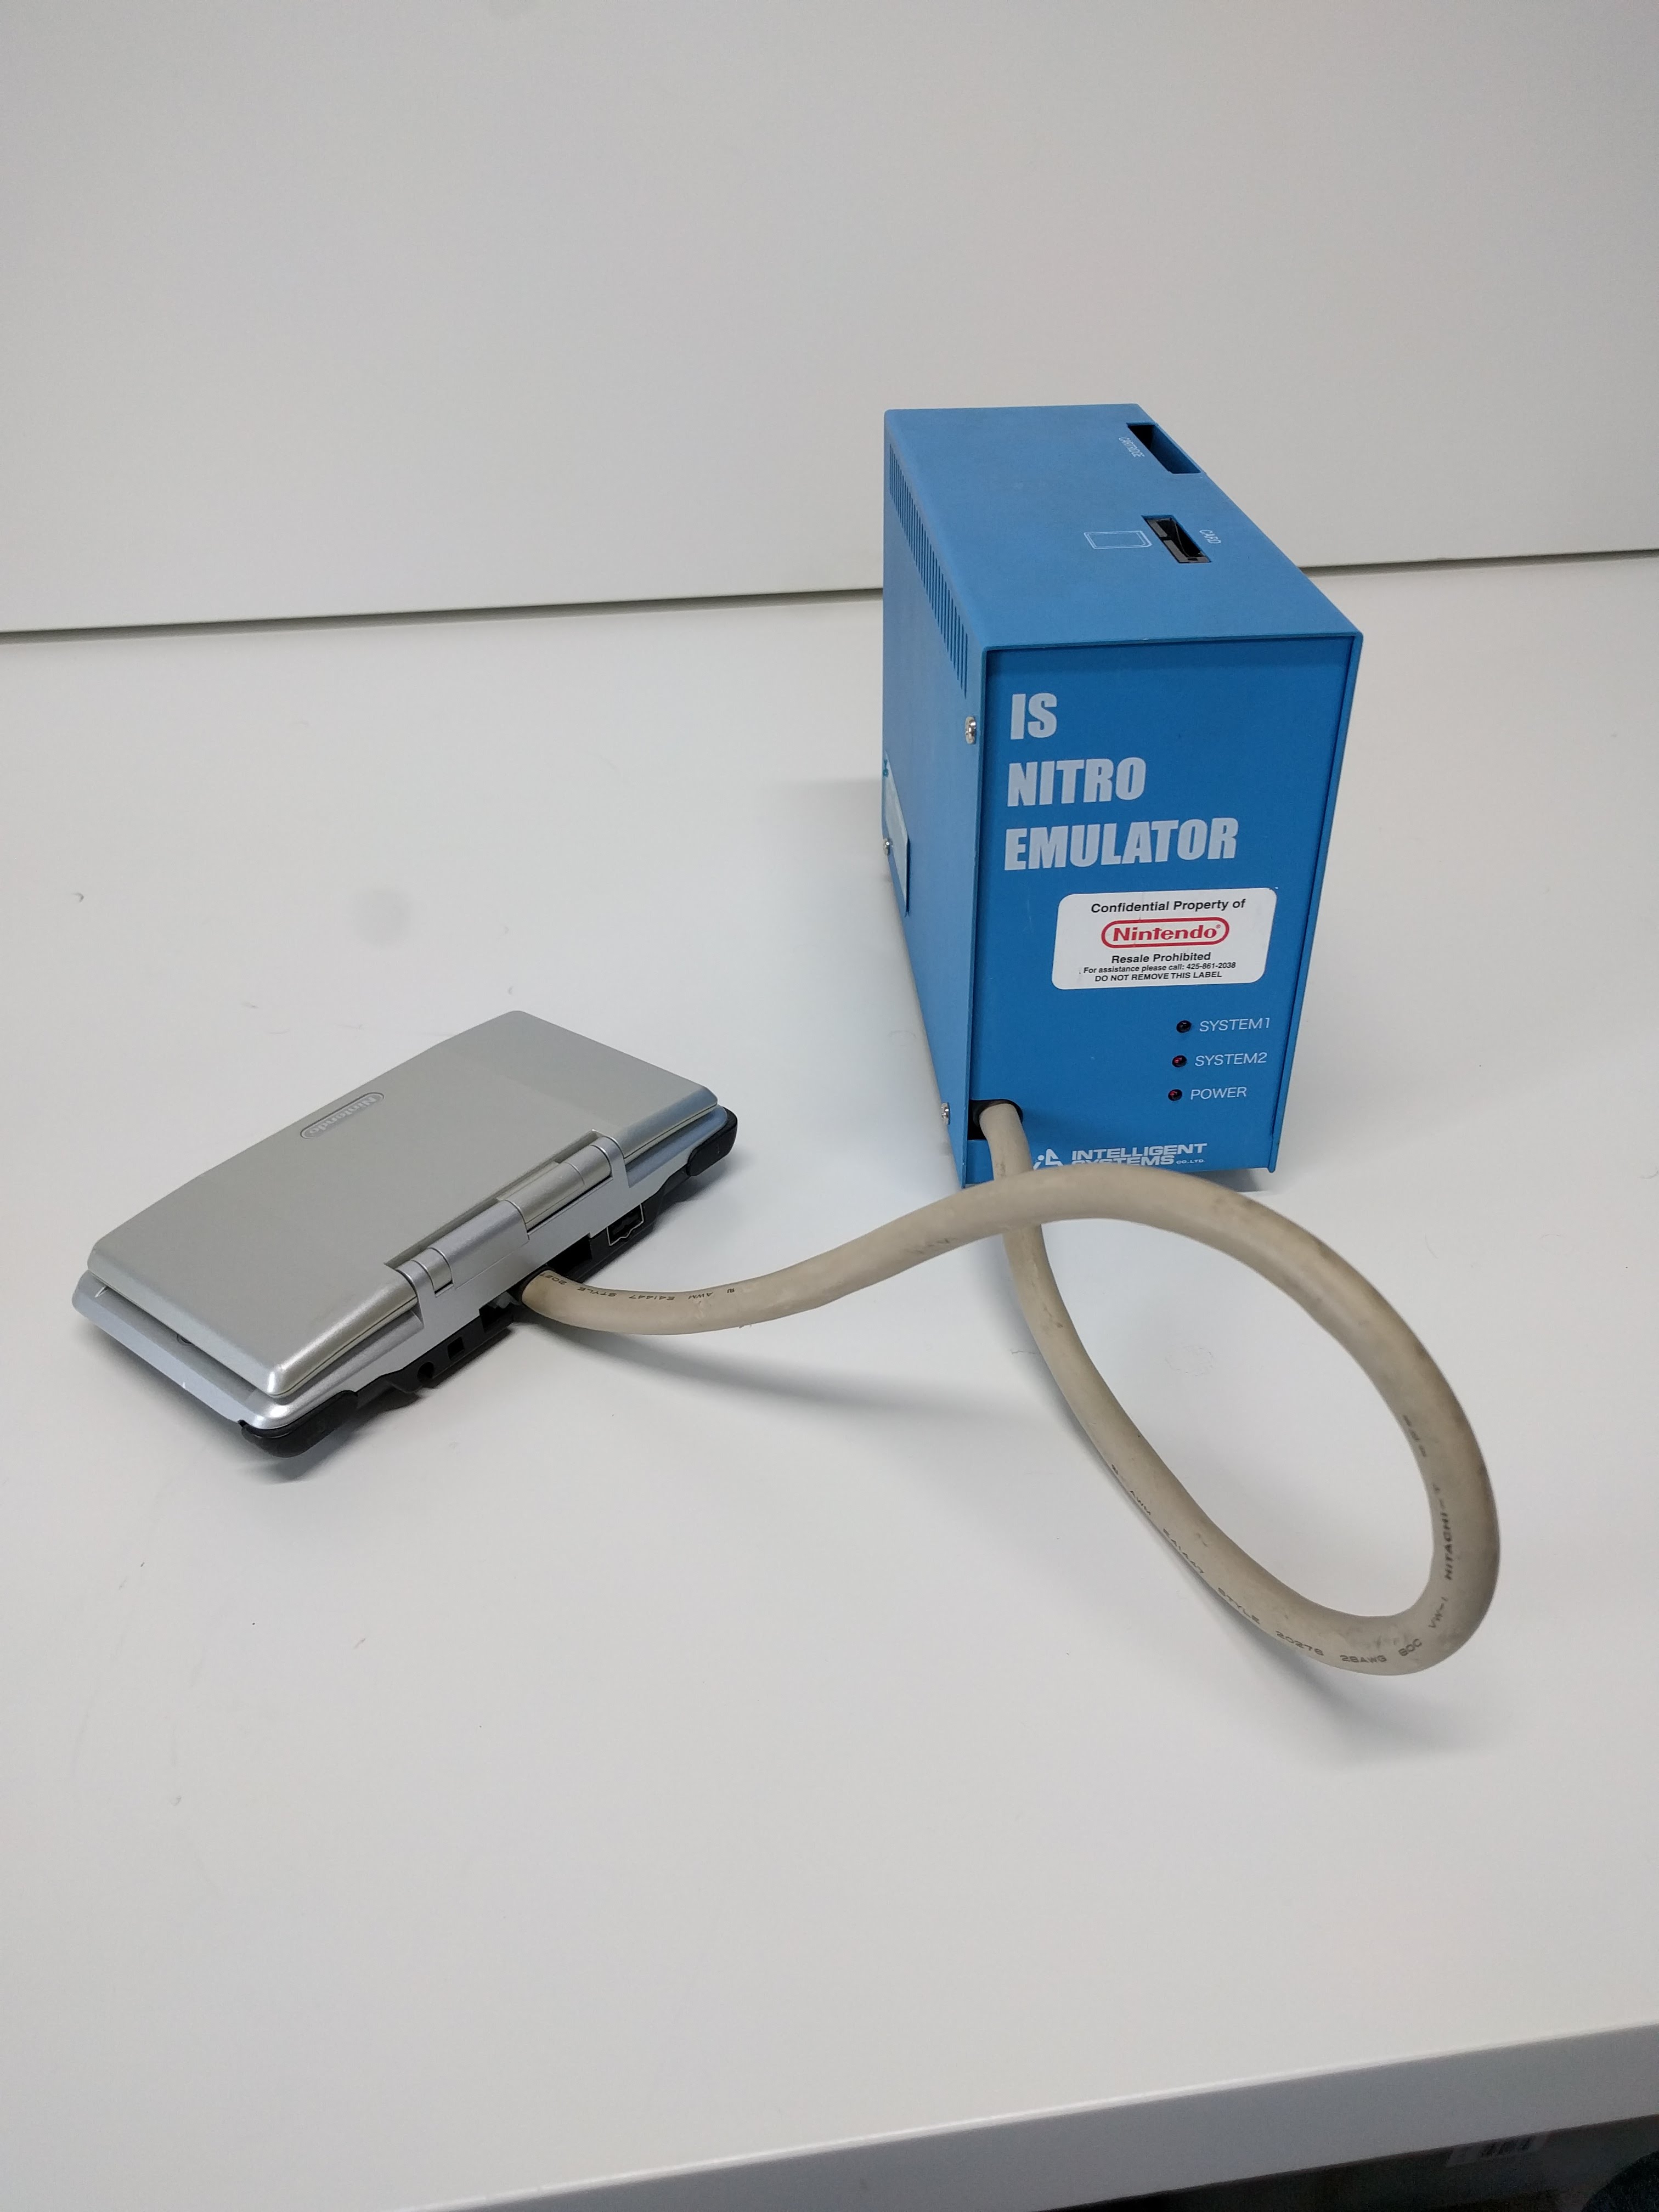  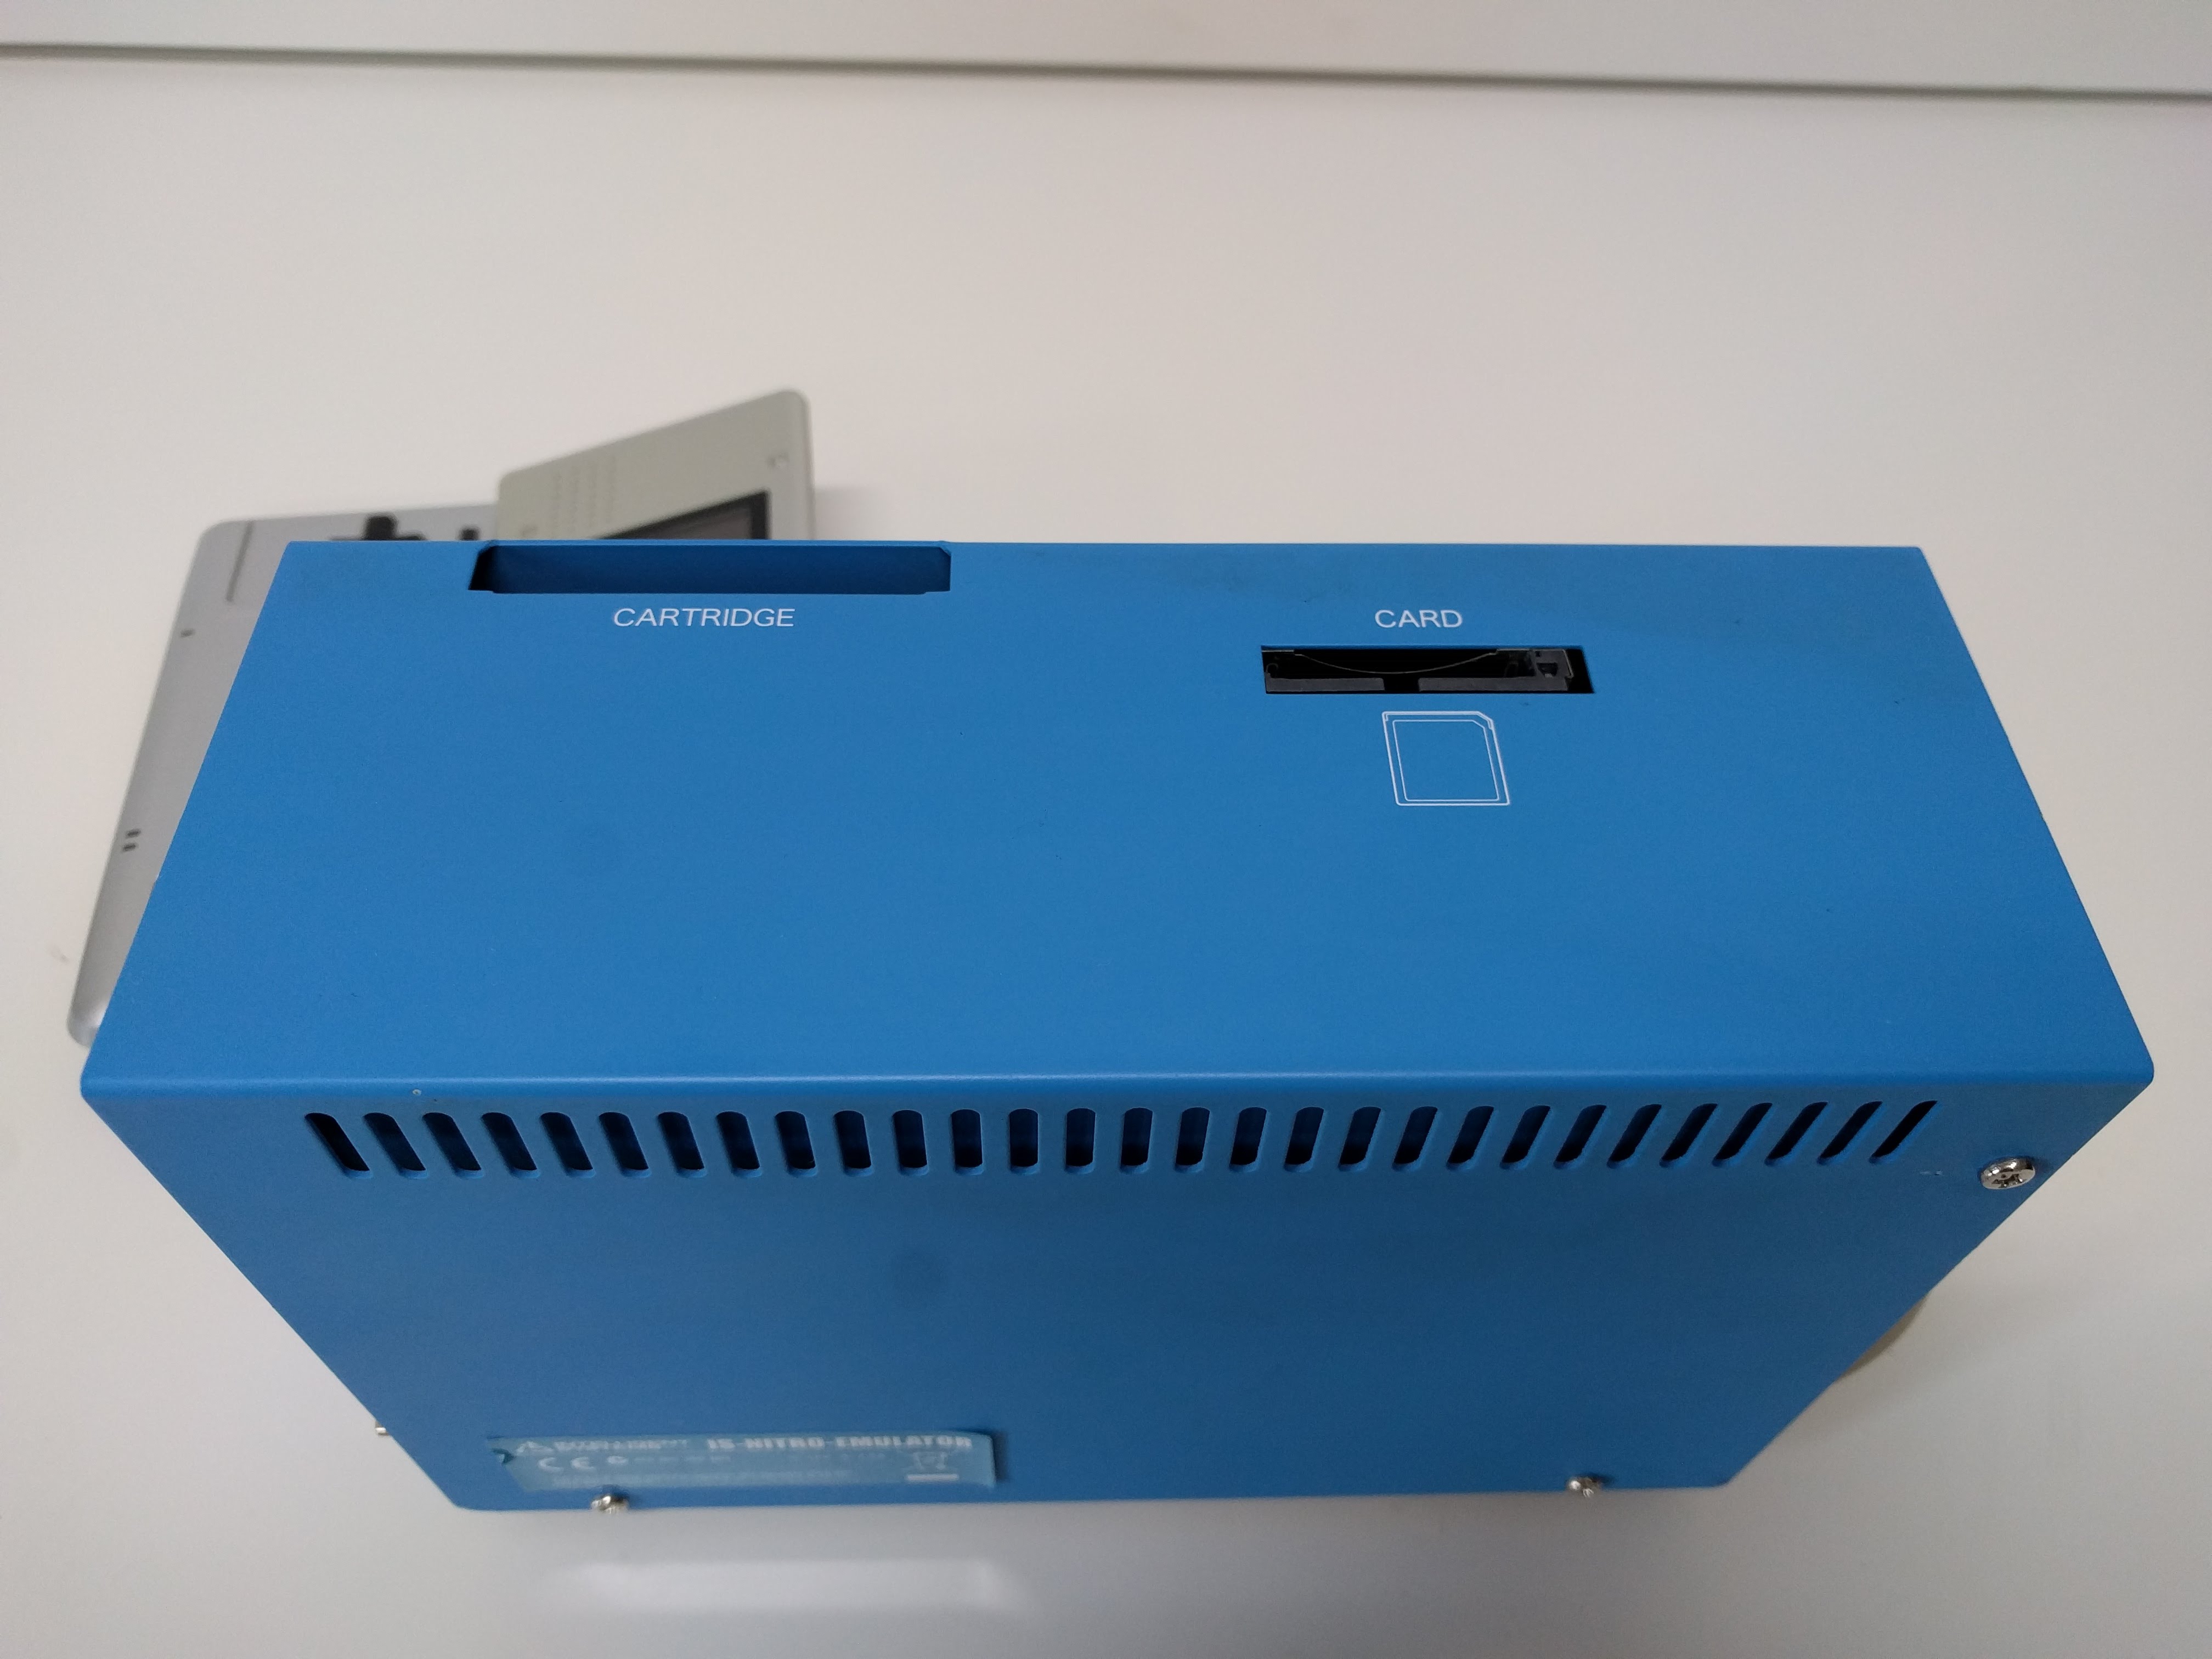 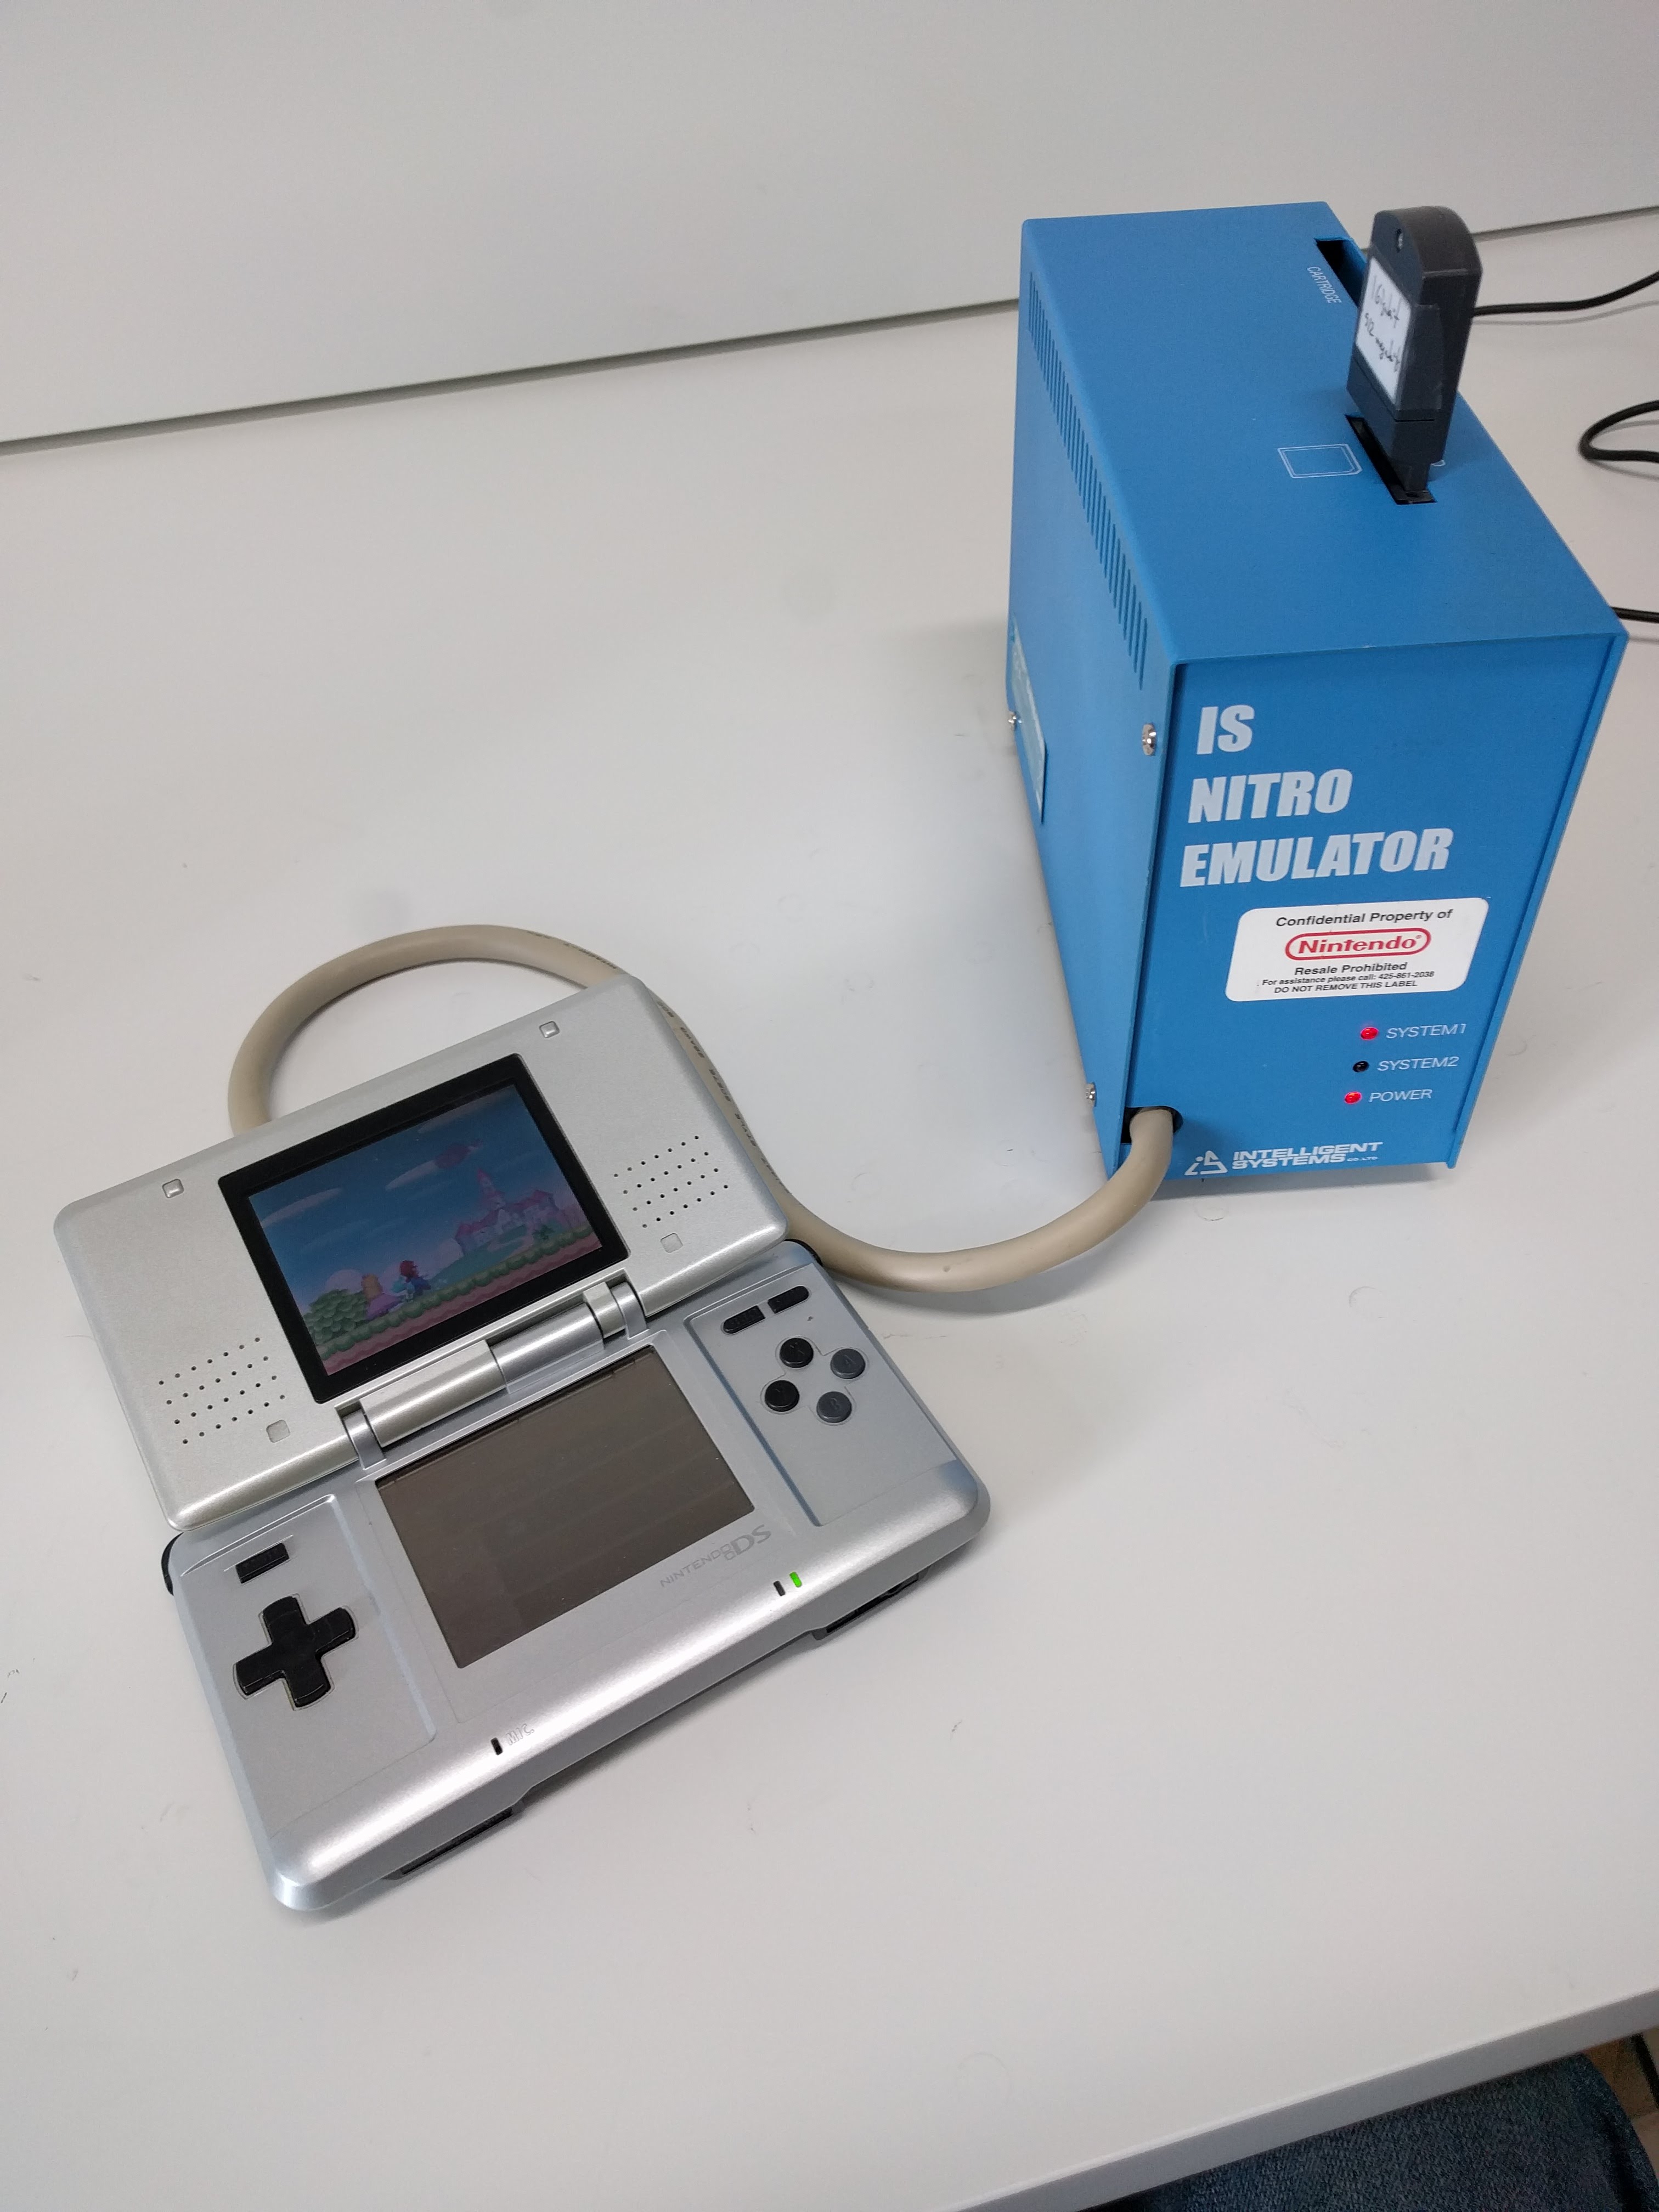 Overview of the thing. Front panel has 3 LEDs: "SYSTEM1", "SYSTEM2" and "POWER". A cable comes out of it to a regular-looking DS, except its SLOT-1 and SLOT-2 are unusable (SLOT1 has the cable, SLOT2 is glued shut). - SYSTEM1: Indicates SLOT-1 is on - SYSTEM2: Indicates SLOT-2 is on - POWER: Power, duh. The top has the SLOT-1 and SLOT-2. Back panel has: - Power switch - Power input (12V DC, it uses the same power connector and adapter as the GameCube) - DIP switches - USB - 2 video outs (same video connector as GameCube). They only work if the IS-NITRO-EMULATOR has the "Video" option. - "Wireless" wired ethernet jack. You can connect two IS-NITRO-EMULATORs with an ethernet cable to simulate wifi connectivity between them. IS-NITRO-EMULATORs that have the Wireless option can use real wifi, and toggle between them with a DIP switch. The "wired wireless" is interesting, and is a recurring theme in Nintendo devkits. I guess it's to prevent interference/saturation if you have 100 developers in a single office with 100 of these, all using wifi at the same time to test their games. Wii and WiiU devkits also have wired coaxial cables between the devkit and the remotes, for example. Options  Devs could buy these with different optional features, at different prices. They have a sticker on the bottom with the purchased options. - "USG": attached controller is DS lite, not old DS "phat". - Video: Allows using video out - Wireless: Can use real wireless and not "wired wireless". The ones that have this have this black flat protrusion at the top, which contains the wifi antenna (If it was inside the blue box it wouldn't work due to it working as a Faraday cage) DIP switches There are 8 DIP switches at the back. This is what they do:
Power on 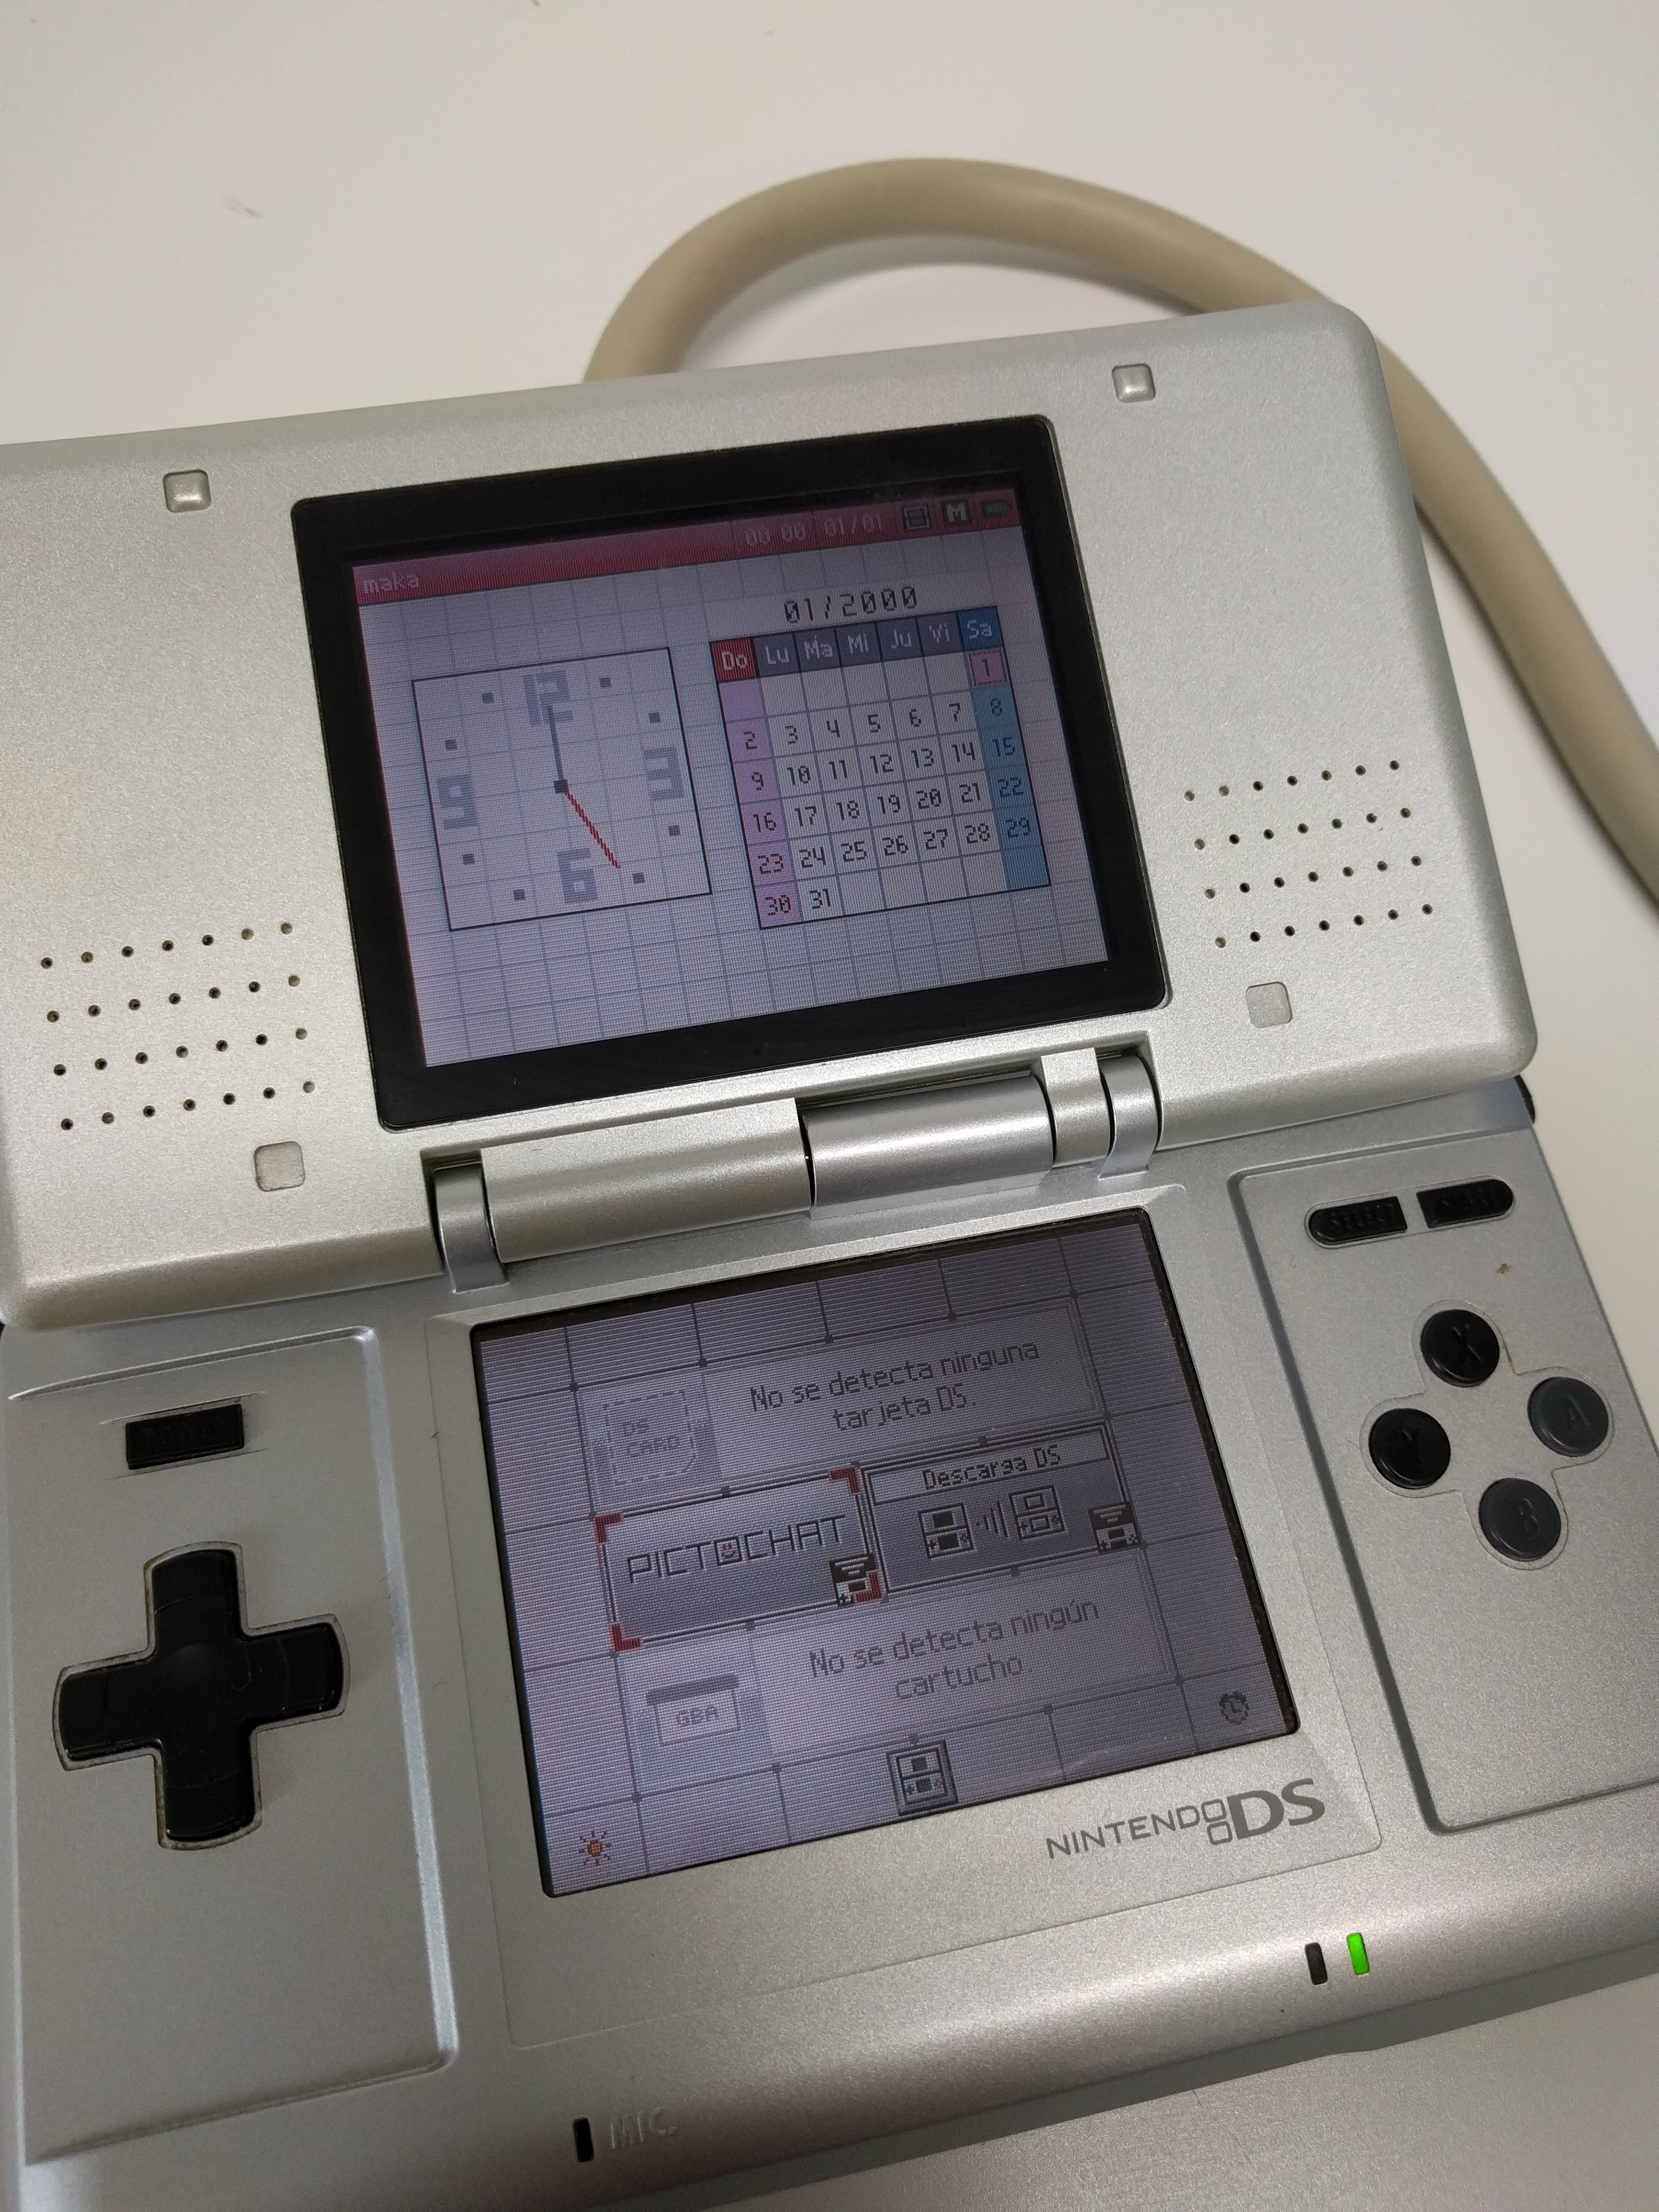 Plug it in, power it on. It boots to the regular DS firmware menu like a regular DS. You can pictochat and Download Play and all. Putting a game card in doesn't work (firmware still shows "no DS card inserted"). This is because it doesn't read from the real plugged in game card, but from the emulated one. You need the PC software to write a ROM to the emulated game card and actually run something in it. Installing the software on Windows 10 Since it's copyrighted, same rules apply as posting ROMs, so I won't post a link. But finding it is easy if you know how to google . It's tricky to get working on Windows 10 because it needs a special driver that's not digitally signed. You have to disable "driver signature enforcement" this way: - Click the Start Start menu and select Settings. - Click Update and Security. - Click on Recovery. - Click Restart now under Advanced Startup. - Click Troubleshoot. - Click Advanced options. - Click Startup Settings. - Click on Restart. - On the Startup Settings screen press 7 or F7 to disable driver signature enforcement. Once this is done, you're ready to install and use the software: - Right-click installer exe, go to Properties - Compatibility - Run in Windows XP compatibility mode - Run the installer - Follow instructions. You'll get prompted two times to install drivers, you have to click "Install anyway". - Done! This is how the PC software looks like. This is when hitting a breakpoint and doing some single stepping. Can you recognize what code is this??  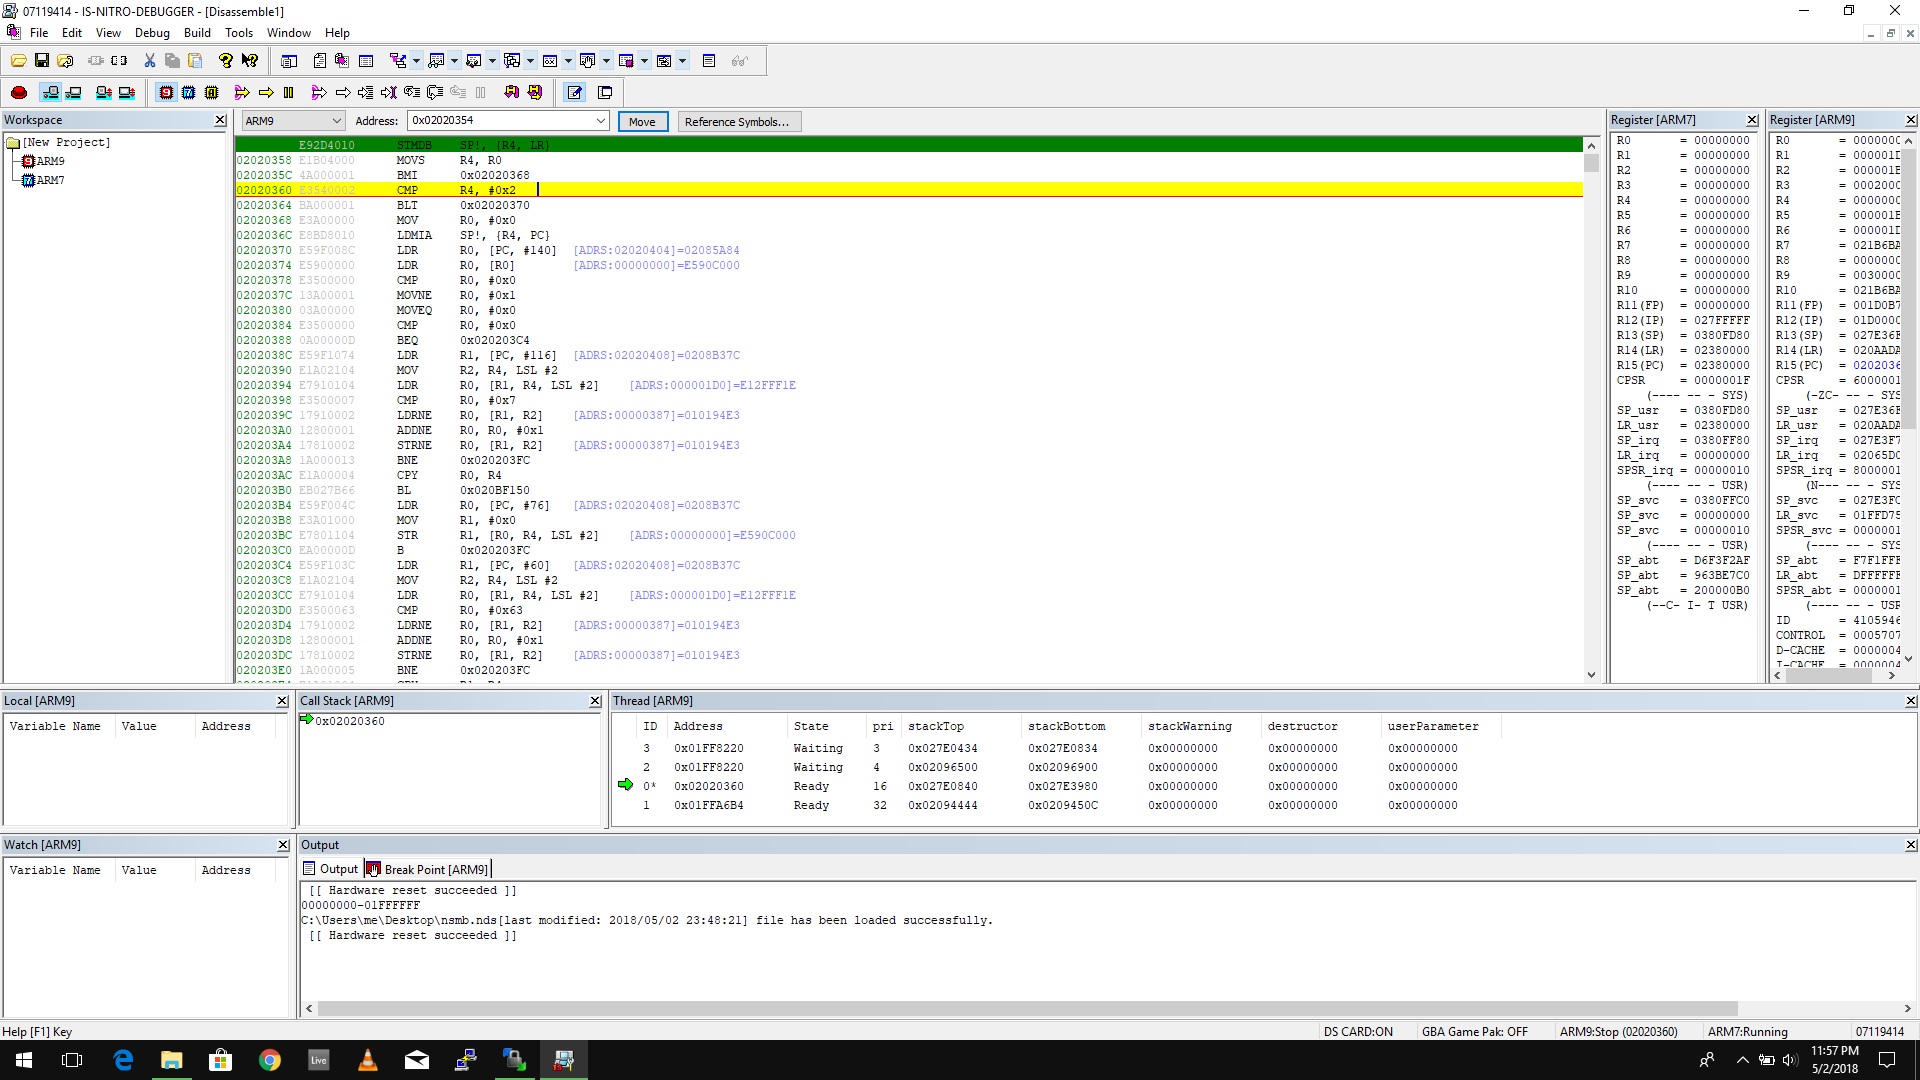 Running a ROM Commercial ROMs have to be encrypted for this to work! Pretty much all ROM you'll find out there are already decrypted for you, so you need to encrypt them back. The best way to do this is with ndstool from devkitPro. ("endrypts advanced", the other tool around for this, seems to work okay for running ROMs but not for writing them to dev cards, so I recommend you use ndstool.) Open a terminal, then run: ndstool -se my_rom_file.ndsHomebrew ROMs don't care if they're encrypted or not because they don't use the ARM9 binary at 0x02000000 - 0x02000800, which is the region affected by encryption. 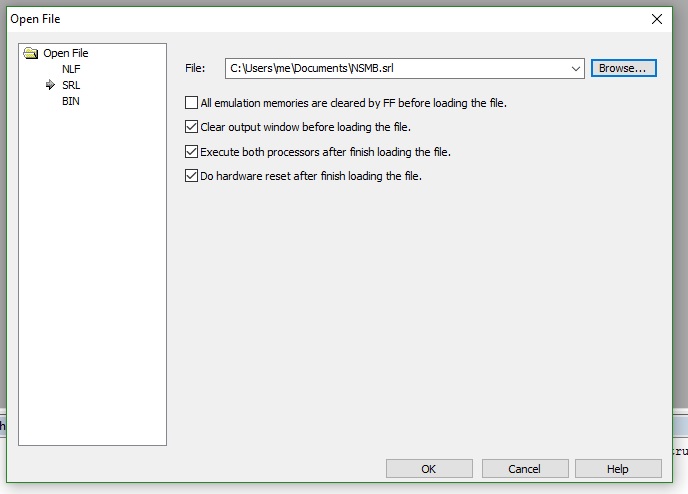 - Go to File -> Load file - Select "SRL" in the left list - Select the .nds ROM file (you have to select "All Files", alternatively rename your ROM to *.srl) - Check "Execute both processors" and "Do hardware reset" - Go! If your ROM requires backup hardware (game save info), you will need to insert a dev card with the right type of save memory (EEPROM vs flash, and right size). From the PC software you can then click the toolbar button "Turning the power on/off of the DS card slot", which will turn on SLOT-1. "SYSTEM1" LED should turn on to indicate SLOT-1 is on. Writing a ROM to a dev flash cards  You can write a ROM in a dev flash card, which then works in regular DSs like a real Nintendo DS commercial game! You can write your ROM hack to it, for example! This is the closest you can get to having your ROM hack in real DS game cards. - Insert a dev flash card in SLOT1. - Run the ROM (see above) - Go to Tools -> DS Flash Card - Click Identify, then Start. - Wait a loooooooong time - Check and pray the card works on a regular DS. Getting this to work is fiddly, I'm still figuring out what works and what doesn't. Sometimes changing the game code to "NTRJ" makes it work, especially for homebrew that has "####" as game code, which the DS firmware doesn't seem to like. If you edit the ROM header don't forget to fix the header CRC. You can do so with "ndstool -f". ==================== Coming soon: Teardown, open source Python driver to load ROMs, and more nice hardware! |
|
|
Posted on 08-10-12, 04:15 pm in HEY! YOU! What are you doing in the trash!? (Take Two)
|
|
Super Mario ( ͡° ͜ʖ ͡°) Karma: 10212 Posts: 2191/4459 Since: 06-08-11 |
Yes, this is where your threads go if they're bad threads.
|
|
|
Posted on 10-30-16, 03:39 am in NSMBHD is NOT moving
|
|
Super Mario ( ͡° ͜ʖ ͡°) Karma: 10212 Posts: 4329/4459 Since: 06-08-11 |
Yeah, as StapleButter says, no need to worry guys.
I'm still here. And I do care about this place. The reason I haven't been active lately, for those that don't know, is that I've started a startup, called Verse, and it's taking way too much time of my life. Let me assure you I still care about this place, and I won't let it go down. Firstly, I definitely have enough money to pay the $20/month for digitalocean plus the $10/year for the domain. (And I also use this server for other things). Second, when I started this, I promised myself that I'd keep this up for as long as needed, and it's still here alive and well I really think that moving is not the best way forward. It will fragment the community, as we've seen in the past for some other ROM hacking communities. In contrast, NSMBHD has been *The* place to talk NSMB hacking since we split from Jul back in 2011, 5 years ago. I promise I'll be more active and I'll try to take more care of the board on the technical side too, for example the uploader stuff, and some other small issues. I will post a more formal announcement soon of the things to come So, long live NSMBHD! 
|
|
|
Posted on 07-10-13, 03:53 pm in NEW RULE: NO MORE 'IS IT POSSIBLE' THREADS.
|
|
Super Mario ( ͡° ͜ʖ ͡°) Karma: 10212 Posts: 3508/4459 Since: 06-08-11 |
Basically when you do ASM hacking you're modifying the game's program code. So ANYTHING is possible. (Unless its a hardware limitation.)
So don't ask if X thing is possible, it probably is. Don't ask for people to do it for you either: it's a lot of work and none will do it. So if you really want X thing, go learn ASM hacking and do it. We will help you learn and we'll help you in your goal, as long as its you who's doing it. |
|
|
Posted on 01-07-12, 01:29 am in How to import and export patches! (rev. 4 by
|
|
Super Mario ( ͡° ͜ʖ ͡°) Karma: 10212 Posts: 1392/4459 Since: 06-08-11 |
A patch is basically a file that basically contains only what you have changed to the ROM, and not the original ROM files.
Why is it legal to post a patch and not a ROM? Because a ROM, even if it's edited, contains nearly the majority of the data of the original game. Since it's copyrighted by Nintendo, that data can't be distributed. It'd be piracy. A patch only contains the edited levels and tilesets, which are made by you, so you're free to post a patch. So, how does this work? To share your hack, you create a patch file and upload it. If other people want to try out your hack, they have to get an original NSMB ROM and your patch file. They then apply the patch to their clean ROM, and they get as a result a ROM with your hack in it, which they can now play.
How can I export (create) a NSMBe Patch? - Open your edited ROM in NSMB Editor. - Go to Tools -> Export Patch - Select an ORIGINAL (unedited) NSMB ROM file when you're asked to. - The editor will now compare the two ROM's and then it'll write a patch file containing only the modified files. You're free to upload and share the created patch file here!
How can I import (apply) a NSMBe Patch? Easy. - Open an ORIGINAL (unedited) ROM in the editor. - Go to Tools -> Import patch - Select the .nmp file. - Then close the editor and play! The ROM you use should be the same region as the one the patch creator used. The author of the hack should have said it in his thread somewhere. USA (U) ROM region is the most commonly hacked. XDelta patches The NMP patch format is still not complete (hehe) and it doesn't export edits made in overlay files and in arm9.bin/arm7.bin and other "special" files. If you haven't edited these you shouldn't worry. If you do, you'll have to use XDelta patches. Go here for the Xdelta tutorial |
|
|
Posted on 08-06-12, 09:18 pm in Board changelog
|
|
Super Mario ( ͡° ͜ʖ ͡°) Karma: 10212 Posts: 2102/4459 Since: 06-08-11 |
New cool feature: Post +1's!
You can +1 posts by clicking the link on the left Obviously you can't +1 your own posts, and you can't +1 twice. Also the total number of +1's you've given and received is shown on your profile
|
|
|
Posted on 01-05-12, 06:50 pm in RULES FOR POSTING A HACK -- READ THIS BEFORE POSTING HERE! (rev. 24 by
|
|
Super Mario ( ͡° ͜ʖ ͡°) Karma: 10212 Posts: 1382/4459 Since: 06-08-11 |
Before posting a thread, make sure it complies with the following rules:
Conditions to make a thread in New hacks:
Threads that do not comply with these rules will be deleted.
Conditions to be approved and moved to NSMB Hacks:
When you post your hack, it'll be reviewed by the board staff. If it's good enough, it will be moved to the NSMB Hacks forum. Otherwise, you'll be given a critique explaining how to improve your hack and you can update it and request review again in your thread. |
|
|
Posted on 08-08-14, 09:23 am in The Ask Nobody Thread
|
|
Super Mario ( ͡° ͜ʖ ͡°) Karma: 10212 Posts: 4140/4459 Since: 06-08-11 |
This belongs to the hall of fame. Totally.
|
|
|
Posted on 06-25-11, 02:55 pm in NSMB Hacking FAQ (rev. 1)
|
|
Super Mario ( ͡° ͜ʖ ͡°) Karma: 10212 Posts: 15/4459 Since: 06-08-11 |
Frequently Asked Questions
Note: This is a copy-paste from Jul. I still have to move each topic to its correct forum! Getting the Editor to work I can't run it! halp! A: Check to make sure you have the .NET Framework 2.0 installed. (If you're on Vista, you should already have it.) If not, download THIS I don't have Windows, can I use it? As from version 4.4, it works on Mono: http://www.mono-project.com/Main_Page. In Debian-based Linux, you can install mono and run NSMBe by typing this into a terminal: sudo apt-get install mono
mono NSMBe5.exe Where do I get a NSMB ROM? Ask google: http://www.google.com Level Editing How do I edit paths? What do they do? Paths are used for some things in the game - most notably: the autoscrolling camera, a few enemies such as Dorrie (World 4's ridable dinosaur), block trains and connected pipes. To edit them: Each path should automatically have at least one point. Hold down Ctrl and drag from a point to add a new one. Hold down Shift to snap to 8 pixels. Hold down Alt and click on a point to delete it. Hold down Control and Alt and drag a point to move the whole path Delete all the points in a path to delete the whole path. Are there any shortcuts I can use when editing levels? Hold Control and Drag to clone objects, sprites or entrances. Hold Shift and drag an object to resize it. Hold Shift and drag an entrance to make it snap to 8x8 pixel grid. Hold the Right mouse button and drag to scroll the level view. How can I get a ? block or a Brick block with a Blue koopa shell? You can't. Instead, you can place a Blue Koopa in your level. It will give you the powerup when you stomp it. The camera in my level doesn't go up!! You need to modify the camera settings for your level. Currently the editor doesn't let you change them, so you'll have to hex edit the level. Follow these steps: - On the level chooser, select world 1-2a area 1 (That one because its camera settings work as we want it to) - Click "Hex Edit" - Select Block 2 (on the top) - Select ALL and copy it (Control+C like in any text editor) - Close the hex editor. - Now select your level - Click "Hex edit" - Select Block 2 - Erase everything in the block - Paste (Control+V) - Save - Close Tileset Editing How can I edit a tileset? There are two ways: - From the Tools tab on the main window, select Tileset Editor and select the tileset to edit. - When editing a level, click on the "Edit Tileset" button on the toolbar to quickly open the tileset in the tileset editor. How can I import / export the graphics from the tileset? Edit the tileset, select Export Graphics, edit them with your favourite editor, and then click Import Graphics. It will take some seconds to import. My imported graphics appear with a black / white / random color BG instead of transparent. You need to edit the tileset graphics in an editor that supports transparency. Most good editors support it. GIMP, Photoshop, Paint.NET, etc. I recommend GIMP. It's free and it's very powerful. You can get it Here Where's a list of all the tile behaviors? Here: http://dirbaio.pastebin.com/tW4FB1UA Background Editing What's the "Change File" button? The Change File button reassigns the BG to use different files. For example, on the Top BG Layer, slots 9 and 10 are both the beach cliffs. They point to the same files, so if you modify one, the other one will get modified to. With the Change File button, you are able to make one of the BG slots point to different files, so that you'll be able to reuse it, to add a new BG instead of replacing another one. For example, you want to change slot 10. Then you select Slot 10, and then look in the file browser what files you want to overwrite. I recommend you overwrite the files in the ARCHIVE folder. Except the Dat_***.narc files, all of them are used for minigames. Let's say you want to overwrite bomthrow.narc, card.narc and casino.narc. They are File Id's 136, 137, 138. So, go to the box next to the Change File button and input "136" and click the button. Then import something into the BG slot. You'll see that the narc's have been replaced with the BG data, and that slot 9 still has the beach cliffs. Note: you can't add files to a ROM, so you're forced to overwrite files from the minigames. Of course, they'll stop working but that doesnt matter. |
|
|
Posted on 07-28-12, 10:33 pm in HEY! YOU! What are you doing in the trash!?
|
|
Super Mario ( ͡° ͜ʖ ͡°) Karma: 10212 Posts: 2045/4459 Since: 06-08-11 |
Yes, this is where your threads go if they're bad threads.
|
|
|
Posted on 08-15-12, 07:29 pm in tutorial How to do multi-palette tilesets! (rev. 4 by ImageBot on 11-21-16, 02:26 am)
|
|
Super Mario ( ͡° ͜ʖ ͡°) Karma: 10212 Posts: 2284/4459 Since: 06-08-11 |
(Note: I'll be using The Gimp (The most awesome free image editor!) for this tutorial, but you can do it with any image editor)
First, create a 256x112 image, like you'd do with a normal tileset. 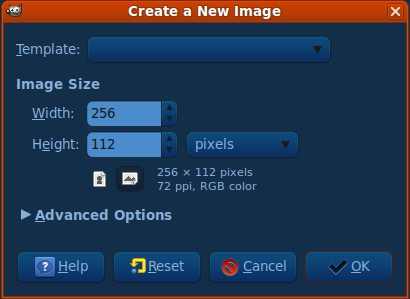 Then draw your awesome epic new tileset in it. I'll use my Ruins tileset as an example in here! 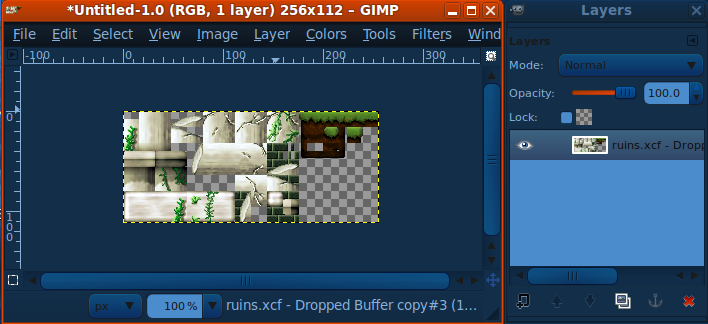 Now go to Image -> Canvas Size and make the image twice as high! (256x224) You need to make sure that your tileset is all in one layer. Open the layers panel (Control+L). If it isn't, do Image -> Merge Visible Layers. Duplicate the layer, and drag one copy with the Move tool (Press M) to the bottom half of the image! Make sure you align it perfectly. If needed, you can zoom in (Press + to zoom in, - to zoom out, 1 to reset zoom). 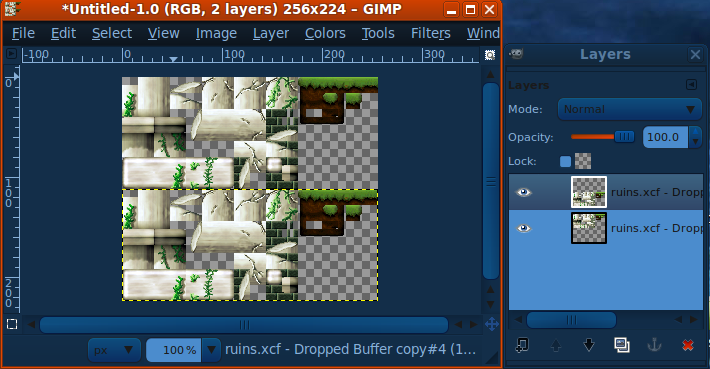 Great, now we have two copies of the tileset! The top half will be what we see with the first palette, and the bottom half will be what we see with the 2nd palette. Now, select the 2nd layer, and recolor it the way you want. You can play with most effects in the Colors menu (Color Balance and Hue-Saturation give pretty nice results!). You should get something like this. I used Color Balance in this case to give it a yellower feel. 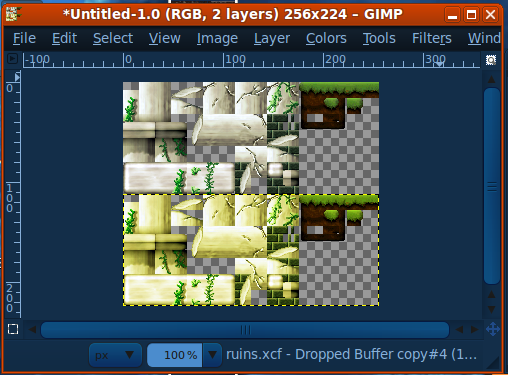 Now you should be good to go! Export the file as PNG! (File -> Save As, and enter a filename ending in ".png") Now, in NSMB Editor, edit your tileset. Go to the Graphics tab, and click "Import all bitmaps with all palettes". Then don't forget to click "Save All". Now, when selecting the 1st palette you should see one color scheme and when selecting the 2nd palette you should see the other color scheme 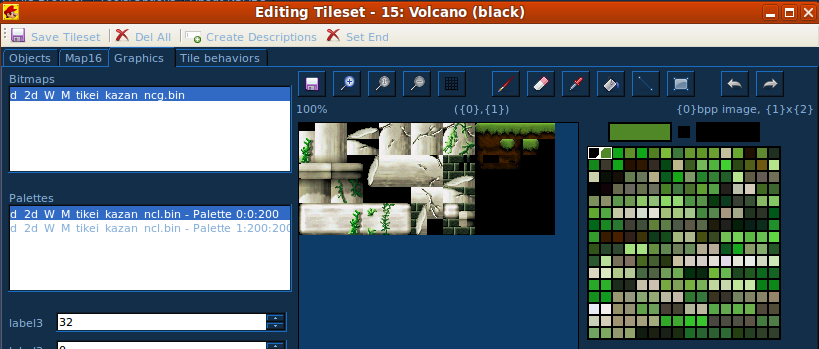 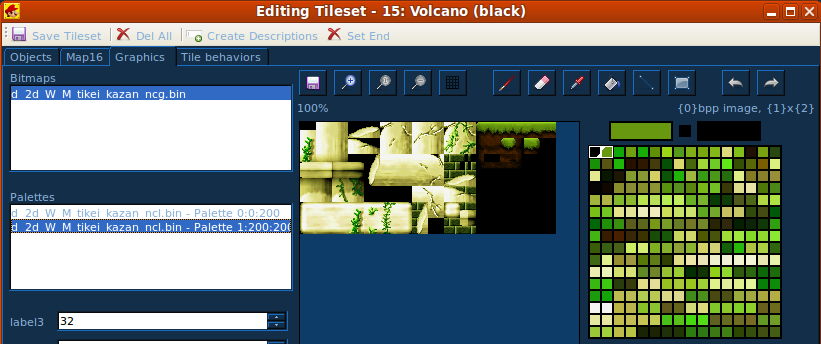 Extra stuffThe different tileset images that go to the different palettes don't need to be just recolors of each one. In fact, you can put completely different images, and they'll still work. However, this makes the quality go down very easily. Let's see why. Tilesets consist of just one graphics file, and multiple palettes. Every pixel has a certain color number that refers to a color in the palette. To make the image look different, it makes the same color number be two different colors in the two different palettes. So if you look at the palettes that we got above, they're the same palettes but differently colorized If the images are really different, then NSMBe can still find a proper pair of palettes. However, it must look for all the color combinations. For example, if on Image 1, there's a green area, and on Image 2, the same area has multiple colors, the first palette will be forced to contain multiple green entries so that these entries can be different on the 2nd palette. Stuff like this makes the importing process run out of palette entries very quick, and then quality goes down pretty fast. For example, when importing this image: (It's done with the two layers containing Filters -> Render -> Clouds -> Plasma) 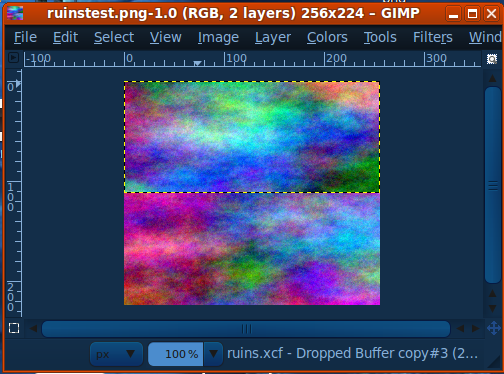 NSMBe stays crunching for a while (lots of different color pairs, DERP) and then it comes up with this: 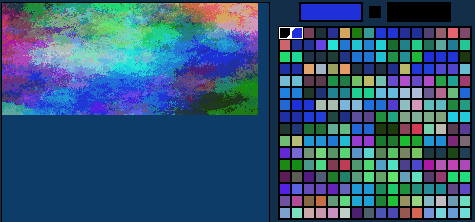 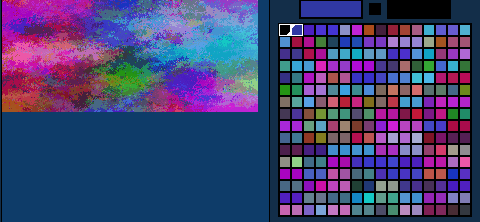 Not very good quality, hmm? There are a lot of repeated colors in either palette, but every pair of colors that's repeated on one palette, isn't repeated on the other one. It's just not possible to import these two images and have them look good with just 256 colors. Multi-palette tilesets are not "Magic" and they can't do what two independant images can. Also one additional restriction is that transparent pixels must be transparent on all images at once. This is because Color 0 of the palette is the only transparent color. Still, if your tilesets aren't really complex and/or don't use much colors, you could really take advantage of this feature to expand your tileset area from 256x112 to 256x224. luckwii has used this feature extensively on his hack New Metroid Bros., and the results are pretty nice! 4-palette tilesetsIt's also possible to make 4-palette tilesets. There's only one tileset in the game that uses 4 palettes, which is the Beach (Blue) tileset. You can do the steps above but copying the image 4 times, and you can have 4 color schemes, or a 256x448 tileset area, which is quite big. Just keep in mind that the "color degradation" effect is way more strong on 4-palette tilesets than on 2-palette tilesets! Any tileset can have 4 palettes. To convert a tileset into a 4-palette tileset, just export Beach Blue and import it in the tileset you want. Enjoy tileset making! |
|
|
Posted on 11-06-12, 08:33 pm in What NOT to do in NSMB Hacks. (rev. 1 by ImageBot on 11-21-16, 02:33 am)
|
|
Super Mario ( ͡° ͜ʖ ͡°) Karma: 10212 Posts: 2813/4459 Since: 06-08-11 |
Post here screenshots of epic fails in hacking, level design abominations, horrible glitches, or whatever. Videos are welcome too!
I'll begin with this disaster that would be sooo annoying to play: 
|
|
|
Posted on 07-25-13, 10:15 pm in NSMBe Java port (rev. 2 by ImageBot on 11-21-16, 02:36 am)
|
|
Super Mario ( ͡° ͜ʖ ͡°) Karma: 10212 Posts: 3542/4459 Since: 06-08-11 |
So I've been porting NSMB Editor to Java since some weeks ago.
Mostly because due to my hate to C# I have a feeling it's killing my motivation to work on NSMBe. And also there's the Mono bugs that never seem to go away. So now NSMBe will work better than ever, and will work well in Linux and Mac  For now all the core stuff is ported. What's missing is all the UI stuff. The plan is get everything ported, and then development on the old C# NSMBe will stop forever Screenshot so far: 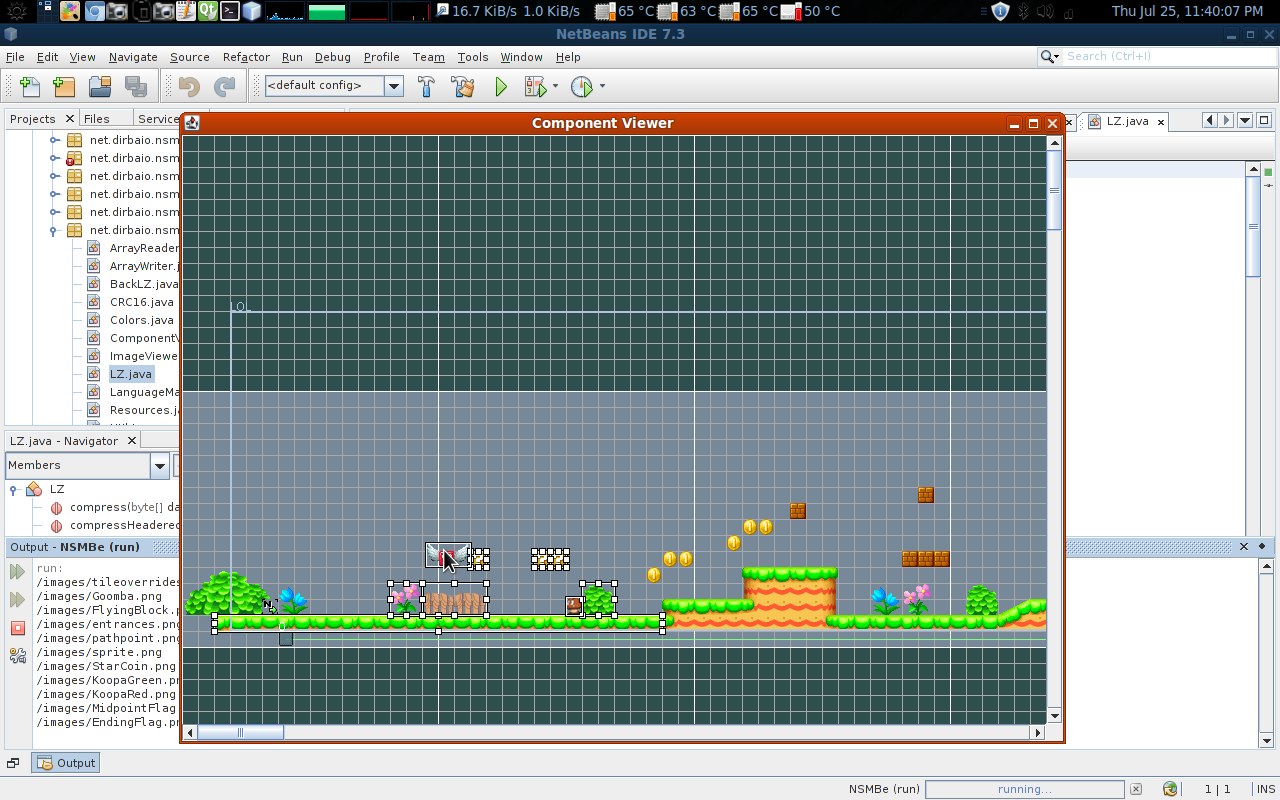 In fact, C# is a crappy Java clone made by micro$oft. |
|
|
Posted on 08-17-14, 10:16 pm in released Dirbaio's Background Tiler v1.0 (rev. 5 by ImageBot on 11-21-16, 03:04 am)
|
|
Super Mario ( ͡° ͜ʖ ͡°) Karma: 10212 Posts: 4197/4459 Since: 06-08-11 |
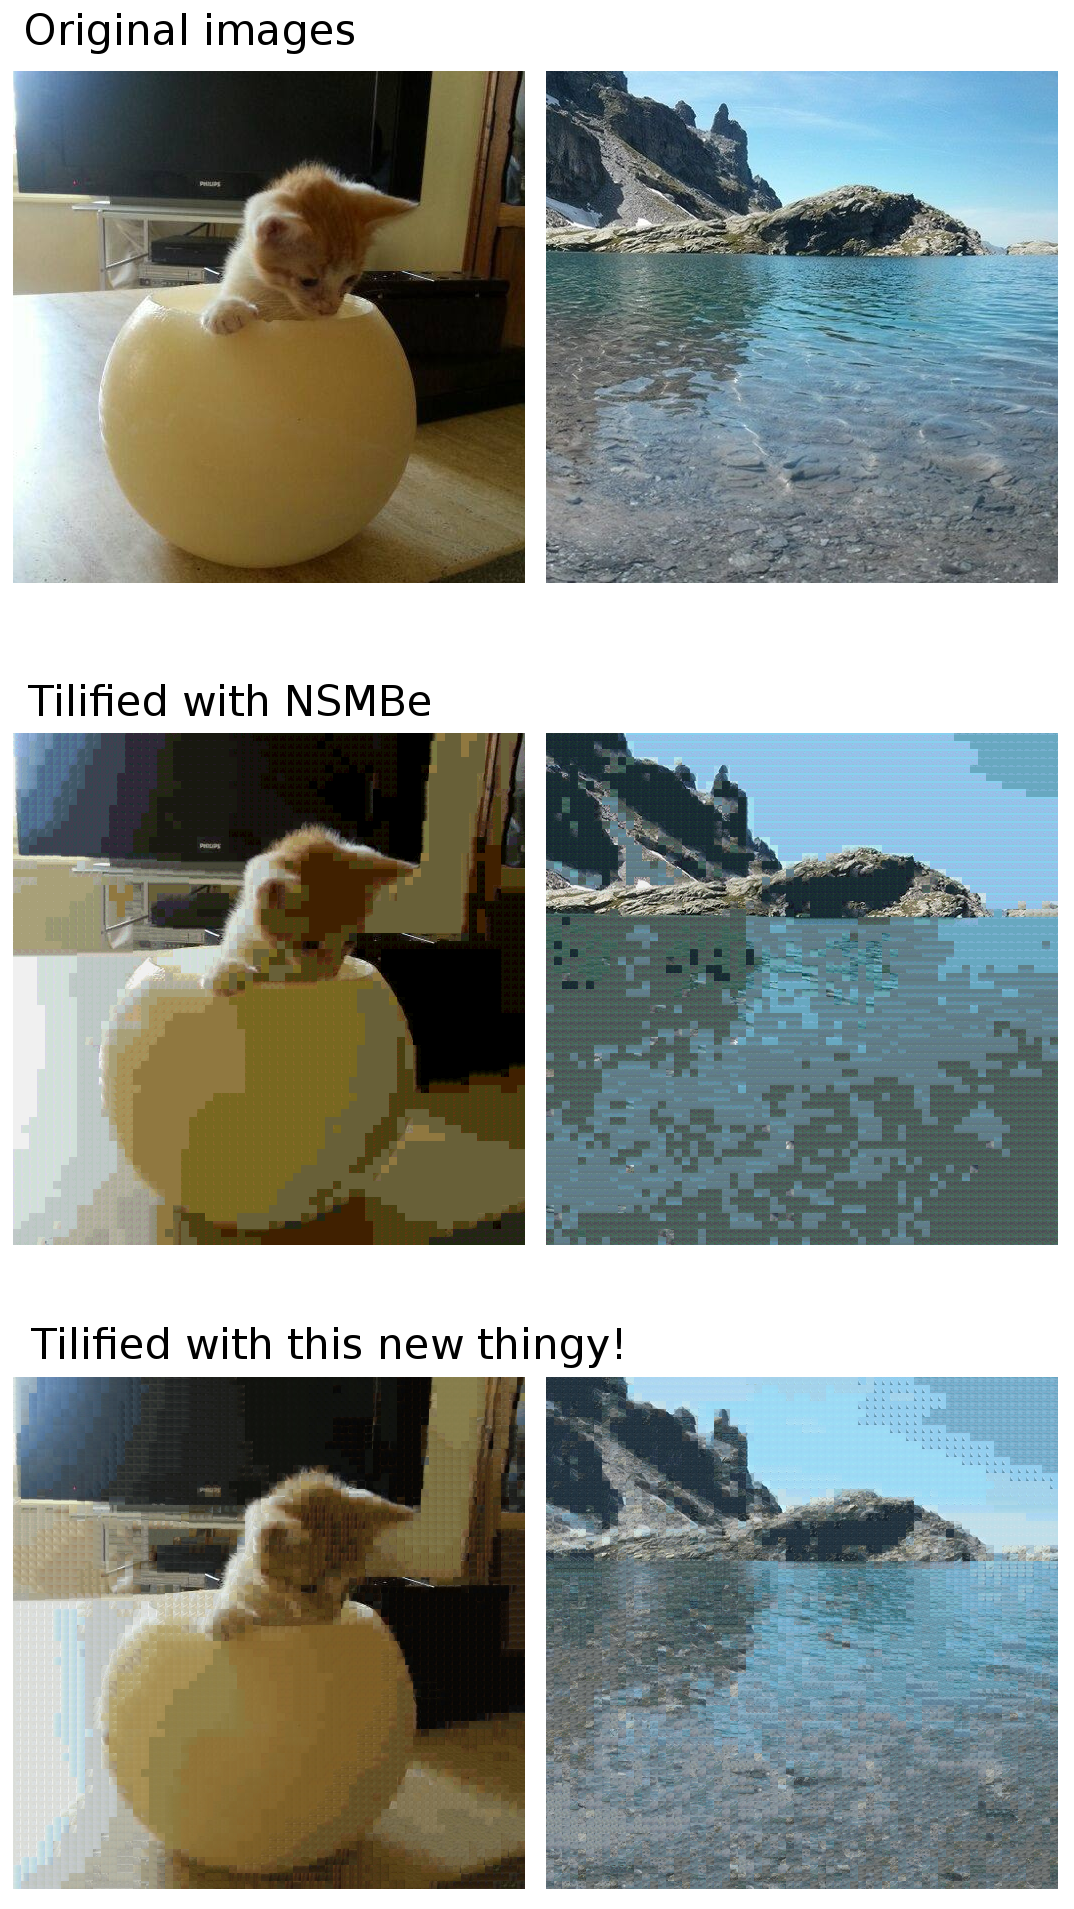
Dirbaio's Background Tiler
This thing converts .png's to .nmb's ready for importing into NSMBe, and does a much better job at it than NSMBe. This is due to a new, much better algorithm I created for this (It does NOT increase the tile number, it's still 320 tiles: it just uses them much better) Comparison of NSMBe vs the Background Tiler: DOWNLOAD v1.1: BackgroundTiler2.zip Includes source code, GPL licensed. How to use
It will create two files:
|
|
|
Posted on 06-25-11, 02:58 pm in Tileset Editing FAQ and How-to's (rev. 1)
|
|
Super Mario ( ͡° ͜ʖ ͡°) Karma: 10212 Posts: 16/4459 Since: 06-08-11 |
Tile behavior list
NOTE: I think some behaviors are missing. Post in this thread if you find one.
--- BASIC ---
00 00 00 00 - Walkable
00 00 01 00 - Solid
00 00 00 80 - Solid-on-top platform
00 10 01 00 - Icy solid
--- SPECIAL ---
00 60 01 00 - Horizontal rope (Like in W2-Tower)
00 A0 00 00 - Vertical pole (Like in W3-Castle)
04 00 00 10 - Lava - Instant death
02 00 01 10 - Spikes facing up
03 00 01 10 - Spikes facing down
01 70 01 10 - Spikes facing right
00 70 01 10 - Spikes facing left
00 40 01 00 - Conveyor belt (Must check direction/speed)
00 50 01 00 - See above
01 40 01 00 - See above
01 50 01 00 - See above
00 00 00 01 - Door - bottom left tile (Assumed)
01 00 00 01 - Door - bottom right tile (Assumed)
02 00 00 01 - Mini-Mario door
03 00 00 01 - Boss door (3x3) - bottom left tile
04 00 00 01 - Boss door (3x3) - bottom centre tile
05 00 00 01 - Boss door (3x3) - bottom right tile
01 02 00 80 - Falling platform from beach levels - left tile
02 02 00 80 - Falling platform from beach levels - right tile
00 30 00 80 - Quicksand
0X 00 00 08 - Patterns of solid 8x8 blocks.
X is a bitfield: 1 = top left, 2 = top right, 4 = bottom left, 8 = bottom right
Default patterns from the Mini Mario bonus room tileset:
http://treeki.shacknet.nu/screenshots/romhacking/mmblocks.png
00 E0 01 00 - Ground which Mummy-Pokey can come out of
--- CLIMBABLE FENCES ---
[Normal Fences]
02 00 00 04 - Top left corner
03 00 00 04 - Top side
04 00 00 04 - Top right corner
05 00 00 04 - Left side
06 00 00 04 - Middle
07 00 00 04 - Right side
08 00 00 04 - Bottom left corner
09 00 00 04 - Bottom side
0A 00 00 04 - Bottom right corner
[Flip Fences]
0B 00 00 04 - Top left corner
0C 00 00 04 - Top side
0D 00 00 04 - Top right corner
0E 00 00 04 - Left side
0F 00 00 04 - Middle
10 00 00 04 - Right side
11 00 00 04 - Bottom left corner
12 00 00 04 - Bottom side
13 00 00 04 - Bottom right corner
--- PATHS ---
These are used for moving platforms. They are all walkable!
01 00 00 00 - Diagonal path, from Bottom Left to Top Right
02 00 00 00 - Diagonal path, from Top Left to Bottom Right
03 00 00 00 - Corner (Place on the top left)
04 00 00 00 - Corner (Combines horizontal + vertical path)
05 00 00 00 - Horizontal path
06 00 00 00 - Vertical path
22 00 00 00 - Reverses direction of the platform/object?
--- SLOPES ---
00 00 20 00 - 1x1 slope going up right
01 00 20 00 - 1x1 slope going down right
02 00 20 00 -- 03 00 20 00 - 2x1 slope going up right
04 00 20 00 -- 05 00 20 00 - 2x1 slope going down right
06 00 20 00 - Top part of 1x2 slope, from Bottom Left to Top Right
07 00 20 00 - Bottom part of 1x2 slope, from Bottom Left to Top Right
08 00 20 00 - Top part of 1x2 slope, from Top Left to Bottom Right
09 00 20 00 - Bottom part of 1x2 slope, from Top Left to Bottom Right
0A 00 20 00 - Always use directly under any sloped tiles. It forces Mario to go up the slope.
0B 00 20 00 -- 0C 00 20 00 -- 0D 00 20 00 -- 0E 00 20 00 - 4x1 slope going up right.
0F 00 20 00 -- 10 00 20 00 -- 11 00 20 00 -- 12 00 20 00 - 4x1 slope going down right.
--- ICY SLOPES ---
0X 10 20 00 - Seems to be the same as the normal slopes section, but acts like ice.
--- UPSIDE DOWN SLOPES ---
0X 00 40 00 - Seems to be the same as the normal slopes section, but Y flipped.
--- MUSHROOM PLATFORMS ---
0X B0 20 80 - These are a little more complicated to explain so here are images of all the matching tiles:
http://treeki.shacknet.nu/screenshots/romhacking/mplat.png
I'm pretty sure these are mapped in a similar way to the normal slopes, although they have different behaviour bytes. Not sure exactly what the difference is.
--- GHOST HOUSE NORMAL STAIRS ---
0X B0 20 80 - Apparently, the stairs in ghost houses (Normal ones - NOT the collapsing ones) also use the mushroom platform behaviours.
Just refer to the normal slope info.
I also found blocks with these attributes in the ghost house tileset, but I don't know what they do:
0A B0 A0 00, 0A B0 21 00, 00 D0 01 00
--- GHOST HOUSE COLLAPSING STAIRS ---
These are split into two parts.
First off, you have the -top- part of the stairs (The bit you can stand on) which uses:
0X 70 20 00 - Refer to the 1x2 normal slopes for the value of X.
Next up, you have the bottom part of the stairs (which you can't jump through, but is a diagonal roof) which uses the upside down slopes:
0X 00 40 00 - Refer to the 1x2 upside down slopes.
|
|
|
Posted on 12-12-12, 05:56 pm in tutorial Locking your ROM! (rev. 4 by
|
|
Super Mario ( ͡° ͜ʖ ͡°) Karma: 10212 Posts: 2990/4459 Since: 06-08-11 |
What is it?So many people ask me how to lock your ROM so people can't open it and steal your levels, tilesets and other cool stuff. The answer is: It's not possible to completely lock a ROM. If someone has your ROM, and the ROM can be played, they have the data in their hands. So in theory, "un-locking" the ROM is always possible. But, fortunately, it's possible to make it as HARD as you want. Basically, to "lock" a ROM: First step is modifying the format of some important data in the ROM so NSMB Editor and other DS hacking tools can't open the ROM properly. Second step is making an ASM hack so that the ROM's code can read the "modified" format. So let's do the thing!One easy way of locking the ROM is modifying the FAT. All DS tools use it to find out where files are located, so if you screw it up, no tool will open your ROM. One way of doing it is XOR encryption: http://en.wikipedia.org/wiki/XOR_cipher We'll do it the easy way. XOR every byte with a fixed byte. It's not "good" XOR encryption, from looking at the FAT in hex it will be obvious, and decrypting it is easy. But, it's a good start. The codeBasically what we will do is hack a function named FSi_RomReadCallback. This function is what the game code uses to read from ROM. Everythign that is read from ROM will go through this function. So if we make it modify the data being read we can "decrypt" the FAT when the game wants to read it. This way the game will "see" the decrypted FAT when it reads it, even though it's encrypted on ROM, and will work properly. The function from the game's code looks like this (when translated back to C): int FSi_RomReadCallback(void* archPtr, u8* dest, const void* pos, u32 size) { CARDi_ReadRom(dmad, pos, dest, size, callb, archPtr, false); return 0; } So we take that code and add our own that will modify the data that's being read if needed. Here's the code. typedef unsigned int u32; #include<nds.h> #include "nsmb.h" //Stuff needed for CARDi_ReadRom #define callb 0x0206AAB4 #define dmad (*(u32*)0x02096100) //Stuff from the ROM header #define fatoffs (*(u32*)0x027ffe48) #define fatsize (*(u32*)0x027ffe4C) //FSi_RomReadCallback int nsub_0206aa68(void* archPtr, u8* dest, const void* pos, u32 size) { CARDi_ReadRom(dmad, pos, dest, size, callb, archPtr, false); //if pos is inside the FAT, loop over all read bytes and decrypt them before returning. if ((u32)(pos) >= fatoffs && (u32)(pos) < (fatoffs + fatsize)) for(int i = 0; i < size; i++) dest[i] ^= 0x9B; return 0; } And add this to nsmb.h: void CARDi_ReadRom(u32 dma, const void* src, void* dst, u32 len, u32 callback, void *arg, bool wtf); Encrypting the FATSo we gotta now to encrypt the FAT. We will do a little test program that will read an unencrypted FAT and write it out encrypted. Very simple code. #include <iostream> using namespace std; int main () { char c; while (cin.good()) { c = cin.get(); if (cin.good()) cout.put(c ^ 0x9B); } } Save it to xor.cpp. Then compile it: g++ xor.cpp -o xor Then open the ROM in NSMBe, extract fat.bin. Encrypt the fat using the little program we just compiled: ./xor < fat.bin > fatenc.bin And then import fatenc.bin into NSMBe. Now close NSMBe immediately, don't do anything else or it will try to do stuff with the encrypted FAT and crash. This is the last time you will see your ROM open in NSMBe ThoughtsThis kind of encryption is easy to hack, because it's easy to look at the ROM in an hex editor, look at the FAT, and see that it's been XOR encrypted. Here's a part of the encrypted FAT: 9F 2D 1E 9B 9F 2D 1E 9B 03 5F 1E 9B 03 5F 1E 9B
43 6A 1E 9B 43 6A 1E 9B BF 6E 1E 9B BF 6E 1E 9B
46 62 1E 9B 7B 62 1E 9B 4B 65 1E 9B 4B 65 1E 9B
27 BD 1D 9B 27 BD 1D 9B B7 C2 1D 9B B7 C2 1D 9B
8F C1 1D 9B 8F C1 1D 9B CF 1E 1D 9B CF 1E 1D 9B
57 20 1D 9B 57 20 1D 9B 53 26 1D 9B 53 26 1D 9B
C5 25 1D 9B FB 25 1D 9B 2A 50 1D 9B 2F 50 1D 9B See all those bytes that are 9B? These were 00 in the original FAT. 0x00 ^ 0x9B = 0x9B. So it's veeeery easy to see the "encryption key" which is 0x9B. Pretty much any non-n00b will think about XOR encryption when looking ath this. And making a program to decrypt the FAT is easy, it's just XORing again with 0x9B. So this encryption will stop most n00bs from stealing your tilesets. But there may be non-n00bs who want to steal your tilesets. (I have no idea why. If they aren't noobs they could make their own as well. But people are stupid, the internet works this way )So you will probably want something better, There's hundreds of ways of improving this. You could encrypt with a stream of pseudorandom numbers. You could even encrypt MORE stuff in the ROM. Nearly all of it, you have to leave header, binaries and icon/title alone so loaders can load it properly. So, yeah. That's it. |
- NSMBHD
- Forum index
- Member list
- +1'd posts