Pages: 1
| Happyday |
Posted on 11-04-24, 07:40 pm
|
|
Karma: 2 Posts: 1/1 Since: 11-04-24 |
Good morning, I want to add a tileset from a Sonic DS game to my hack but I don't know how to transform jpg to nmt, any answer would be very helpful🫶
|
|
|
Posted on 11-05-24, 12:04 pm
|
 Nipper Plant Nipper PlantI do things sometimes  Karma: 1215 Posts: 363/416 Since: 08-07-17 |
to make a new tileset youll have to replace an existing one. since this is your first time making a tileset it might be a good idea to replace the unused bonus room one (slots 20, 67-72), that way you not only dont have to sacrifice any of the used vanilla tilesets, you also sidestep more complicated things (like tileset animations, randomization, or other stuff) so you can just worry about getting a feel for nsmbe's tileset editor.
to start editing a tileset, go to the "Tilesets" tab in NSMBe (1), select the tileset you want to edit (2), and click the "Edit" button (3), which will open NSMBe's tileset editor. 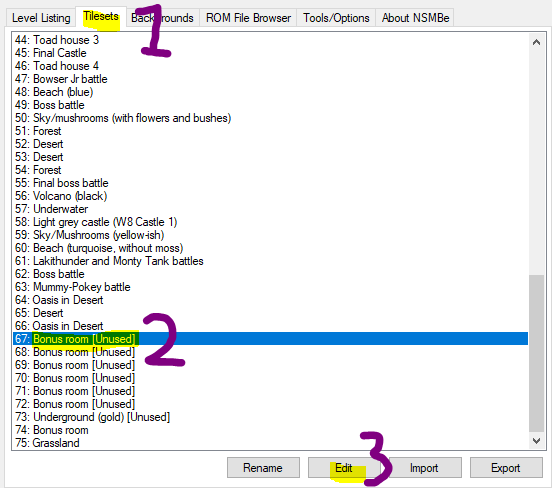 alternatively, you can double-click the tileset to go into the tileset editor. since youre making a totally custom tileset, youll probably want to hit the "Delete All" button so that youre working with a more-or-less blank slate  now youll wanna go to the "Graphics" tab 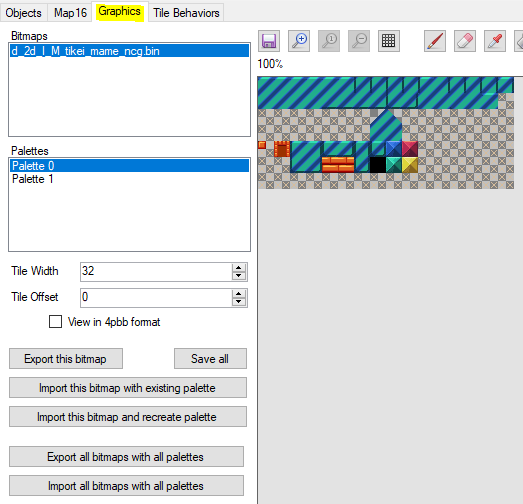 here, you can import custom graphics for your tileset or draw them directly in the editor (though the latter i wouldnt reccomend). there are 3 buttons for importing graphics: "Import this bitmap with existing palette", "Import this bitmap and recreate palette", and "Import all bitmaps with all palettes". The first one imports your graphics while trying to adapt it to the palette you have selected, and the second imports your graphics while overwriting the palette you have selected with a new, custom palette. for these options, the image you wanna import should be the same dimensions as the image in nsmbe, which for typical tilesets is 256 x 112. the third one, "Import all bitmaps with all palettes", overwrites all palettes and requires the dimensions of image youre importing to be 256 x (112 * number of palettes). (you can read a bit more on multi-palette tilesets here, but for sake of this tutorial and because the info there is a touch lacking, id reccomend just using the "Import this bitmap and recreate palette" option for now). when prepping the graphics for importing, try to keep things locked to an 8x8 grid. once youve got your graphics imported, make sure to save. next, youll need to head to the "Map16" tab 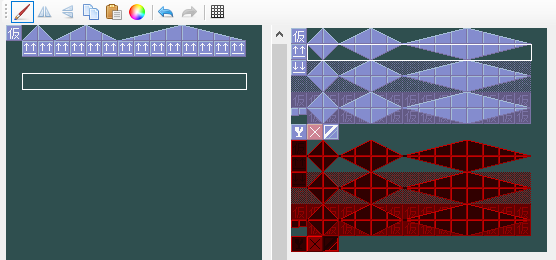 this is where youll be mapping your tiles. you can select tiles from your tileset's graphics on the right, and draw on your tilemap to the left by using the pen tool. you can also mirror tiles horizontally or vertically, copy and paste tiles on your tilemap, or change which palette certain tiles are using. make sure to keep things locked to the 16x16 grid. Once youve done that, youll have to set the tile behaviours of your tiles by going to the "Tile Behaviors" tab. 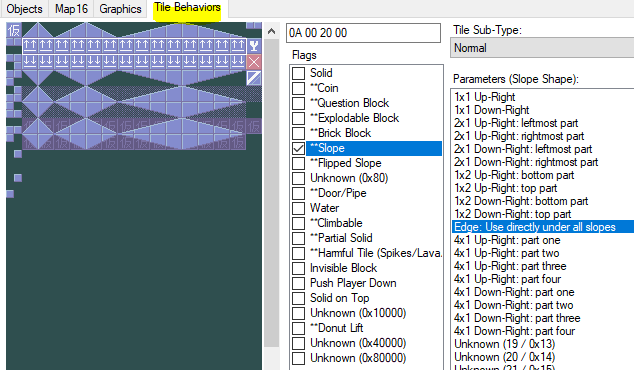 here, you can set how the tiles are supposed to behave--- whether theyre meant to be solid, semisolid, slopes, slippery, or whatnot. you can also select multiple at a time to set tile behaviours en masse. Lastly, youll wanna head to the "Objects" tab. this is where you can create tile objects. you can select tile objects to edit from the left and select tiles from your tilesets tilemap you wanna add on the right. the middle shows the current selected object.  clicking the numbers in the object editor selects the line your adding tiles to. you can add new lines by clicking the "New Line" button. clicking tiles selects them, allowing you to delete it, adjust the tile its meant to be, or change the control byte for it. the control byte affects how the tile is tiled in the level editor--- for example, setting it to "1" will repeat it horizontally. you can see the effects of different control bytes on the tiling on the preview screen at the bottom. additionally, you can add slope control tiles by clicking the "Slope Control" button. these help with the tiling for sloped things and can be adjusted by tweaking their control byte. once youre done with everything, click "Save Tileset". hopefully this is all understandable and helpful--- this isnt comprehensive, but it should cover most things well enough. additionally, try to experiment with the editor and use other in-game tilesets for reference, and feel free to ask here if theres something youre trying to do but dont know how to. |
Pages: 1