Connected PipesEach end of the pipe needs an Entrance. Both must have the same connected pipe ID.Set area 0 in one end and area 1 in the other end. Make a Path with the same ID as the entrance's "Connected Pipe ID". Each node on the path must be placed and "Value 6" in the node numbered as below: Image of how to place the node in each pipe with its value: 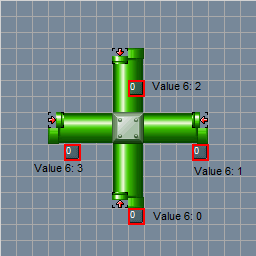 If value 6 does not show up for you, then try using the original NSMBe. The path must be connected from one end of the pipe to the other; this is just to show the placement. You can place more nodes on the path if you need, only the first and last need the above value 6 number. World 7-A area 2 is good for more information. Example shapes: Reverse L Setting a pipe as "exit only" also works, and is used in retail (eg 7-A). |
|
|
|
|
| Views: 52,104,381 | 0 users online. | 27 guests | 85 bots | 07-24-26, 11:12 am |