Pages: 1
|
|
Posted on 09-07-24, 02:43 am (rev. 5 by
|
 Flurry FlurryUnfortunately, where there is light, there is dark. Where there's a Star, there's a Ztar! Karma: 1022 Posts: 206/262 Since: 02-02-24 |
As the title says, in this tutorial, I will explain how to make a custom background using NitroPaint, this tool can help you create graphics for Nintendo DS games, you can create NCG's, NCL's, NSBTX's and many other things, but in this specific tutorial, I will be covering background creation. You can download NitroPaint by clicking here.
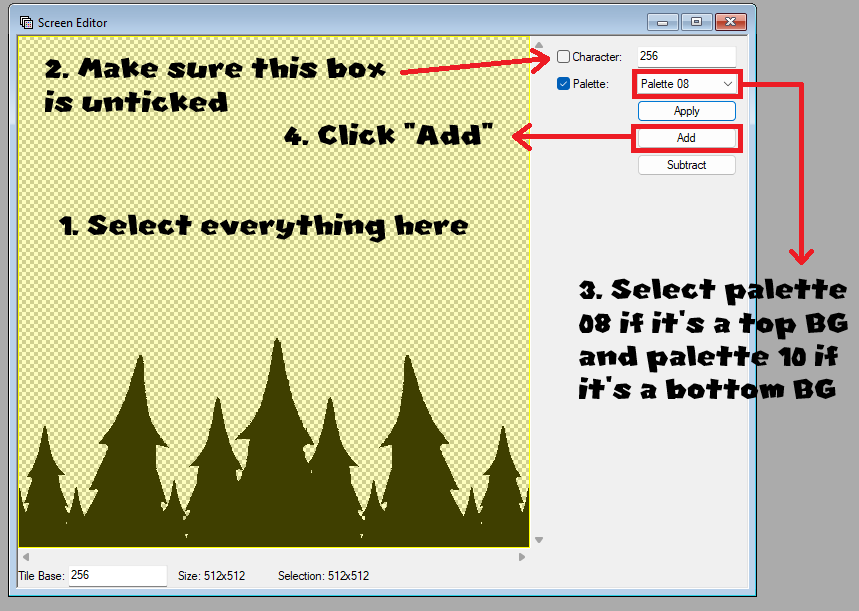
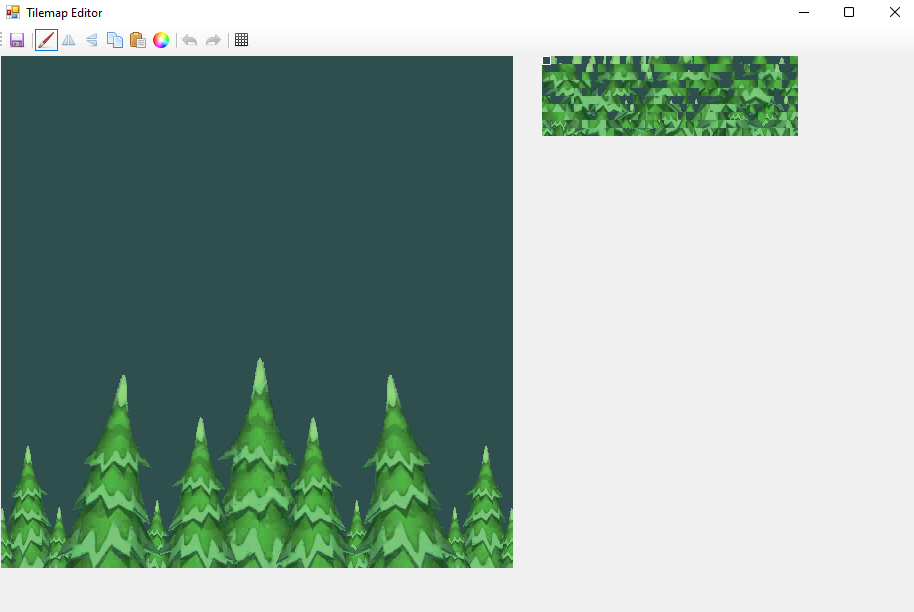
As usual, you have to make your custom background and make sure it's 512x512 pixels in size, for this specific tutorial, I will use a custom background made by If you import this background in NSMBe, it'll look like this: And this how it looks when you use Dirbaio's Tiler: As you can notice, the background looks really terrible with both methods, now let's see the magic of NitroPaint. Open NitroPaint and click File --> New --> New BG Then, click on the three dots at the top right corner and select your background image, after that, you must set the following settings: Palettes: 1 (You can use two palettes if you want, but you'll get a much faster conversion when using only one palette, and according to Garhoogin, there's a bug regarding the output file, so it's best to use one palette) Base: 0 Size: 256 Offset: 0 Depth: 8 bit Tile Base: 256 if it's a top background, and/or 576 if it's a bottom background Max characters: 320 Also, make sure to select "Raw compressed" in the format drop-down, and make sure to tick the "compress" button in the palette settings (When you enable this setting, the background generator will combine identical tiles to save graphics space, utilizing the horizontal and vertical flip properties of background tiles, kinda like you can do in map16). You could alternatively enable dithering to save some quality in case your background has too many details or gradients, but this depends on a case by case basis. Here's a screenshot of how the settings should be: After that, click on "Generate" and the background will start creating, once it's created, it'll generate the bitmap, the palette and the tilemap, which are the files from which the background is made of (Click the image if it's too small) It's very important to know the concept of these because you'll need to replace these files later in NSMBe, the bitmap are the tiles the background is made of, the palette are the colors used by said tiles and the tilemap is the background built with the bitmap tiles. Now, in the background screen, you must select everything, uncheck the "character" box, select palette 08 if it's a top bg or palette 10 if it's a bottom bg, and click "Add", this way you'll be setting the background the way NSMBe expects to load it, though, it'll appear completely black in NitroPaint, this is completely normal After this, save all of the files in their corresponding formats ("ncl.bin", "ncg.bin" and "nsc.bin") Now it's time to replace these files in NSMBe, look for the background you want to replace, and locate its files in the ROM File Browser Tab, you can easily locate your background files by clicking on "Edit Properties" and noting the file IDs shown in the bg properties menu, you could alternatively take a look at this list to easily locate the background you want to replace, the files are in the "BG_ncg", "BG_ncl" and "BG_nsc" folders, the files you're looking for should have the same names across the different folders but with different file extensions, they also have key names: Free: Top background Back: Bottom background Expand these folders, find the respective graphics and replace the NCL, NCG and NSC of the background with the ones you made in Nitro Paint. Important: For some reason, when you replace the NCL file, it'll get descompressed, make sure to LZ compress it again after you've replaced it. Now, open your background in NSMBe and take a look at the final results: Voila! Not bad eh? Much better than when using Dirbaio's Tiler  . .With this method you can make good-looking backgrounds without having to worry about their quality being downgraded by the awful tiler, however, don't expect this to always work, if your background has way too many tiles, it is very likely that you'll get undesired results or some quality losses, make sure to not make very detailed bgackgrounds. I really hope this tutorial will be useful for many people, this may look complicated but it's way easier than you think, I sincerely apologize if this tutorial was not very understandable or had any flaws, I'm not very good at writting tutorials  , if anyone thinks this tutorial can be better phrased, just let me know and I'll probably update this post, and if you don't understand anything, feel free to ask in this thread , if anyone thinks this tutorial can be better phrased, just let me know and I'll probably update this post, and if you don't understand anything, feel free to ask in this thread  . .Credits: -Garhoogin for creating NitroPaint and taking the patience of explaining me the background making procedure - - _________________________  .png) My YouTube Channel  NSMB Central Discord Server NSMB Central Discord Server 
|
|
|
Posted on 09-08-24, 03:13 pm
|
 Fire Snake Fire SnakeEugene Karma: 3854 Posts: 1154/1161 Since: 11-29-11 |
Thank you for making this tutorial!
|
|
|
Posted on 09-08-24, 04:48 pm
|
 Snifit SnifitNew Super Mario Bros.: Blasting off Again! status: stopped procrastinating Karma: 569 Posts: 78/280 Since: 08-24-24 |
Everybody who has started to make tutorials lately will also get some thanks from Thierry: she told me in the usercomments she's really grateful for other users making tutorials as she doesn't have much time anymore for writing them because she just got a new job.
"To boldly glitch where no one has glitched before" - Staryu Trek Hover! Posted by kikilxve SM64DS body horror (hacking fail) Yeah Sig background from dreamstime.com Avatar Staryu model from Retromesh (edited) Avatar background from space.com |
| ApprenticeModder |
Posted on 11-18-24, 03:59 pm
|
|
Karma: 1 Posts: 1/2 Since: 11-18-24 |
Seems like a dumb question, where do i find the rom file browser tab. I am new to this and can not find it.i thought it was in my nsmb ds rom file, but i was wrong. Where can i find that?
|
|
|
Posted on 11-18-24, 04:02 pm
|
 Flurry FlurryUnfortunately, where there is light, there is dark. Where there's a Star, there's a Ztar! Karma: 1022 Posts: 224/262 Since: 02-02-24 |
| ApprenticeModder |
Posted on 11-18-24, 04:15 pm
|
|
Karma: 1 Posts: 2/2 Since: 11-18-24 |
Thanks!
|
|
|
Posted on 03-01-25, 08:55 pm
|
 Mole MoleGoomba's run the world... Karma: 463 Posts: 298/358 Since: 08-27-20 |
Nice, this has always been a bit of a frustrating problem. I can still see a few funky tiles here and there, but I mean with a system like this you aren’t really supposed to be able to push it too hard either way unfortunately, but it’s cool to see how far we can get…
_________________________  Hacks Channel: https://www.youtube.com/channel/UCqA5CgsW-CTfD56DCa2kvYw/channels |
Pages: 1


.png)
.png)


.png)

