Pages: 1
|
|
Posted on 06-30-23, 12:26 am
|
|
Duplicate account
 Karma: 29 Posts: 4/5 Since: 06-15-23 |
Hello everyone, long time no here, with the time I have been here I have learned a lot about NSMB hacking on my own and since I have experience I would like to share some of my knowledge that I have acquired, with you.
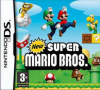
1.Quicksand Of course I've made this work correctly using the desert and desert underground tilesets in New Super Toad DS, so I didn't actually use any code at all. The requirements for this tutorial are: 1. Nsmb editor (in my case I will use 5.2) 2. Paint.net or another image editor This tutorial is not going to show you how to do things from scratch, it is simply going to tell you how the texture works. This texture has 2 blocks both have different animations, there is the top block and the bottom block. 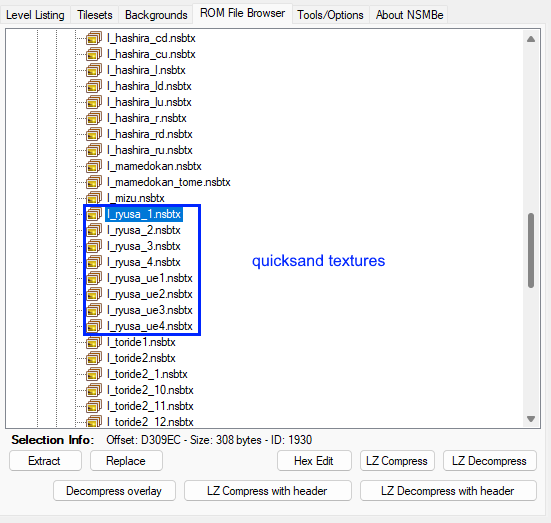 The texture named "I_ryusa_uex.nsbtx" is the texture of the top block and the texture named "I_ryusa_x" is the texture of the bottom block. Its location is at (Rom File Browser>root>polygon_unit) for all the files. There you can edit the texture respecting the color limitations (this part is optional, and is if you want to change the texture color or replace it with something else). Ok, we already know how the texture works, now let's go to the second part, how it works on the tilesets. I'm sure you all remember that I made another tileset work as quicksand in New Super Toad DS, well that didn't need coding either. I have only found 2 tilesets with this function, number 6 and number 47. In the tilesets, only 2 blocks are programmed to load the texture, one block for the top and one block for the bottom. The texture is really damaged because you put another configuration to the block if you replace it with any free tilesets. The configuration of the blocks must always be as follows. 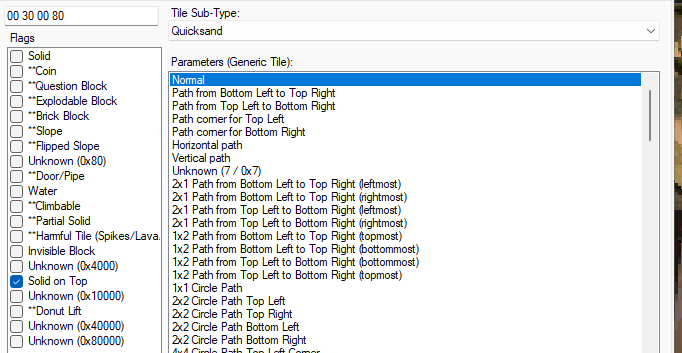 But your question is where those 2 blocks are located in each tileset, so I will show them to you.  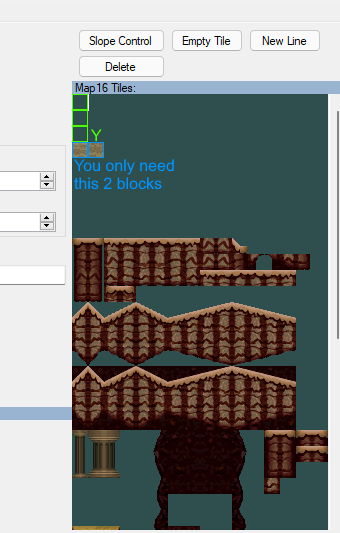 The tileset 6 is from the NSTDS Desert tileset, and the tileset 47 is from the NSTDS Desert Undergroud tileset. The red and green blocks indicate how many blocks you have to run horizontally and vertically so you don't get tangled guessing the block, the blue ones are the actual texture. The blue block on the left is the top block and the block on the right is the bottom block. You can replace whatever you want in tileset, but without stepping on those 2 blocks since they load that animation, and they are placed in the Map 16 window since it is not applied to the palettes. This is the end of this tutorial, if you have any questions I can answer them, I hope you have understood perfectly. 🙂 2.NSTDS Sandstorm (soon!!) |
Pages: 1