Pages: 1
|
|
Posted on 08-15-12, 07:29 pm (rev. 4 by ImageBot on 11-21-16, 02:26 am)
|
 Super Mario Super MarioAAaAaaaaAAAaaaa Karma: 10223 Posts: 2284/4462 Since: 06-08-11 |
(Note: I'll be using The Gimp (The most awesome free image editor!) for this tutorial, but you can do it with any image editor)
First, create a 256x112 image, like you'd do with a normal tileset. 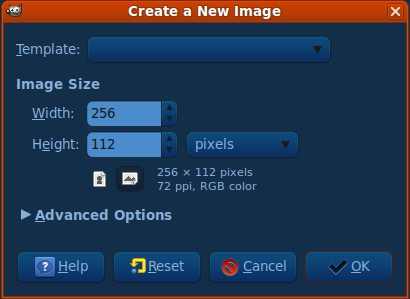 Then draw your awesome epic new tileset in it. I'll use my Ruins tileset as an example in here! 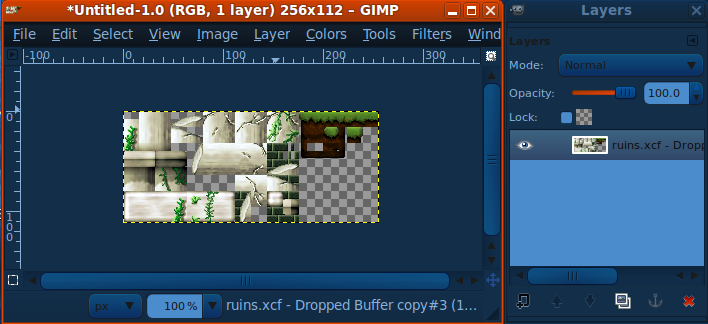 Now go to Image -> Canvas Size and make the image twice as high! (256x224) You need to make sure that your tileset is all in one layer. Open the layers panel (Control+L). If it isn't, do Image -> Merge Visible Layers. Duplicate the layer, and drag one copy with the Move tool (Press M) to the bottom half of the image! Make sure you align it perfectly. If needed, you can zoom in (Press + to zoom in, - to zoom out, 1 to reset zoom). 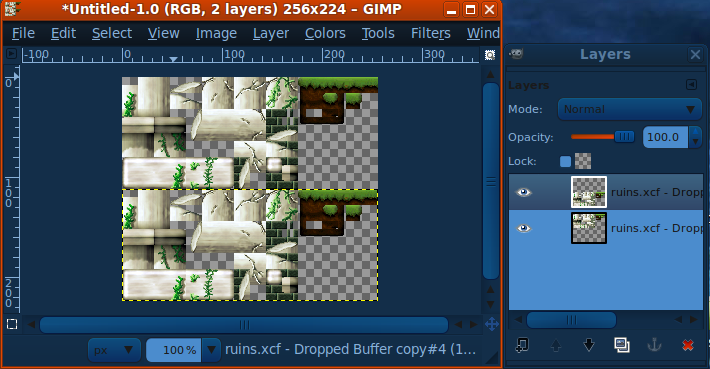 Great, now we have two copies of the tileset! The top half will be what we see with the first palette, and the bottom half will be what we see with the 2nd palette. Now, select the 2nd layer, and recolor it the way you want. You can play with most effects in the Colors menu (Color Balance and Hue-Saturation give pretty nice results!). You should get something like this. I used Color Balance in this case to give it a yellower feel. 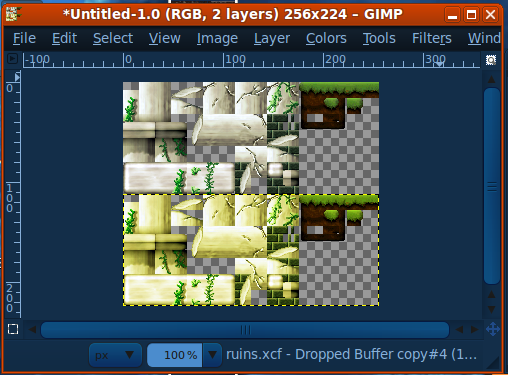 Now you should be good to go! Export the file as PNG! (File -> Save As, and enter a filename ending in ".png") Now, in NSMB Editor, edit your tileset. Go to the Graphics tab, and click "Import all bitmaps with all palettes". Then don't forget to click "Save All". Now, when selecting the 1st palette you should see one color scheme and when selecting the 2nd palette you should see the other color scheme  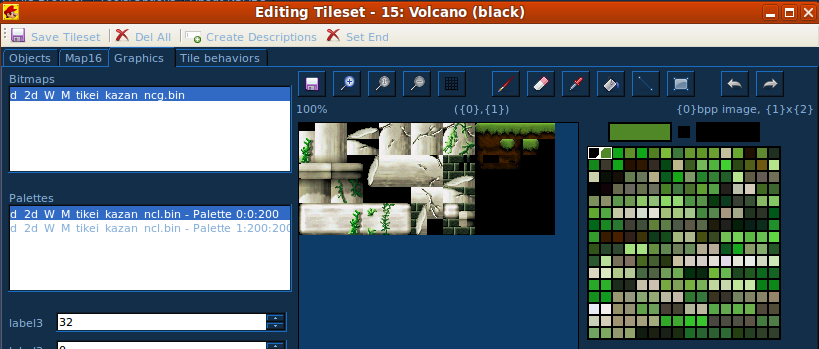 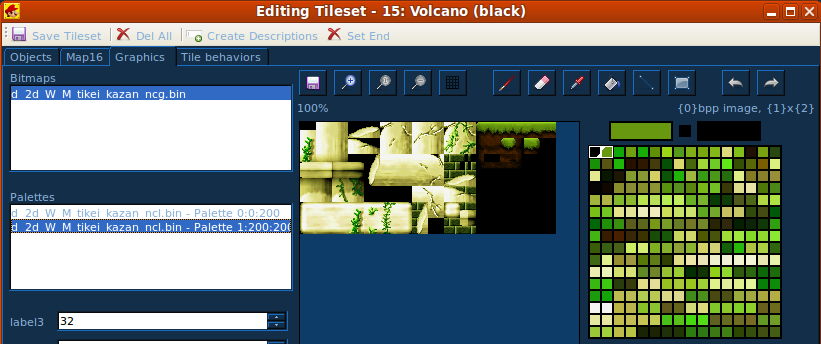 Extra stuffThe different tileset images that go to the different palettes don't need to be just recolors of each one. In fact, you can put completely different images, and they'll still work. However, this makes the quality go down very easily. Let's see why. Tilesets consist of just one graphics file, and multiple palettes. Every pixel has a certain color number that refers to a color in the palette. To make the image look different, it makes the same color number be two different colors in the two different palettes. So if you look at the palettes that we got above, they're the same palettes but differently colorized If the images are really different, then NSMBe can still find a proper pair of palettes. However, it must look for all the color combinations. For example, if on Image 1, there's a green area, and on Image 2, the same area has multiple colors, the first palette will be forced to contain multiple green entries so that these entries can be different on the 2nd palette. Stuff like this makes the importing process run out of palette entries very quick, and then quality goes down pretty fast. For example, when importing this image: (It's done with the two layers containing Filters -> Render -> Clouds -> Plasma) 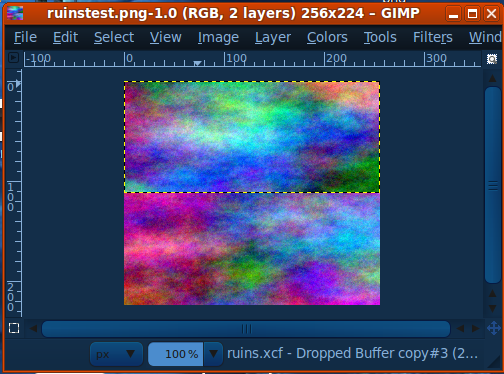 NSMBe stays crunching for a while (lots of different color pairs, DERP) and then it comes up with this: 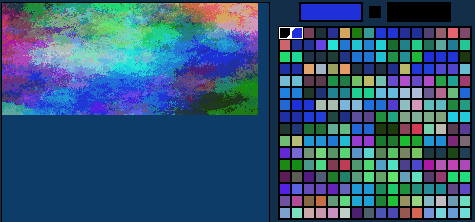 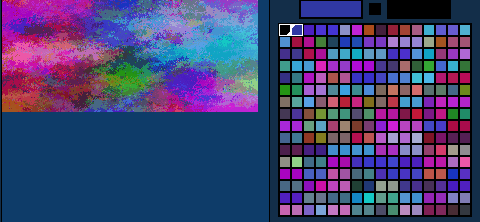 Not very good quality, hmm? There are a lot of repeated colors in either palette, but every pair of colors that's repeated on one palette, isn't repeated on the other one. It's just not possible to import these two images and have them look good with just 256 colors. Multi-palette tilesets are not "Magic" and they can't do what two independant images can. Also one additional restriction is that transparent pixels must be transparent on all images at once. This is because Color 0 of the palette is the only transparent color. Still, if your tilesets aren't really complex and/or don't use much colors, you could really take advantage of this feature to expand your tileset area from 256x112 to 256x224. luckwii has used this feature extensively on his hack New Metroid Bros., and the results are pretty nice! 4-palette tilesetsIt's also possible to make 4-palette tilesets. There's only one tileset in the game that uses 4 palettes, which is the Beach (Blue) tileset. You can do the steps above but copying the image 4 times, and you can have 4 color schemes, or a 256x448 tileset area, which is quite big. Just keep in mind that the "color degradation" effect is way more strong on 4-palette tilesets than on 2-palette tilesets! Any tileset can have 4 palettes. To convert a tileset into a 4-palette tileset, just export Beach Blue and import it in the tileset you want. Enjoy tileset making! |
|
|
Posted on 08-15-12, 07:32 pm
|
 Roy Koopa Roy Koopa Karma: 4036 Posts: 2115/2722 Since: 06-26-11 |
Just a small addition:
See a lots of creative DS Hacking hereThis goes for ALL NCG's with multiple palettes  (Thats how you can easily edit jyotyu or menu files) (Thats how you can easily edit jyotyu or menu files) 
_________________________ If you want to support me, you might check out my Patreon Page : ) |
|
|
Posted on 08-15-12, 07:32 pm
|
 Birdo Birdo Karma: 3336 Posts: 494/2026 Since: 06-28-11 |
Thanks for the tutorial dirbaio!
  (I always wanted to know how to do this for a while now) (I always wanted to know how to do this for a while now)This will come in handy for making better tilesets and variations of it.
_________________________ |
|
|
Posted on 08-15-12, 07:36 pm (rev. 1 by
|
|
Super Mario AAaAaaaaAAAaaaa Karma: 10223 Posts: 2285/4462 Since: 06-08-11 |
Posted by ray Just a small addition: This goes for ALL NCG's with multiple palettes (Thats how you can easily edit jyotyu or menu files) Yea, that's important too. Didn't you make a If not, you really should because you seem to be expert on it. Posted by gridatttack Thanks for the tutorial dirbaio! (I always wanted to know how to do this for a while now)This will come in handy for making better tilesets and variations of it. Thanks Any question or comment, just post it, I'll be here helping! |
|
|
Posted on 08-15-12, 07:41 pm
|
|
Roy Koopa Karma: 4036 Posts: 2116/2722 Since: 06-26-11 |
Posted by Dirbaio Posted by ray Just a small addition: This goes for ALL NCG's with multiple palettes (Thats how you can easily edit jyotyu or menu files) Yea, that's important too. Didn't you make a tileset on how to import/export jyotyu stuff to PNG? If not, you really should because you seem to be expert on it. Yeah sure, I made a Tileset No I didnt. Only linking from Tilesets to Jyotyu I could, actually... But Fr33ze is even better than me in this. He made the blocks for NSHB
_________________________ If you want to support me, you might check out my Patreon Page : ) |
|
|
Posted on 08-15-12, 08:03 pm (rev. 1 by
|
|
Karma: 3782 Posts: 1431/2112 Since: 06-28-11 |
Posted by ray I could, actually... But Fr33ze is even better than me in this. He made the blocks for NSHB  
|
|
|
Posted on 10-25-12, 01:40 am (rev. 1 by ImageBot on 11-21-16, 02:32 am)
|
|
Doesn't actually do anything.
 Karma: 3052 Posts: 7/653 Since: 10-22-12 |
Sorry for the bump (I think, the FAQ doesn't specify how long a bump is and I can't seem to find a rules thread?). Anyway, I found a way to make multi-palette tilesets like those done in NSMB. Bear with me here, since this method is somewhat hackish. So for the purpose of this tutorial, I'm going to take my NSMBWii underground tileset and add a whole bunch of colored pipes for absolutely no reason: 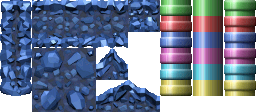 Note that this is far more than 256 colors. Now I take that and try to insert it with the editor using the "Insert this bitmap and recreate palette" option. This is the result: 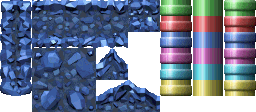 The actual underground tiles look okay, but you can definitely notice the color loss in the pipes. Let's fix that. To start off, I split the picture into two, like this: 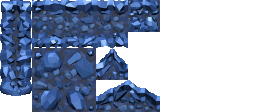  I insert the first picture (the underground tiles) using the first palette using the "Insert this bitmap and recreate palette" option. Export this picture. I repeat this for the second picture (the pipes) with the second palette. Now this is where the hackish part happens. I used MS Paint (don't close your browser yet) and GIMP for this. I click on the first palette. This is what I get:  You can kind of see the pipes, but otherwise it's just a huge mess. But that's what I want. I export this picture, then open it up in paint. I also open up the picture with just the underground tileset, then cut and paste the pipes from the first picture to the second. The result looks like this: 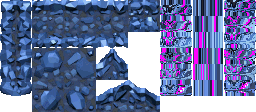 Now I go back to the editor, and select the first palette. I reinsert the first picture (the underground tileset) using the "Insert this bitmap with existing palette" option, then I select the second tileset and export that picture:  I open it up in paint, as well as the picture with just the pipes, then cut and paste the underground tileset to the other picture. The result is this:  Now I take the two pictures I made in paint, then stack them on top of each other... 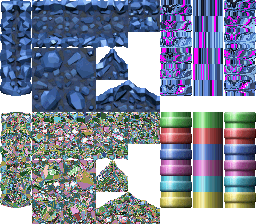 ...remove the white... 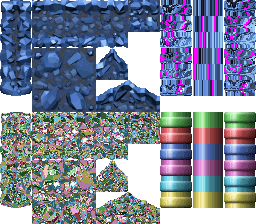 ...then insert it using the "Insert all bitmaps with all palettes [BROKEN]" option. Then it's done. The result is this: 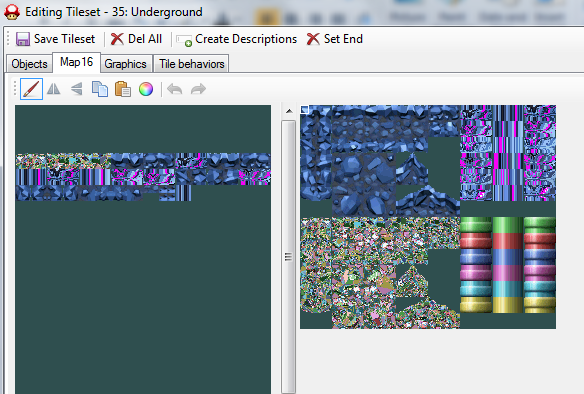 That is a much better result than if it only used one palette. ♪♫♩♬ |
|
|
Posted on 10-25-12, 01:52 am
|
Birdo Karma: 3336 Posts: 872/2026 Since: 06-28-11 |
Well, its ok to bump a thread to add something on topic, and you just did, so no problem. (and generally, bump is when you post on a thread that is 1 month old since a reply or more)
While the original tutorial in this thread is to add another palette to the same tileset, yours is to have maximum quality when importing one tileset using the 2 palettes. As for the tutorial, thanks for it! I never have imagined to do that way, so nice tutorial to keep the tileset good looking _________________________ |
|
|
Posted on 10-25-12, 01:55 am
|
|
Doesn't actually do anything.
Karma: 3052 Posts: 8/653 Since: 10-22-12 |
Yeah, I know it's not quite the same as the one in the first post, but I stuck it here since it still fits the definition of "multi-palette tileset". /shrug ♪♫♩♬ |
|
|
Posted on 10-25-12, 01:59 am
|
|
Birdo Karma: 3336 Posts: 873/2026 Since: 06-28-11 |
Also, your tutorial can be also used for the 4 palette tileset the beach one has. So if we take that tileset, we can have up to 1024 colors for a tileset, so we can make more detailed tilesets. Thanks for the tutorial again ^^
_________________________ |
|
|
Posted on 10-25-12, 09:25 am
|
|
Super Mario AAaAaaaaAAAaaaa Karma: 10223 Posts: 2756/4462 Since: 06-08-11 |
That's definitely not a bump,
(Bumps are shit when someone posts on a "dead thread", for example, a thread with a question that's been solved). In fact you made me think of something interesting. Right now, when you import multipalette tilesets, the forces pixels that are transparent on one palette and not transparent on the other to black. So there's not much benefit from doing that. But I could make the editor make these pixels be able to be *anything*, so you could import a multipalette tileset with the top image containing the underground tiles and the bottom half containing the pipes, and the editor would optimize so you'd get a result similar to what you have done, but it would be completely automatic I'll see if I can code it, though. Because it makes the algorithm far more complicated... |
|
|
Posted on 09-12-13, 03:50 pm, deleted by
|
|
|
Posted on 05-10-15, 01:39 pm, deleted by Thierry
|
| Thierry |
Posted on 05-10-15, 08:55 pm, deleted by Thierry
|
Pages: 1